File Management
The “File Management” module displays a summarized view of all operations processed by SPS regarding:
-
The acquisition of creditor files;
-
The delivery of files to the creditors’ banks;
-
The reception of files from the creditor’s banks.
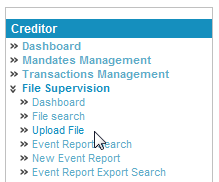
The module is available from the [File Supervision] link.

Three features are immediately available:
-
A dashboard to overview file activity across the system;
-
A search function;
-
A file upload module;
-
The event report module.
The Dashboard
The default page displayed while accessing the File management module is the Dashboard: Home > Creditor > File Supervision > Dashboard.
The page displays, for a selected creditor entity, the number of processed files, received from the creditor, issued to the bank or received from it.

A first block, named “Creditor filter”, allows the user to select a creditor entity (see Choosing a Creditor Entity).
The next three blocks display a synthetic view of all processed files.
The “Received from creditor” block show how many files were received and processed by SPS regarding the mandates, SDDs and R-Transactions, schedules and the third party database.
The table columns are:
-
The number of files received by SPS;
-
The number of files successfully processed;
-
The number of files that were only partially processed and that contain errors;
-
The number of erroneous files that could not be processed;
-
The number of file-processing reports created by SPS.

The “Issued to creditor bank” block display the information about following file formats:
-
SDD (Pain.008)
-
Reversals (Pain.007)
-
SCT (Pain.001)
The “Issued to creditor bank” block also display the number of files that were sent to the creditors’ bank regarding the SDDs, reversals and SCTs.
The table columns are:
-
Number of files sent by SPS;
-
The number of files received and processed by the banks;
-
The number of files received but only partially processed by the
banks; -
The number of rejected files that were not processed.

The last block, “Received from creditor bank”, summarizes the number of files returned by the banks after they were issued by SPS. The columns display a count of file received by SPS and a count of those sent by SPS to the creditors.
The “Received from creditor bank” block also displays information for following file formats:
-
Acknowledgments, rejects or returns (pain.002)
-
Bank to customer debit/credit notification (Camt.054)
-
Bank to customer statement (Camt.053)
-
Account management (Acmt.022)
-
CODA
-
CBISTIN003
-
CBISTIP002

Searching for a File
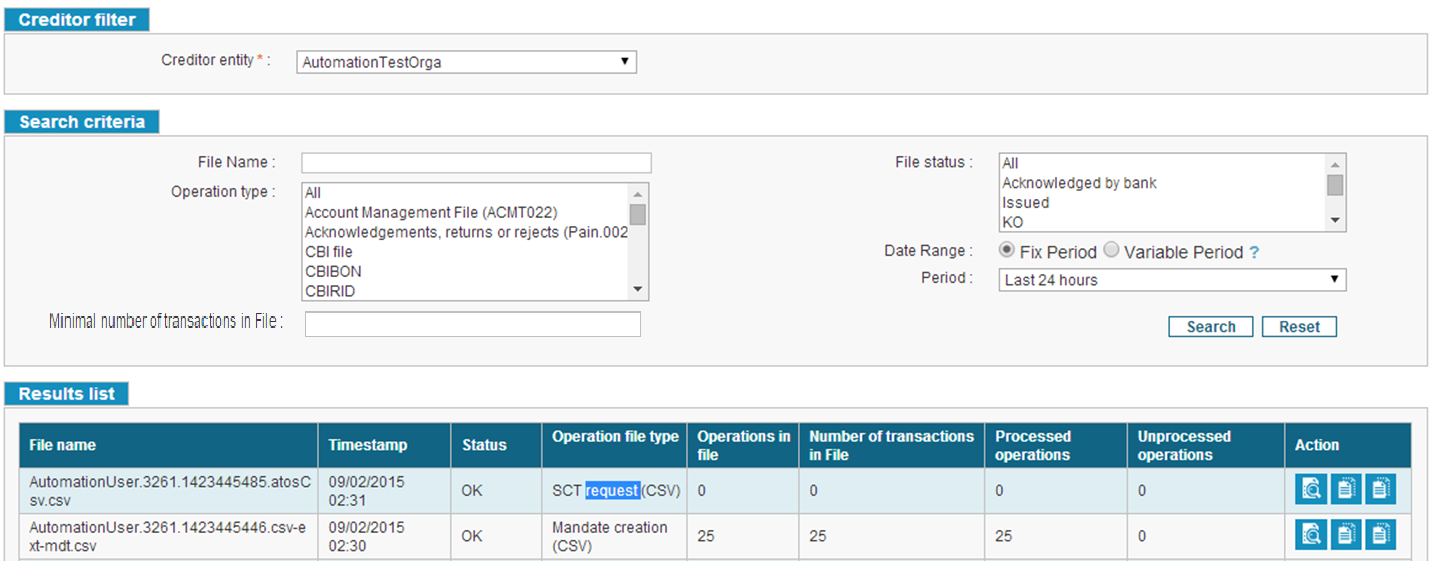
Searching for a file can be done from the “Search” page in**: Home > Creditor > File Supervision > File Search**.

A first block allows the user to select a creditor entity (see Choosing a Creditor Entity).
The “Search Criteria” block allows entering additional search filters. The user can specify a file name, select an operation type, a file status, set a time period and set minimal number of operations in file.
The user can search the files based on the minimal number of operations it contains in uploaded files. So when user enters the value for the field “Minimal number of operations in file”, then all files with number of operations greater than or equal to the entered value appears in search result.

The Operation Type filter provided in the File Search page displays all file formats present in the application. This list of File Formats is filtered to include only those formats for which the User has the appropriate Profiles.

The Creation date must be in format dd/mm/yyyy. If user provides the wrong input for the creation date then error “The date format is invalid (dd/mm/yyyy)” Is displayed.

The last block displays the search results. For each entry, a [File details] button allows to view the specifics of a given file.
For each result, the following data is displayed in the table:
-
The file name;
-
A time stamp;
-
The file’s status;
-
The operation file type;
-
The number of operations on file;
-
The number of transactions in file;
-
The number of processed operations;
-
The number of unprocessed operations.

If the organization have the selected option, the user can download the retained transactions of an imported files by clicking the [Download the retained transactions] button. If some transactions are rejected, the others are processed, and then the Generated File will contain only the Rejected transactions along with its Header and Footer, with the total amount recalculated. This action is available only for CFONB160 and DOM80 files format.

The name of the Generated CFONB file will be the same as the imported file, with an “_UNPROCESSED” suffix
Example:
Imported File Name: cfonb160.txt
Name Of Generated File: cfonb160.txt_UNPROCESSED
An Export to CSV button is provided on the top of the File Search screen. This button will export the search result into a .csv file
The exported file contains all the search results that were returned for the input criteria.
The header contains the following text: “Results for the following criteria:” followed by the search criteria provided by the user in the next line (if there was no search criteria provided, the text “No filter set” should be displayed). This should be followed by the text “Display X file(s) on dd/mm/yyyy”
The body of the csv contains file details in the form of 8 fields. These fields will form the first row after the header content. The fields are:
-
File Name
-
Timestamp
-
File status
-
Operation File Type
-
Operations in File
-
Number of transactions
-
Processed Operations
-
Unprocessed Operations
The naming rule of the search results report is Files_Results<Timestamp>.csv
The maximum number of files exported in the csv file is limited to 100001.
But if the number of files to export is more than 100001, then an error message is displayed.

If the user clicks on [Export to CSV] button again while previous export is still in process then error message is displayed.

Viewing File Details
This function is available from the “File Details” page: Home > Creditor > File Supervision > File Search after hitting the [File Details] action button on the results table.
The page allows the user to view the details of a file processed by SPS, as well as the operations that were completed.
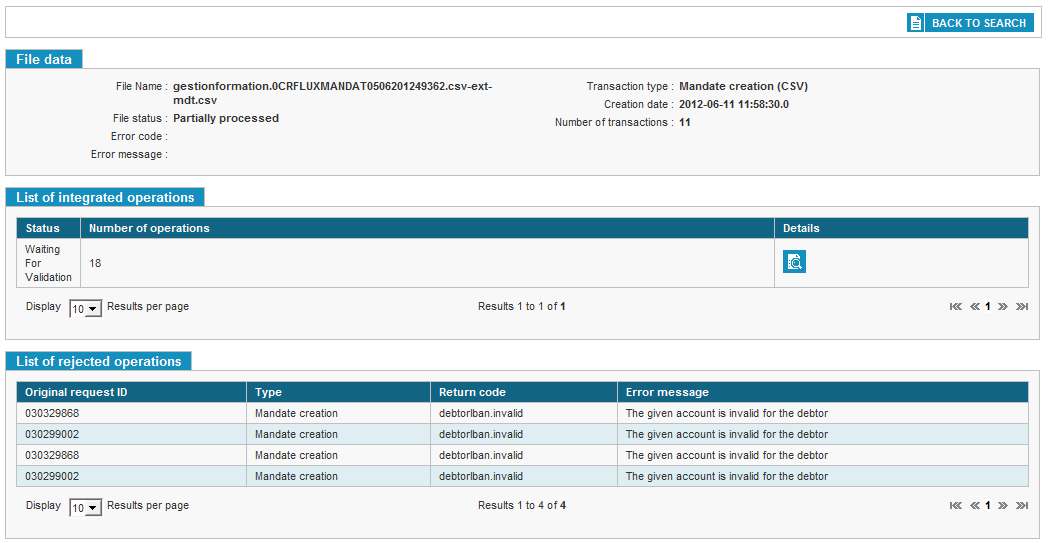
The [Back to Search] buttons ends the user back to the search page.

The first blockdisplays basic file information, its name, status, the transaction type, its creation date, the error code and error message, and the number of transactions on file.

The other blocks show the operations computed by SPS.


If the user clicks on the button of consultation a window pop-up is displayed with the IDs, type, creation and update dates, and status
For the files with a KO status, the user should be allowed to download the File integration report from the File Detail Screen by clicking the [DOWNLOAD THE FILE] button, and to download the integrated file by clicking on the [DOWNLOAD IMPORTED FILE] button. The [DOWNLOAD THE RETAINED TRANSACTIONS] button is available only for CFONB160 and DOM80 files (only if the organization has the selected option)

Note: The IBAN information present in File Integration Reports for Transactions, Mandates, Collections, Creditors and Third Parties is never masked whatever the user’s role.
Importing Files
All available features of the GUI support the upload and mass processing of files.
Importing mandates, SDDs or transactions is accessed through Home > Creditor > File Supervision > Upload file.

The above screen shot contains the drop down “Select Upload Type” that contains the default values that is shown in the table below.
| Upload Type |
|---|
| Transactions files upload |
| Debtor files upload |
| Mandate files upload |
| Return files upload |
| Schedule files upload |
Table 8.4.1 Default values in the Select Upload Type.
The user can select the appropriate Upload type before selecting the file format. Upon selecting the upload type, the next drop down appears and displays the list of file formats that are supported for the selected upload type. Below is the list of file format that comes under the Upload type.
| Upload Type (Mandatory) | File Format (Mandatory) | Additional Drop Down (Mandatory/Optional) |
|---|---|---|
| Transaction files upload | CBIRID CFONB - SDD CLIEOP CSV debits DTA NORMA19 OC240 PAIN008 XML debit DOM80 128/180 - SDD |
Created mandate type: Contains the Values “New SEPA Mandate”, “Pre-SEPA Migrated mandate”, “Existing SEPA Mandate” |
| Mandate Files Upload | CSV mandate management XML mandate management DOM80 - migration ZIP mandate management PAIN012 Mandate Response |
No additional drop down will appear |
| Return Files Upload | PAIN002 CAMT053 CAMT054 ACMT022 CODA CBISTIP002 CBISTIN003 |
No additional drop down will appear. |
| Debtor Files Upload | CSV debtors management XML debtors management | No additional drop down will appear |
| Schedule Files Upload | XML schedules management CSV schedules management | No additional drop down will appear. |
Table 8.4.2 Upload Types and the supported files
Note: File formats are visible in the list to the user, depending on the rights the user has.
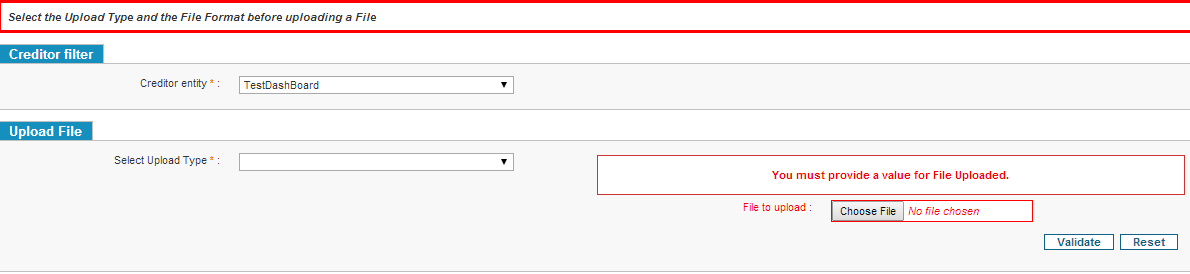
The block "creditor filter" allows selecting the node for the account from which the user wants to import the file. This takes into account the configuration of the sub-nodes during actions on business objects.
If the user chooses the wrong file, clicking the Reset Button will clear all the fields to avoid processing the wrong file and the user will be able to choose the correct file and process properly.
If user tries to upload a file without selecting any Upload Type then an error message will appear on the top of the page asking User to select the upload type. Below is the screen shot that displays the error message to the user.
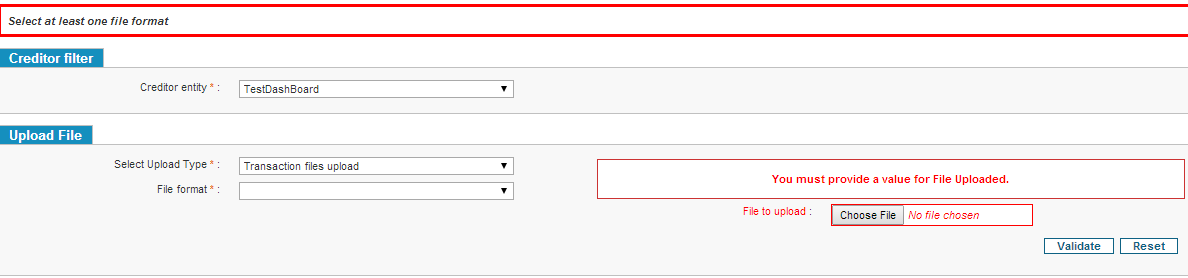
If the user selects the Upload Type and tries to submit the form without choosing a File Format in the respective select box, an error message appears on top of the page asking the user to select the file format. See the screen shot below.
Importing transactions files
The user can import transaction files through the web interface. He must first select the upload type “Transaction files upload”, in the File format drop down dynamically displayed he can select the format of the file to upload (CSV debits, XML debits, CFONB - SDD, DOM80128/180 SDD, DTA, NORMA19, CLIEOP, OC240, CBIRID, PAIN008), then the type of mandate (New SEPA Mandate, Pre-SEPA migrated Mandate, Existing SEPA Mandate) and finally he must browse to the relevant file. Hitting [Validate] will launch the upload, while [Reset] will return the field values to their default state.

If the type of the transaction file is SDD and the setting “Management mandates payments instruction” was previously selected by the creditor, the user must determine the nature of the mandate that will be created by this import.
The user can select:
-
New SEPA mandate: in this case, if the referenced mandate does not exist in the system, the application extracts the information and established the mandate. In the case of importing a domestic transactions file, the status of the mandate will be "Incomplete" because all the required data will be missing.
-
Pre-SEPA migrated mandate: in this case if the referenced mandate does not exist in the system, the application extracts the information and established the mandate. Specific migration rules of country (determined from the imported file) will be applied. In the case of CFONB: the signature date is equal to the current date and will be replaced by the date of the first SDD issued on this mandate. The mandate will be in Active status. Then click the [BROWSE] button, and select the ".csv" file to import. Click the [ENTER] button to import the file. If the user does not want to import the file, it can choose another or click on the [RESET] button to delete the selected file.
A third mandate nature is available for the files format CFONB SDD, DTA Clieop and Norma19:
- Existing mandate: when integrating the file, the valid mandates will be created, if the optional field for the due date of the last SDD issued is not filled, the current date is use by default. Thereby the first SDD issued by SPS will be set as a recurrent and not as a first.
Importing mandate files
The user can import mandate management files. He must first select the upload type “Mandates files upload”; in the File format drop down dynamically displayed he can select the file format between CSV mandate management, XML mandate management, ZIP mandate management (containing a CSV file or a XML file plus an attachment), PAIN012 Mandate Response or DOM80 migration. He then clicks on [Browse] and chooses the file from his computer. Hitting [Validate] will complete the process. If he does not want to import the file and go back, the user can select another document or click the [RESET] button to delete the selected file.

Importing R-Transaction files
The user can import R-Transaction files. He must first select the upload type “Return files upload”; in the File format drop down dynamically displayed he can select the file format (PAIN002, CAMT.053, CAMT.054, CODA, ACMT.022). He then clicks on [Browse] and chooses the “.csv” file from his computer. Hitting [Validate] will complete the process. If he does not want to import the file and go back, the user can select another document or click the [RESET] button to delete the selected file.

Importing Debtor Files
The user can import debtor management files. He must first select the upload type “Debtor files upload”; in the File format drop down dynamically displayed he can select the file format between CSV and XML. He then clicks on [Browse] and chooses the file from his computer. Hitting [Validate] will complete the process. If he does not want to import the file and go back, the user can select another document or click the [RESET] button to delete the selected file.

Importing Schedule Files
The user can import schedule management files. He must first select the upload type “Schedules files upload”; in the File format drop down dynamically displayed he can select the file format between CSV and XML. He then clicks on [Browse] and chooses the file from his computer. Hitting [Validate] will complete the process. If he does not want to import the file and go back, the user can select another document or click the [RESET] button to delete the selected file.

Uniqueness of the files
Once the user has clicked on the [VALIDATE] button, the software generates an unique file name based on the current user, the selected node, the original name of the imported file and a single number, for ensuring that each file will have a unique reference before being processed by the system.
Empty File Integration
If the user uploads valid file which does not contain any transaction, then the status of the file must be set to “OK”. This is applicable for all file formats.
Searching for Event Reports
The function is available from Home > Creditor > File Supervision > Event Report Search.

Any user with sufficient rights can search for event reports using the following criteria:
-
The event report’s name;
-
The relevant business object;
-
A time table for the generation of the event report.
The following screenshot shows the search module and the results table.
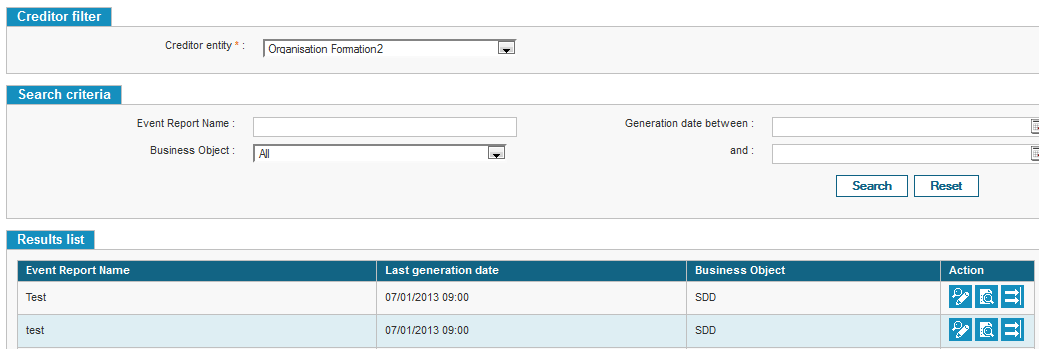
To initiate the search, the user should hit [Search] and to reset the search criteria, hit [Reset].
For each result, the following actions can be taken:
-
Edit the event report (this page is the same as the creation page, the user can confirm the modification by clicking on [update] or go back by clicking [back to search], he can also resets his modification with the button [reset]);
-
View the event report exports;
-
Manually initiate an event report export.
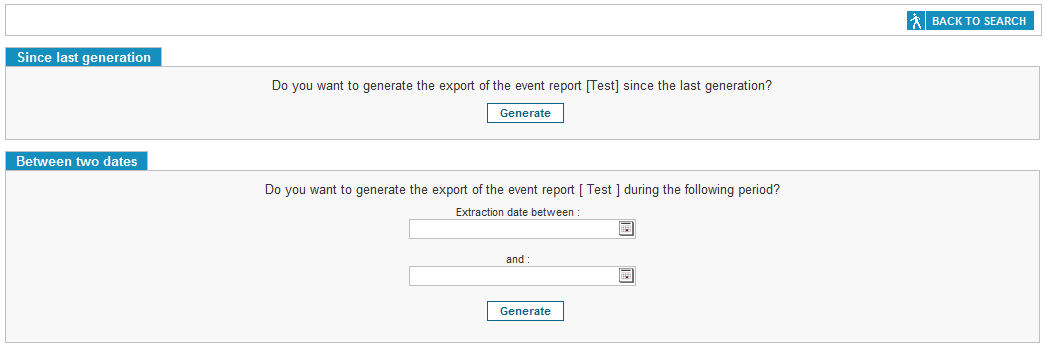
On the image above, two choices are available to manually generate an event report export:
-
On the “Since last generation” block, the user can generate a report of the events that occurred since the last export:
-
If at least one event report exists, an event report will be generated for events that occurred after the date of the last generated export;
-
If no event report was ever created, a new export will be generated using the event report frequency setting (which can be set to weekly or daily).
-
-
On the “Between two dates” block, the user chooses two dates, separated by at most 31 days, and clicks on [Generate].
New Event Report
This feature is available on Home > Creditor > File Supervision > New Event Report.
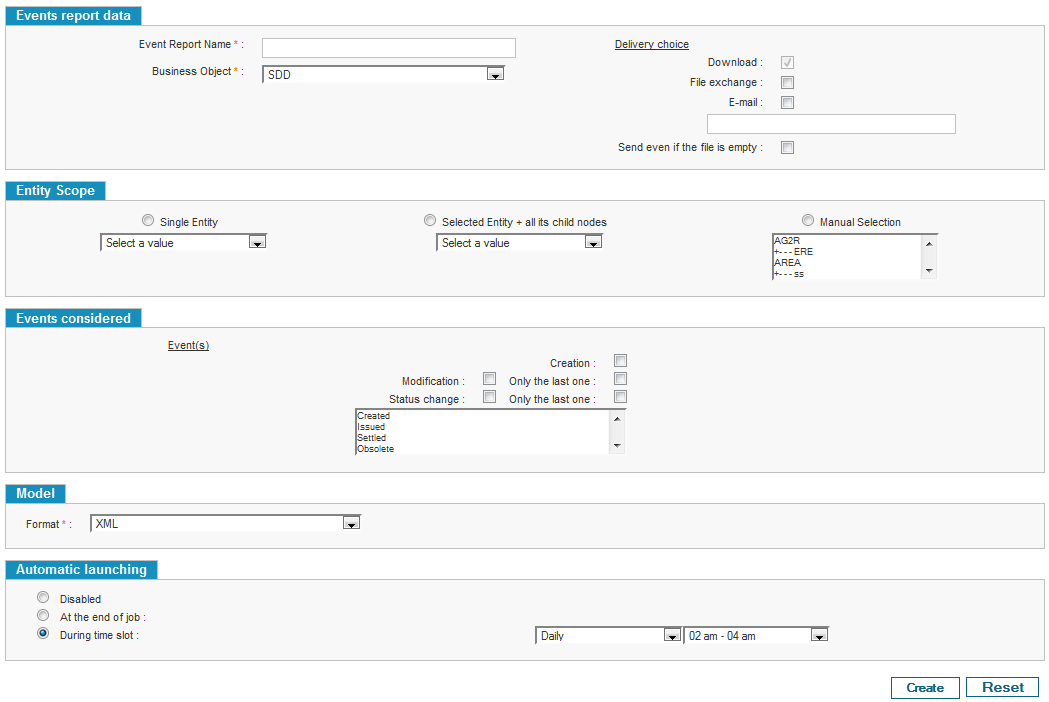
A user with sufficient rights can create a new event report by using the following criteria:
-
The “Events report data” block:
-
Name of the event report
-
Business object
-
Send even if the file is empty: the user can choose to receive the file if there is no event to report.
-
Delivery mode:
-
Download: the choice is always ticked by default, because a created event report can always be downloaded;
-
File exchange: if the option is selected, an export of the event report can be transferred to an external information system;
-
Email: if the option is selected and a valid email address is entered in the text field, the event report will be delivered by email (ZIP archive, 10Mb at most). Only one email can be set.
-
-
-
The “Entity scope” block:
-
Single entity: only the business objects linked to the chosen entity will be exported in the event report;
-
Selected Entity | all its child nodes: only the business objects linked to the chosen entity and its child nodes will be exported in the event report;
-
Manual Selection: only the business objects linked to the chosen entities will be exported in the event report.
-
-
The “Events considered” block: According the selected business object, the content of the block is:
| Business Object | Events considered |
|---|---|
| SDD | Creation: all created SDDs will be included in the event report; Modification: the event report export will contain all the SDDs that were modified (a status change is not considered as a modification). All revisions are exported by default, unless the user ticks the “Only last” option, in which case only the last change will be included in the event report. Status change: At least one status in the listmust be selected. The event report will collect all SDDs that have or had the selected status(es). By default, for every SDD, all revisions in the selected statuses will be included in the event report. However, the user can tick “Only last” to include in the event report only the last revision in the selected statuses. |
| SCT | Creation: all created SCTs will be included in the event report; Modification: the event report export will contain all the SCTs that were modified (a status change is not considered as a modification). All revisions are exported by default, unless the user ticks the “Only last” option, in which case only the last change will be included in the event report. Status change: At least one status in the list must be selected. The event report will collect all SCTs that have or had the selected status(es). By default, for every SCT, all revisions in the selected statuses will be included in the event report. However, the user can tick “Only last” to include in the event report only the last revision in the selected statuses. |
| Mandate | Creation: all created mandates will be included in the event report; this encompasses migration too Move to a new organization Modification: At least one modification data type in the list must be selected. The event report export will contain all the mandates that were modified (a status change is not considered as a modification) with the ability to distinguish modification on creditor data, on debtor data, on mandate related data. All revisions are exported by default, unless the user ticks the “Only last” option, in which case only the last change will be included in the event report. Status change: At least one status in the list must be selected. The event report will collect all SDDs that have or had the selected status(es). By default, for every SDD, all revisions in the selected statuses will be included in the event report. However, the user can tick “Only last” to include in the event report only the last revision in the selected statuses. Transaction: At least one transaction criteria in the list must be selected. The list contains: - The issue of an SDD related to this mandate (by issue we mean the actual inclusion of an SDD into a PAIN.008 file, not just the creation in SPS). - The reception of an R-transaction related to this mandate All revisions are exported by default, unless the user ticks the “Only last” option, in which case only the last change will be included in the event report. |


-
The “Model” block:
-
Format: the user can choose the format of the event report between csv and xml.
-
Grouping options: this field is dynamically displayed by selecting “Mandate” in the list of business objects. This option allow the user to choose whether each batch will generate a single file or several ones, by grouping events based on:
-
Organization level
-
ICS (without BC)
-
Business code
-
-
Within each group, event reports should be ordered by RUM and timestamp of the modification. The naming rules of mandate event reports are detailed in Appendix 3 - Filenames Conventions


-
The “Automatic launching” block:
- At the Event report creation, the user can activate the automatic launching of the report generation. The user can choose between “At the end of job: Mandate file integration (CSV/XML)” or “During time slot” with the choice of the frequency, the day of the week if weekly and the hour. The default value is “Daily” at “10pm” (10pm-12am). The user can also choose the “monthly” frequency (the report is generated the first day of each month, containing the events that happens in the last calendar month (between the first day and the last day of the previous month, both inclusive). The user can choose the hour of the generation (minimum of 28 days records and a maximum of 31 days records)).If the user chooses the option “Deactivated”, the Event report will ne be generated automatically, but can still be launched manually.
To create the event report, hit [Create]. Hitting [Reset] will reset all choices.
Searching for the Export of an Event Report
This feature is available from Home > Creditor > File supervision > Event Report Export Search.
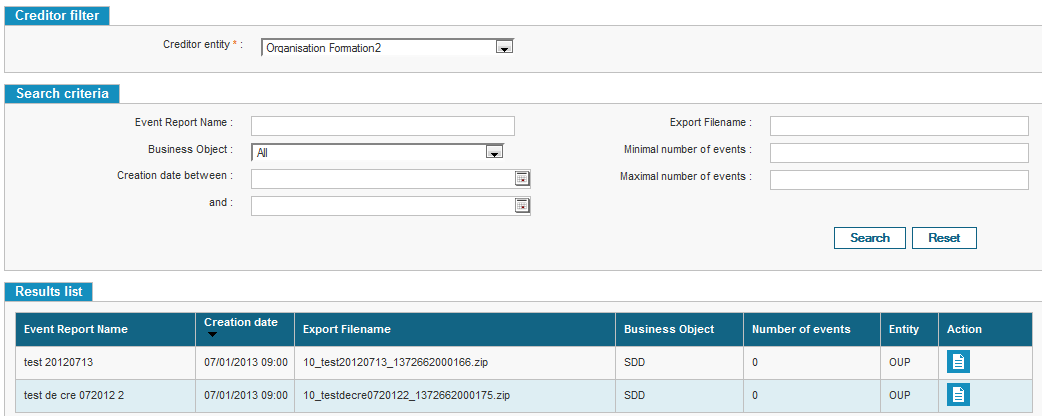
A user with sufficient rights can use the feature and search for exports of event reports using the following criteria:
-
Name of the event report;
-
Name of the exported file;
-
Creation date (between two dates);
-
Minimum number of events;
-
Maximum number of events.
-
The relevant business object;
To initiate the search, the user must click on [Search]. Hitting [Reset] will clear all fields on the page. For every report found by a search, clicking on  will initiate the download.
The IBAN information present in event reports for Transactions and Mandates is never masked whatever the user’s role.