The following features are available in this module:
-
Viewing an SDD;
-
Creating an SDD;
-
Editing an SDD;
-
Cancelling an SDD;
-
Refunding an SDD through an SCT;
-
Viewing SDD statistics;
-
Viewing the cash flow;
-
Viewing an R-Transaction.
These features will be explained in the following subsections.
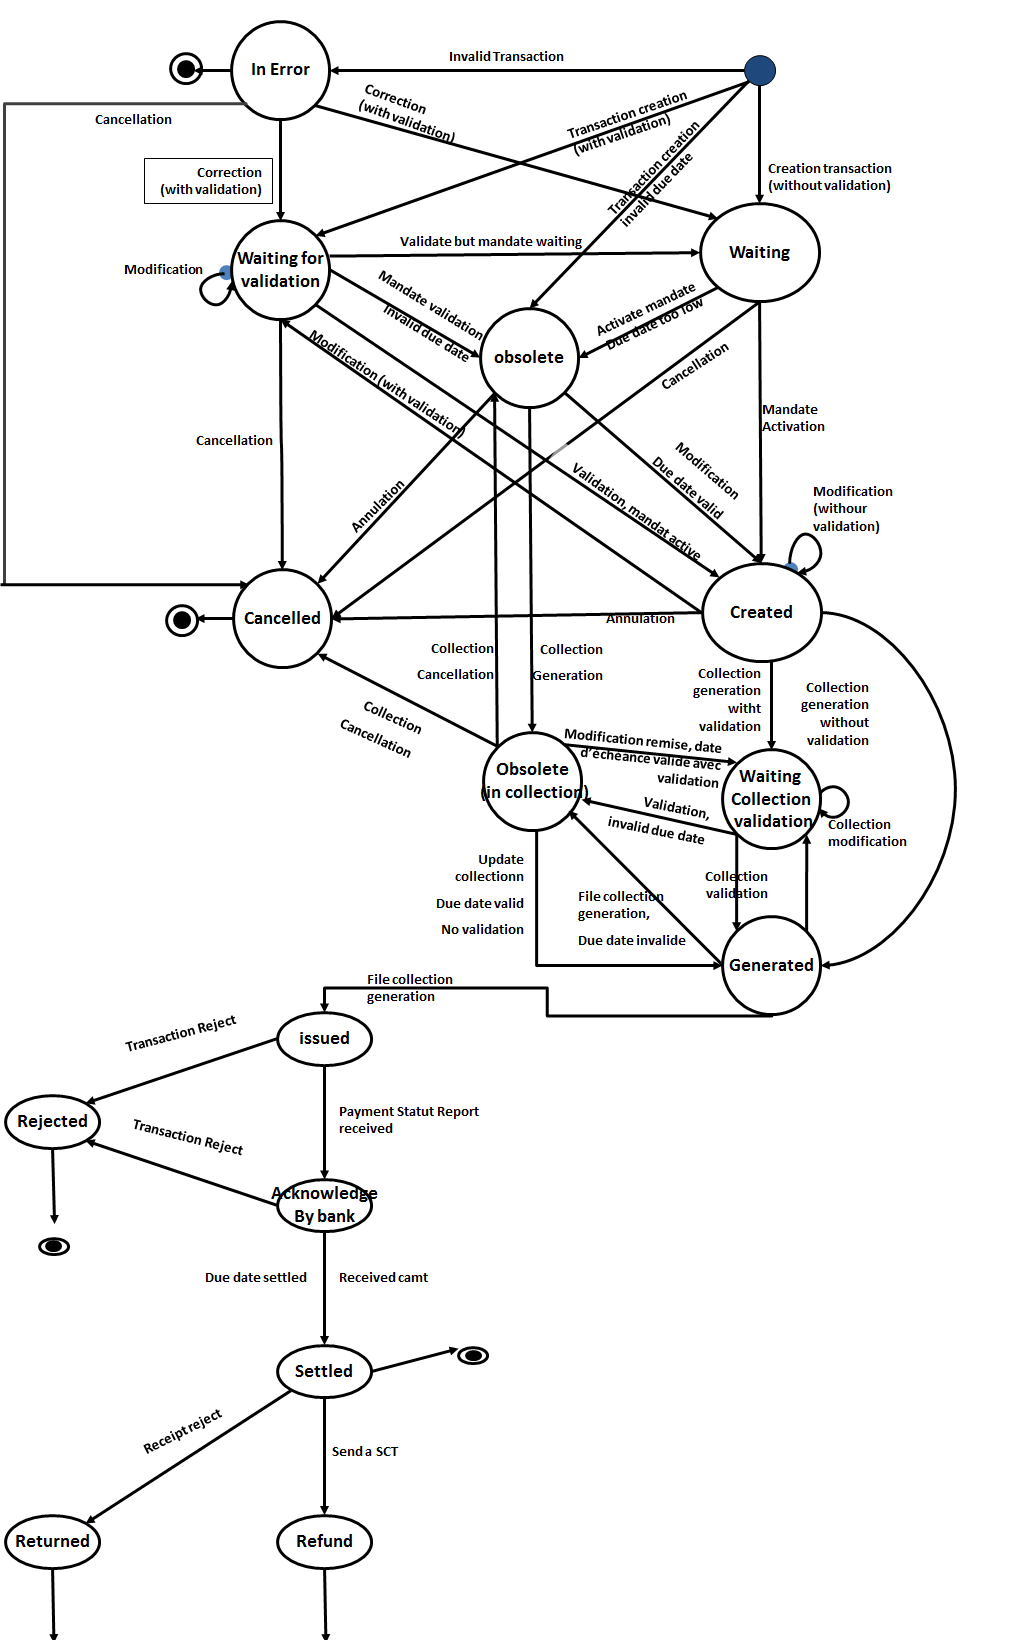
Reminder: The SDD Life Cycle
SDDs created in SPS exhibit the following life cycle:
Viewing a Transaction
When the user clicks on the [SDD details] button, the “Display” page appears and the user can see a summary of the transaction: Home > Creditor > Transaction Management:Display.
The page displays the information related to the SDD/SCT, its modification history, the associated mandates and several actions (Cancel/Update Status/Validate the SDD) are available.
Viewing a Transaction through the “Transaction Search” Page
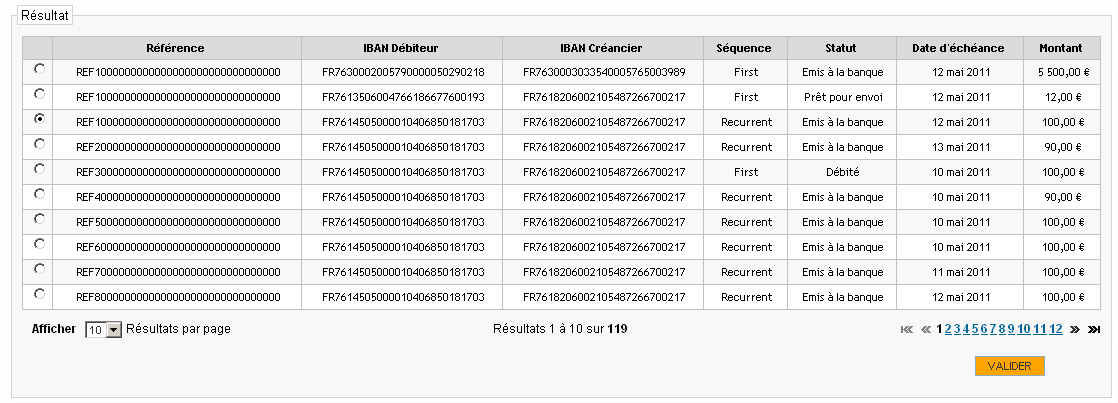
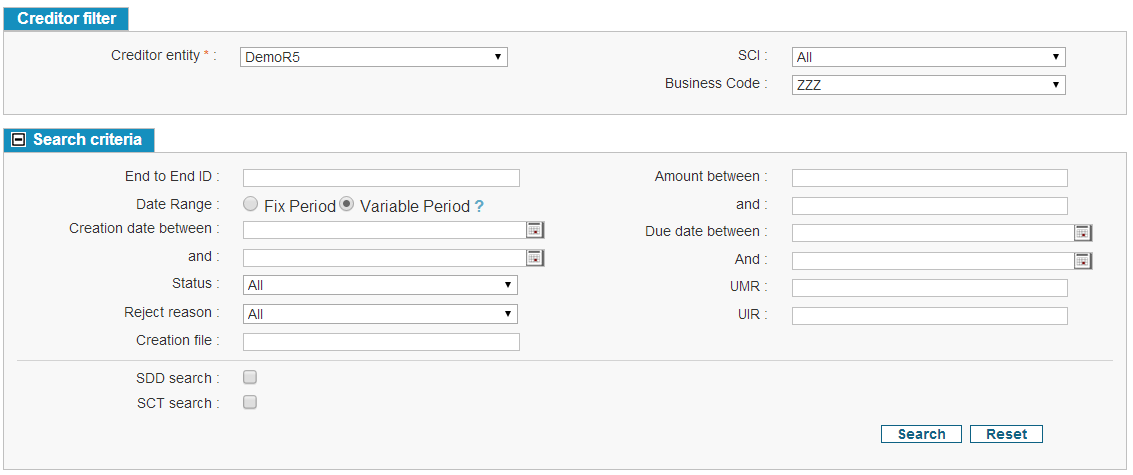
Searching an SDD or an SCT is done on the “Search” page: Home > Creditor > Transactions Management: SDD Search.
The search page displays the search criteria and results and allows viewing and editing if the user has the sufficient rights.
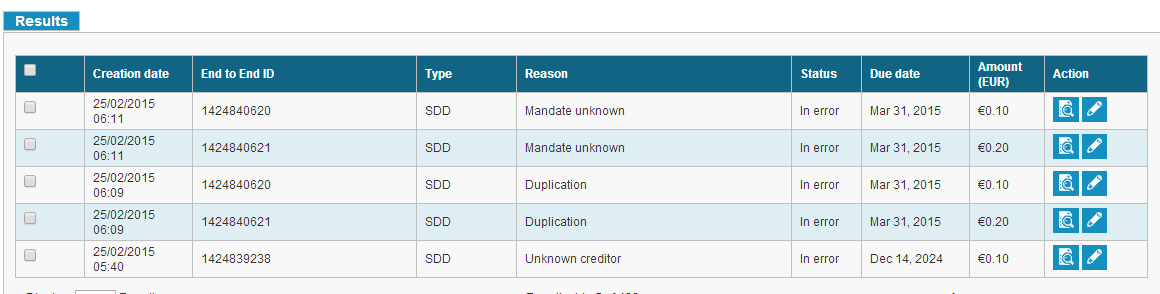
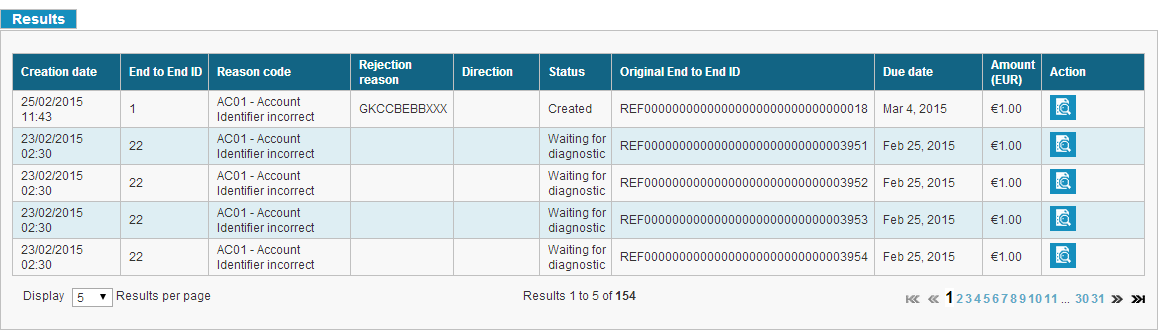
When the user clicks on [Search] button, the transactions satisfying search criteria are displayed in result block.
The maximum number of transactions displayed in search result block is limited to 1001. If the number of records satisfying search criteria is greater than 1001 , then only first 1001 records will be displayed to the user and the remaining records will not be displayed to the user.
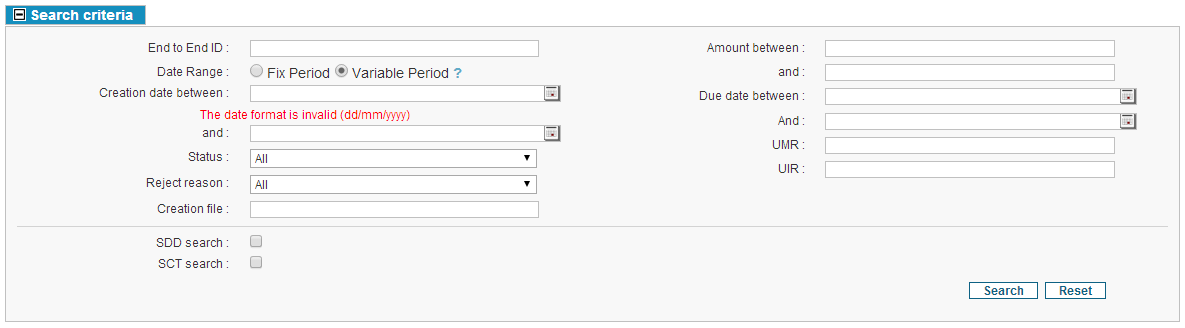
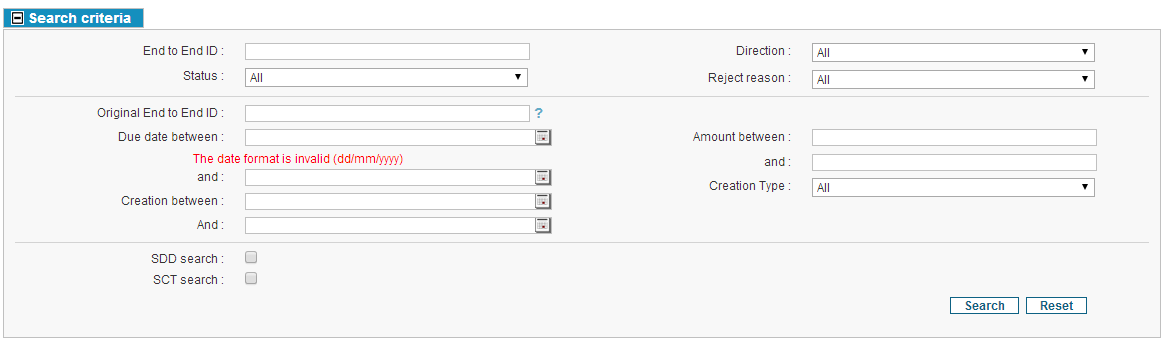
The Creation date must be in format dd/mm/yyyy. If user provides the wrong input for the creation date then error “The date format is invalid (dd/mm/yyyy)” Is displayed.
This is also applicable for due date and value date.

The user can see the amount only if user is associated with “View Transaction Amount” profile
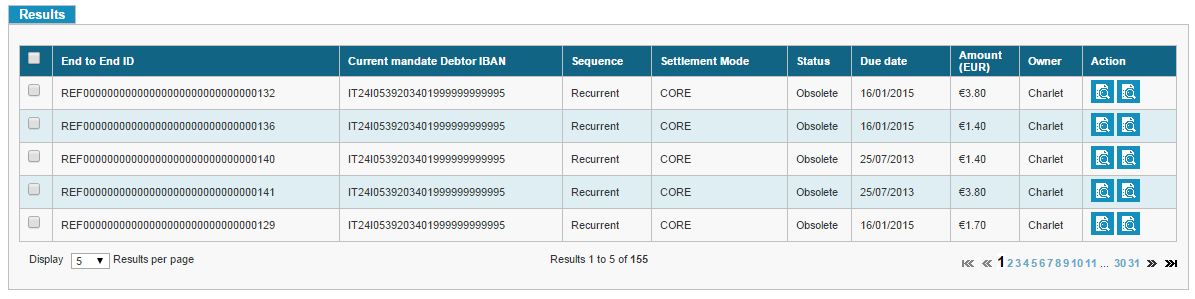
If the user is not associated with “View Transaction Amount” profile, then the amount is shown in masked format.

The creditor can extract the results by clicking the [EXPORT TO CSV] button, the IBAN information present in the file is masked according to the user’s role.
The maximum number of transactions exported in the file is limited to 100001.
But if the number of transactions to export is more than 100001, then an error message is displayed.

If the user clicks on [EXPORT TO CSV] button again while previous export is still in process then error message is displayed.

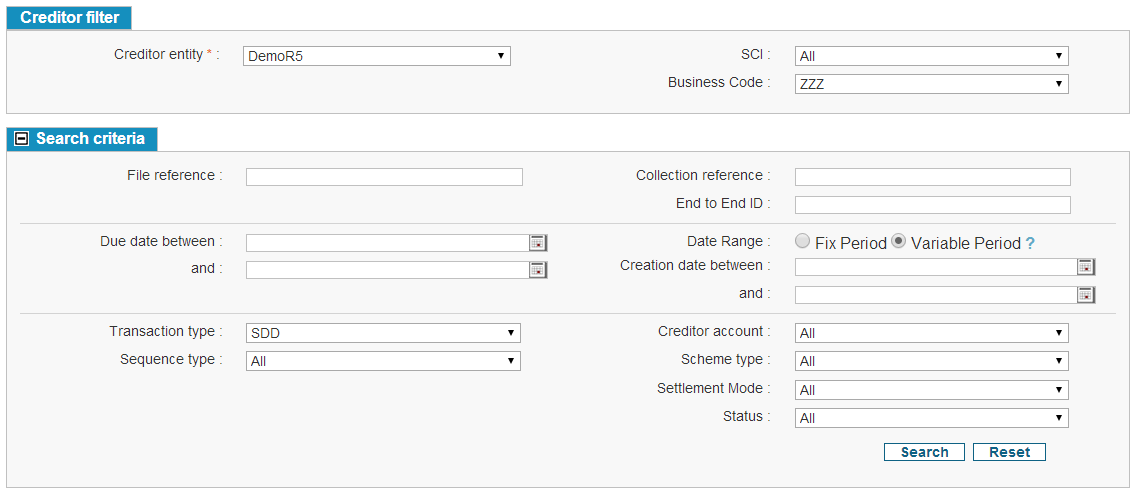
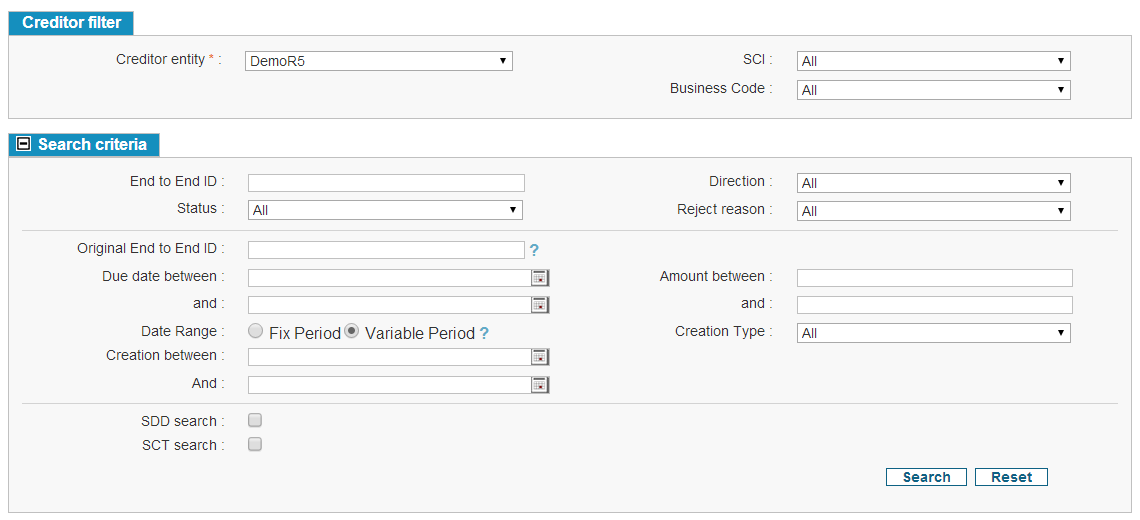
Selecting the Search Criteria
-
The “Creditor filter” blocks allows the user to select a creditor entity, an SCI and a Business Code (see Choosing a Creditor Entity, an SCI and a Business Code).
-
The “Search criteria” block offers additional filters.
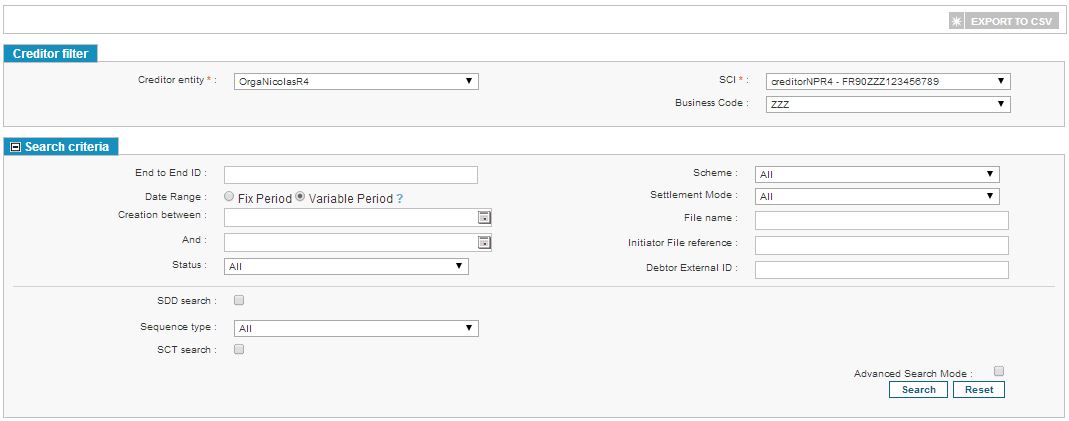
“Initiator File Reference” give the client the possibility to use the IFR to find transactions.
Please note that the user must select either “SDD search” or “SCT search” in order to be able to launch a search.
If the user hits [Search] without changing the default criteria, then all available SDDs or SCTs will be displayed in the results table at the bottom of the page.
As described in Search Criteria, if the user inputs additional search criteria and launches a new search, the results table will be updated.
The user can also hide the “Search criteria” block (see Hiding the Search Criteria).
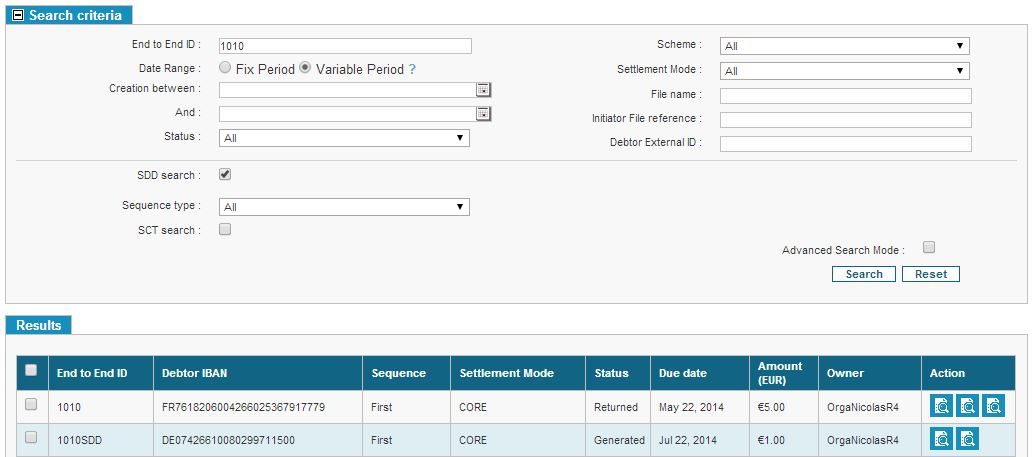
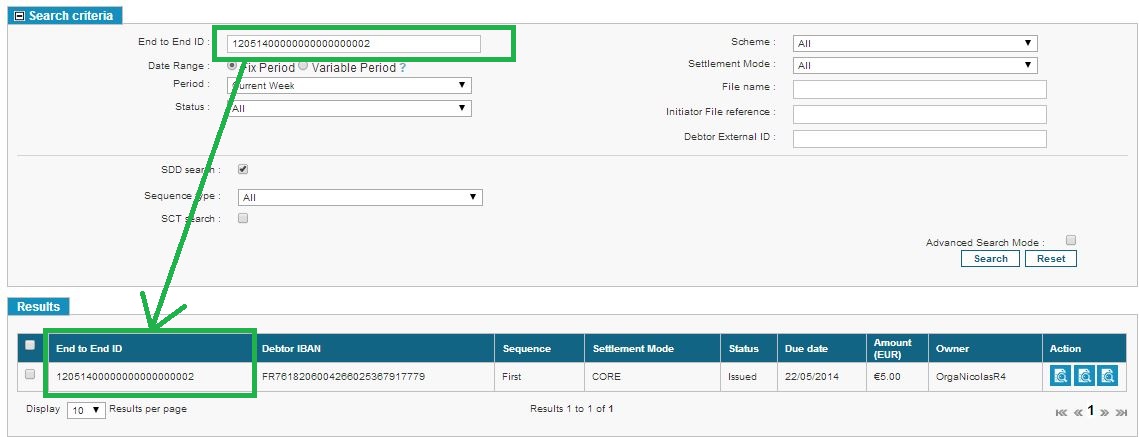
“LIKE” search for transactions using End to End ID
The Transaction search page allows the user to search for SDDs using the End to End ID of the transaction. The result list contains all transactions with an End to End ID that partly or completely contains the text entered in the search criteria.
The search works for any number of given characters, but the “like” search works only for an E2EID provided with a minimum length of 3 characters.
The E2EID provided in the search filter returns all the transactions with an E2EID containing the search characters. The limit of results is 1001.
The “like” search returns only the E2EID “starting” with the value set for the search. It is not possible to return results not starting with the value. This is because performance would be impacted (the request would not use the index of the field used for the search request).
For Example: An SDD with the End to End ID 1010SDD will be returned for a search using "1010", but an SDD with an End to End ID equal to SDD1010 will not be returned.
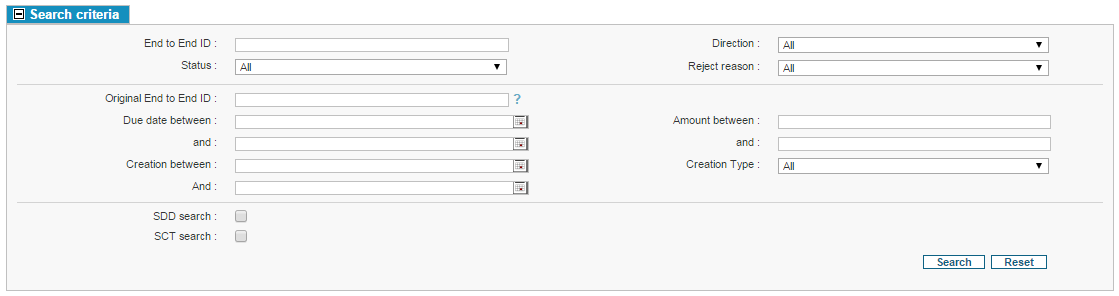
Advanced Search Option
By clicking the advanced search option check box, several new options are dynamically displayed:
The “Due date” field defines the date at which the transaction is expected to happen.
The “Value date” field defines the date at which the transaction has actually happened.
“Initiator Transaction Reference” give the client the possibility to find the transactions in SPS using the old references he had in his system.
“Initiator Collection Reference” give the client the possibility to find multiple transactions which belonged to the same collection in the clients’ system
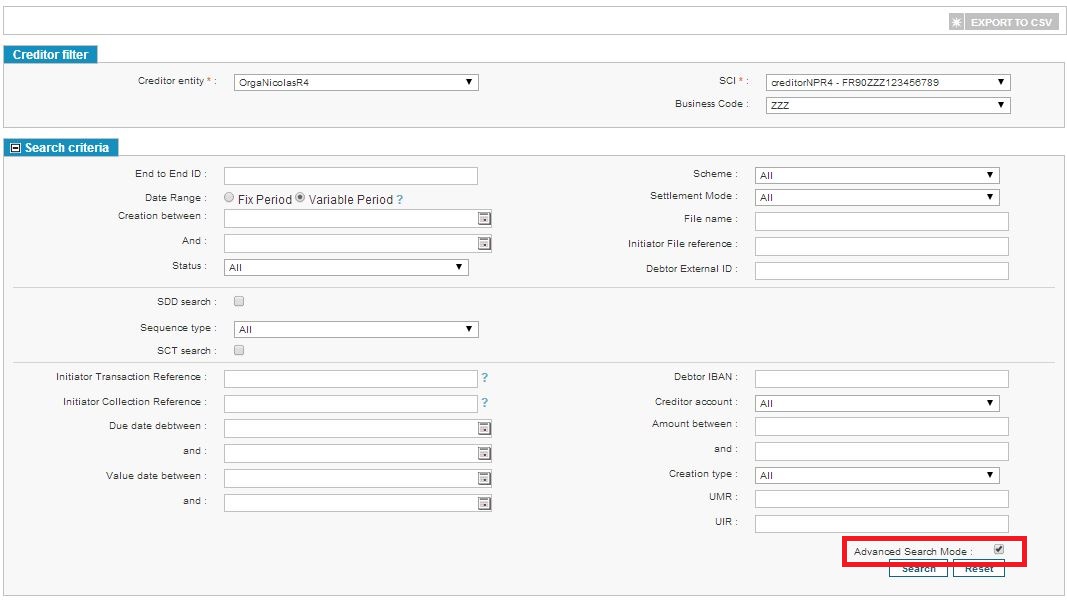
As for the mandate advanced search option, if the user filled an advanced search field and unchecked the advanced search option, when he clicks on [submit], the search do not take account of the advanced search field.
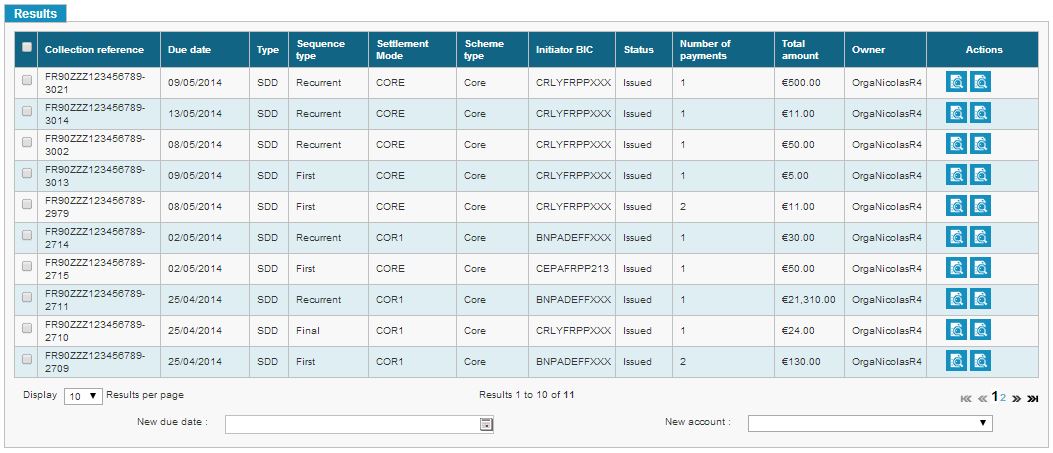
Subtotals
After the user launches a search and if this search returns results (results can be paged if their number exceeds the number that can be displayed on a single page), he will be able to tick transactions from the results table. The number of selected transactions and the total amount will be displayed at the bottom of the table and updated in real time.
The Total amount present in the search result is masked according to the user’s role.
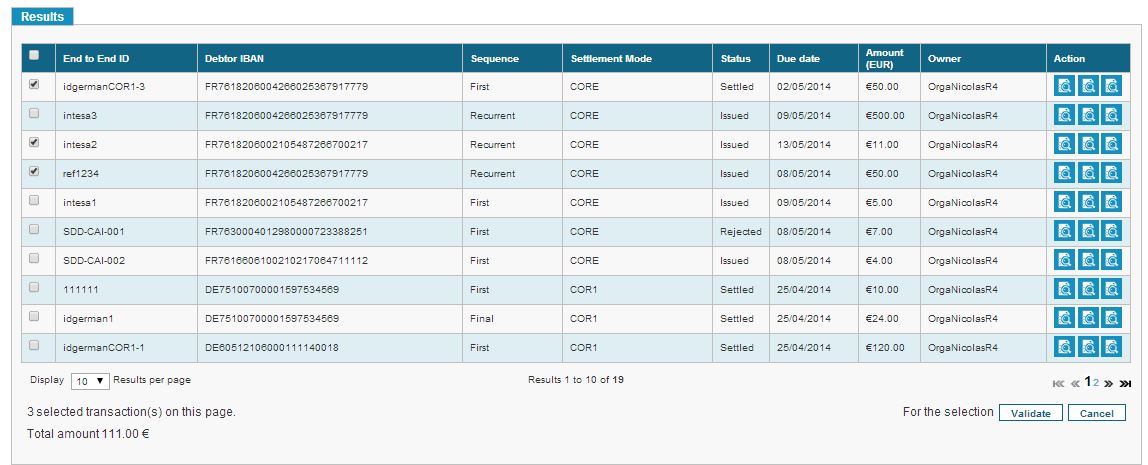
If the user ticks the main box at the top of the results table, all transactions on the current page will be selected and a message will be displayed to remind the user that those transactions are ticked.
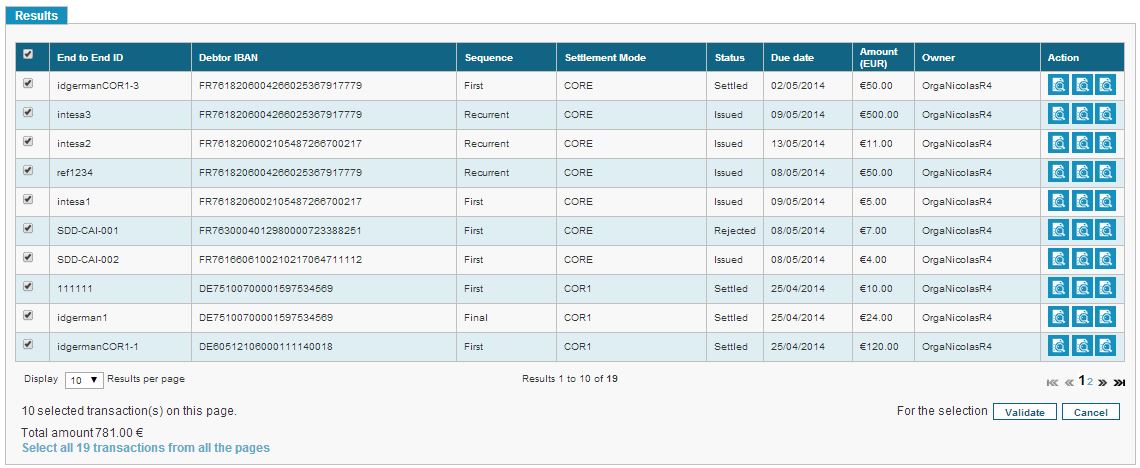
A message will appear at the bottom of the page to allow the user to select all found transactions on all pages, even if they are not currently visible.
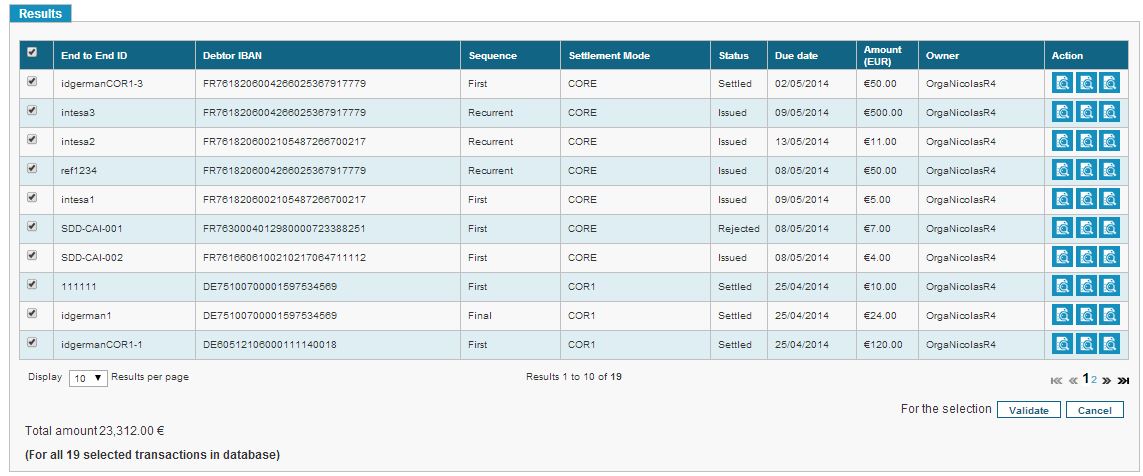
The message now indicates that all transactions are selected. Should the user untick one transaction on the current page, all transactions on non-visible pages will be unselected as well.
It is also possible to cancel and validate transactions: these actions will be applied to all currently selected transactions.
Launching a Search on a Specific Criterion
Example: the user launches a search on a specific UMR and hits [Search].
Results appear on the “Results” table at the bottom of the page.
Available search criteria are:
-
The transaction’s unique ID: the End to End ID;
-
The mandate’s sequence type (available choices are: First, Final, Recurrent, One-Off);
-
A time period for the due date (allowing the user to search transactions which have a due date set between two dates);
-
A time period for the transaction creation date (allowing the user to search SDDs/SCTs which were created between two dates);
-
The net worth of the mandate, in Euros, with a configurable upper and lower amount;
-
The debtor’s IBAN;
-
The creditor’s bank account;
-
The transaction’s status;
-
The creation type (GUI, file transfer, file upload, and web service).
-
The initiator transaction reference
-
The initiator collection reference
-
The Scheme
-
The settlement mode
-
The file name
-
The initiator file reference
Hitting [Reset] sets all search criteria to their default values (see The [Reset] Button). The number of the displayed results is limited to 1000.
To view the details of an SDD, the user must click on the [SDD details] button.
If the transaction is part of a collection, it is possible to view it by clicking the “See collection details” button.
If the transaction is part of a collection file, it is possible to view it by clicking the “See collection file details” button.
Viewing SDDs and R-Transactions from the “Mandate Search” Page
Alternatively, viewing an SDD from a mandate is achieved by clicking on [Mandate details] from the results table then on [Associated SDD] from the mandate details page (see Viewing a Mandate, Associated Actions).


The user is redirected to the Display page that shows SDDs and R-Transactions associated to a mandate. Its path is Home > Creditor > Transactions Management: Display.
The first block is a reminder of the mandate data:

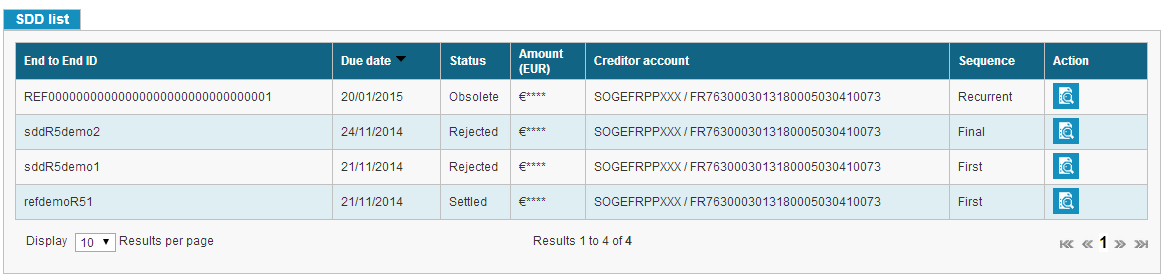
The next blocks display as tables the SDDs and R-Transactions associated to the mandate, in a way similar to what has been described in Viewing a Transaction through the “Transaction Search” Page and Searching for a Collection.
The Total amount present is masked according to the user’s role. If the user is associated with “View Transaction Amount” profile, then amount is shown in unmasked format else it is shown in masked format.


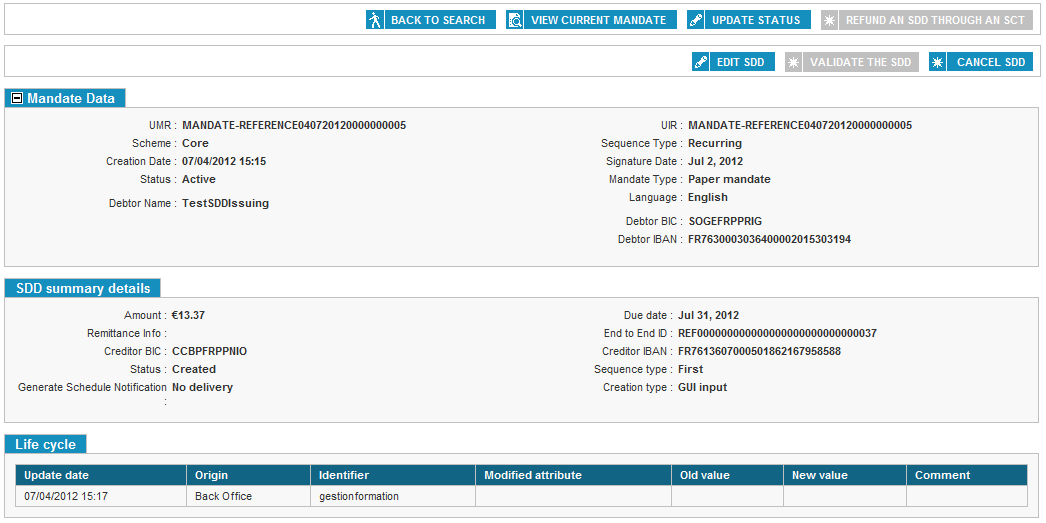
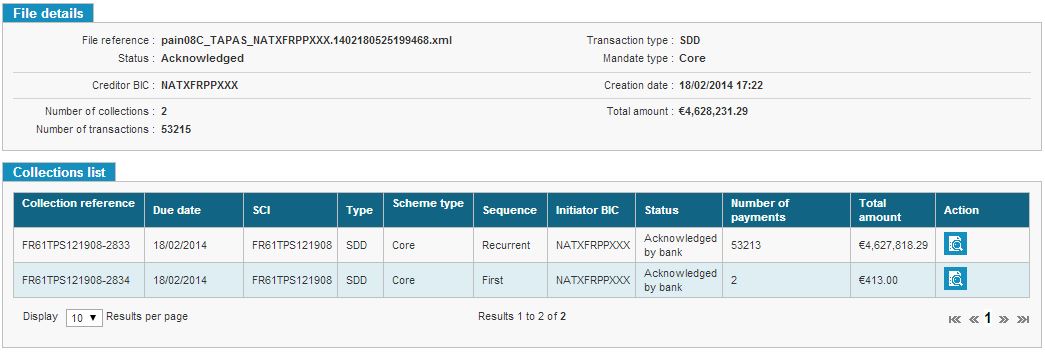
Viewing the Details of an SDD
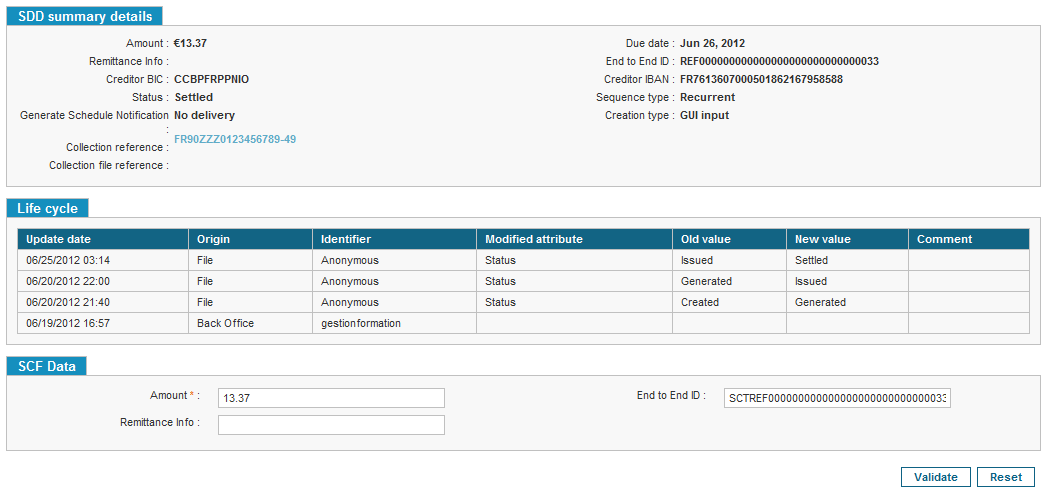
The SDD details appear when the user hits the [SDD details] button. The user has now access to all available details on the selected SDD: Home > Creditor > Transactions Management: Display.
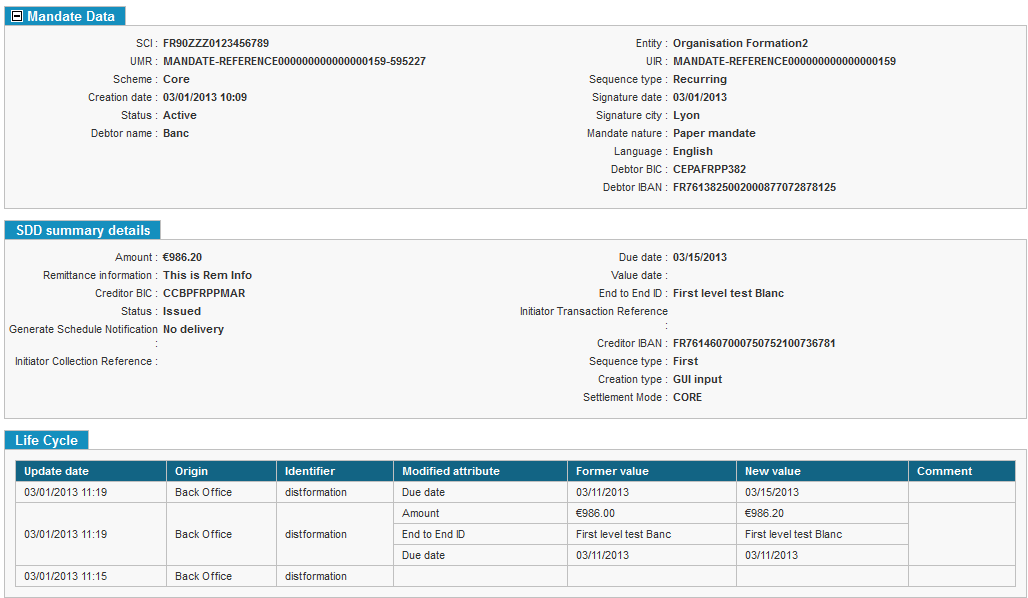
The SDD details are displayed in four blocks:
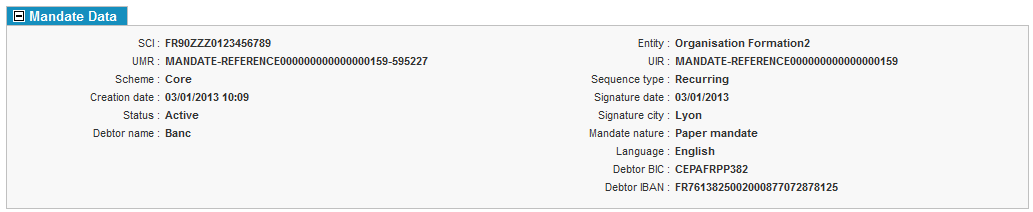
- The “Mandate Data” block:
-
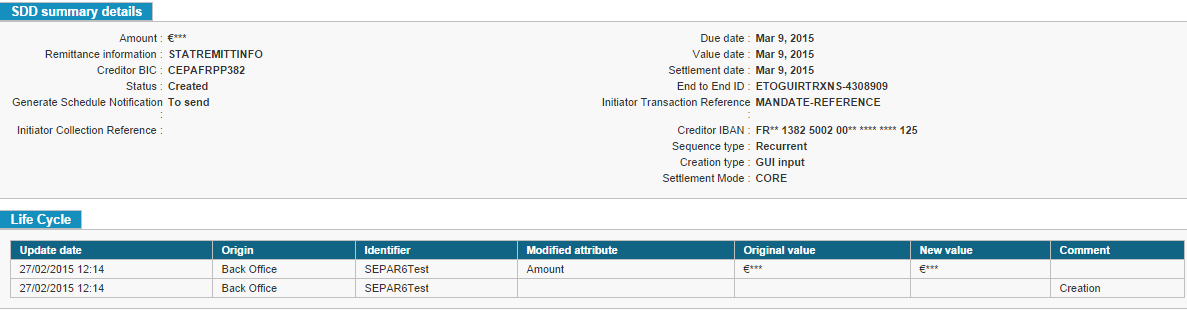
The “SDD summary details” block:
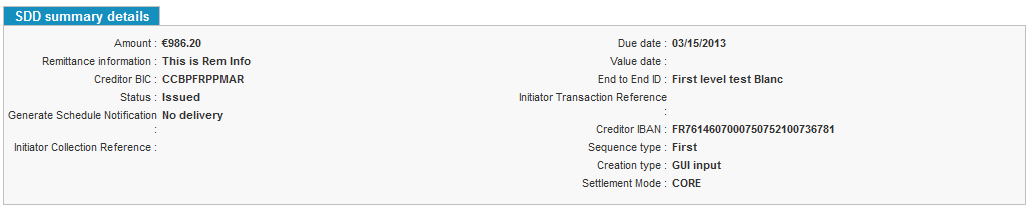
The amount field in this block is displayed in unmasked form only if user is associated with the “View Transaction Amount” profile else it is shown in masked format.

-
The “Associated R-Transaction” block (see Viewing the Details of an R-Transaction):
The amount field in this block is displayed in unmasked form only if user is associated with the “View Transaction Amount” profile else it is shown in masked format.

-
The “List of refund” block:
The amount field in this block is displayed in unmasked form only if user is associated with the “View Transaction Amount” profile else it is shown in masked format.

- The “Life Cycle” block (see Life Cycle for more information):

Viewing the Former and Previous Mandates from the SDD
If an SDD was sent to the bank, SPS will save the mandate that had been delivered. When a user is viewing such an SDD, two additional actions are available:
-
The [View original mandate] button displays the mandate information that was sent to the debtor’s bank when the SDD was issued;
-
The [View current mandate] button displays the mandate as it stands today.

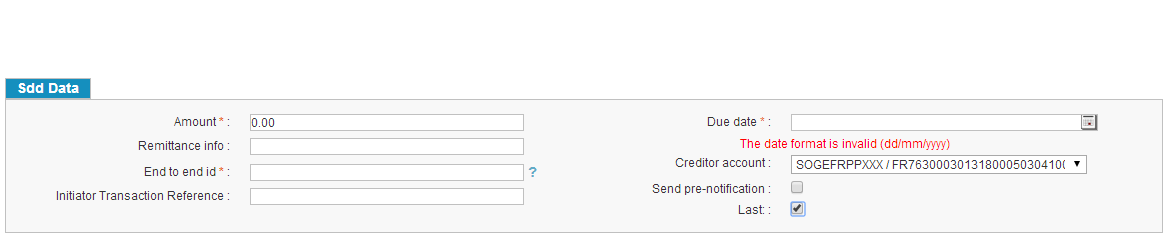
NEW Creating a SDD from SDD creation form
A SDD can be created using WEB GUI, only if the mandate on which SDD is created is in “Active” status. To create a SDD the user must reach the Mandate view page.

From this page, the user clicks the [Create SDD] to begin the SDD creation process
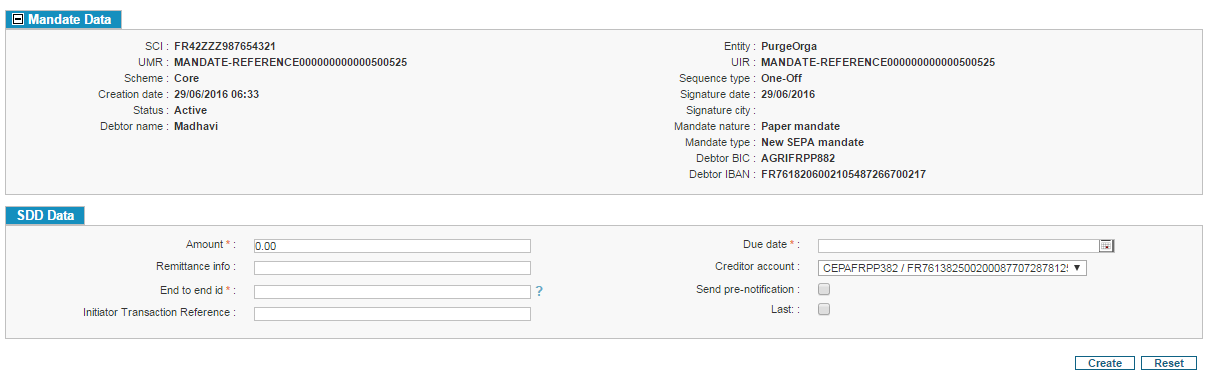
The user can fill following data:
-
The SDD amount
-
The remittance information
-
End to End Id
-
The due date
-
The creditor’s bank account
-
Send pre-notification
-
Last : To specify if this SDD is last SDD on the current mandate
-
The Initiator Transaction Reference
If the “RCUR only management” checkbox is not activated for Organization, then the checkbox “Last” appears on SDD creation page.

Once the “RCUR only management” checkbox is activated for Organization, then the checkbox “Last” disappears from SDD creation page.

Creating an SDD from the Payment Scheduler
In order to create an SDD from the GUI, the user must create a payment schedule for the debtor to be charged.

Viewing a Mandate
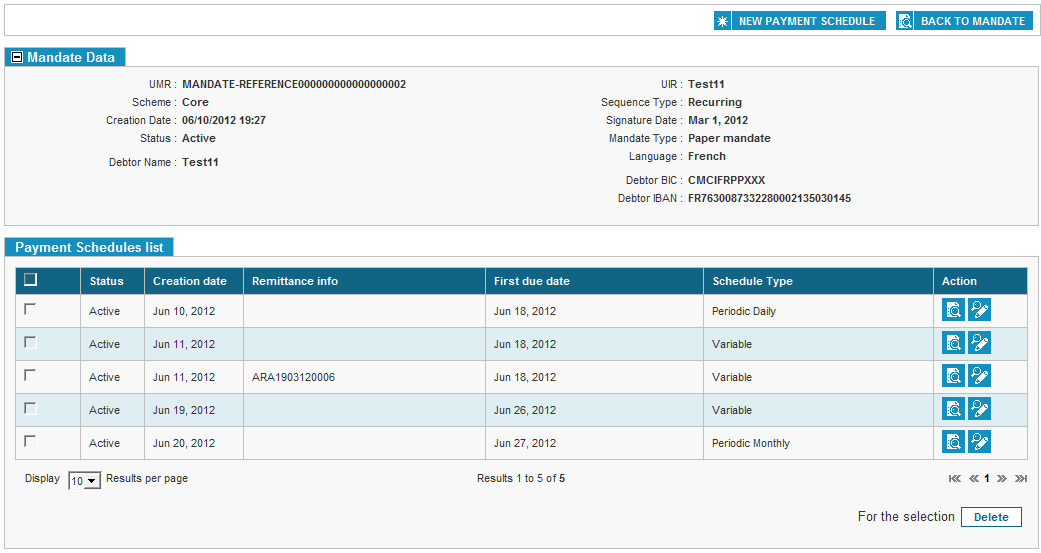
To create a payment schedule, the user must first reach the details page for the chosen mandate (see Viewing a Mandate, Associated Actions).
The [Associated Payment Schedule] button appears on the top. If the mandate is not flagged as “Active” or if there are no payment dates, the button will not appear.

Viewing the Schedules
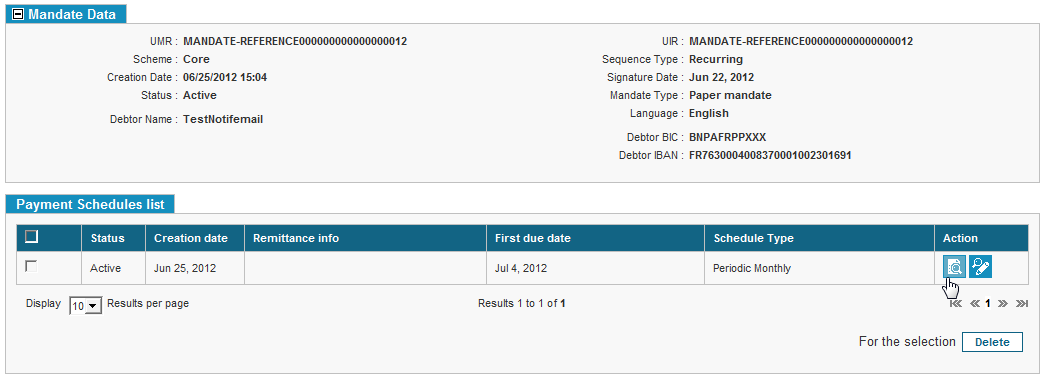
From the associated payment schedules page, all active schedules will be displayed. The page is available from Home > Creditor > Mandates Management: Display.
To create a new schedule, the user must click on “Create a new schedule”. The button only appears if the mandate is active.
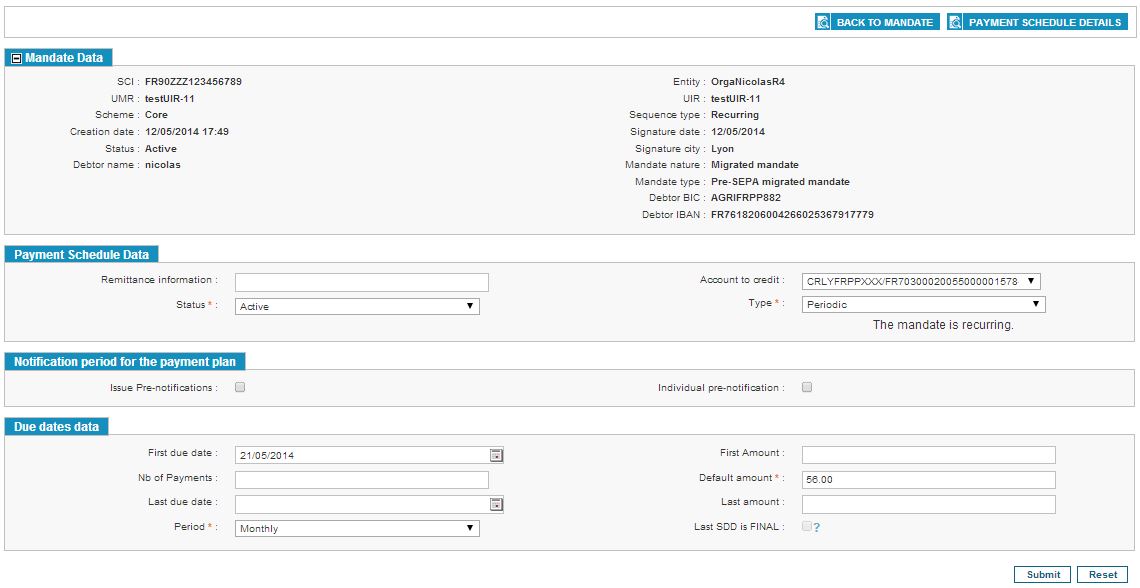
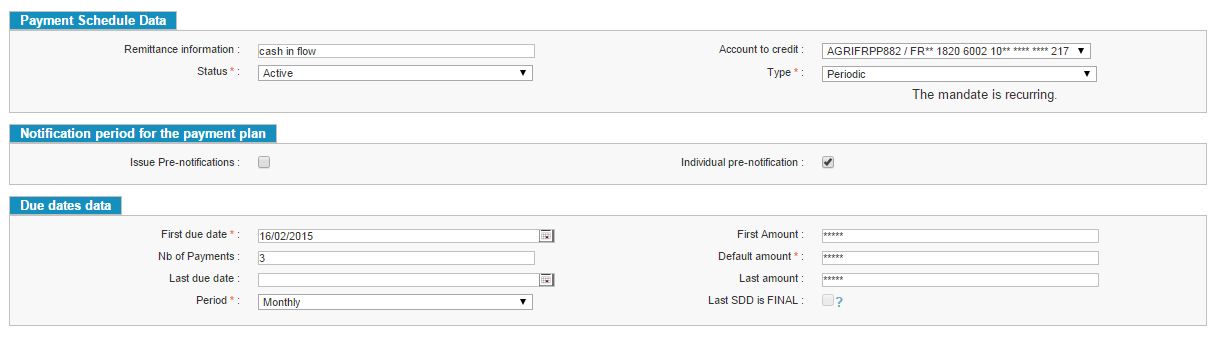
Creating a Payment Schedule
Case of a Recurring Mandate
After clicking on [New Payment Schedule], the user is redirected to a new page: Home > Creditor > Mandates Management: New Payment Schedule.
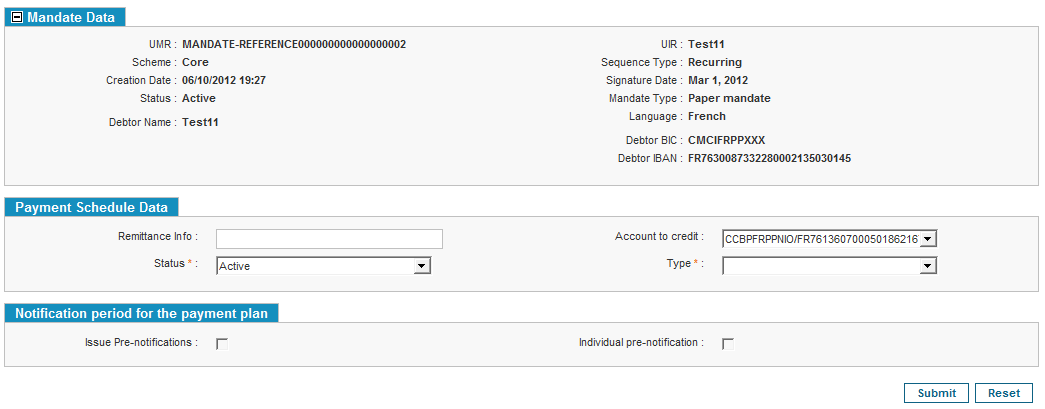
From this page, the user must:
-
Define a remittance message that will be sent to the debtor for every payment computed by the payment scheduler;
-
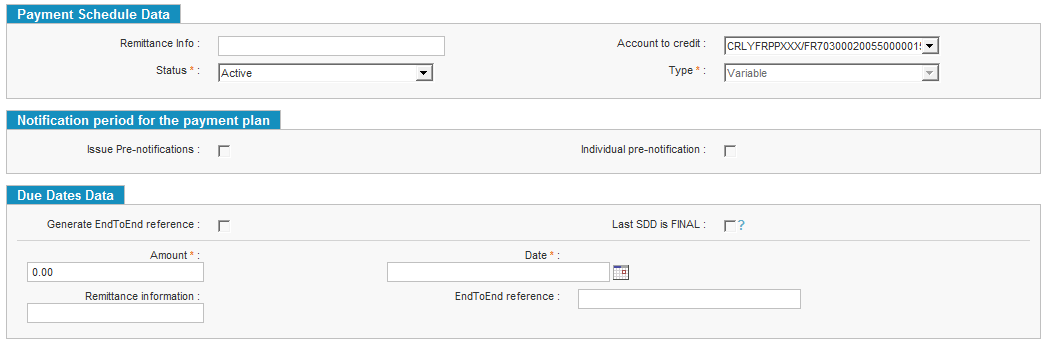
Define the status of the schedule:
-
Active: the payment scheduler will compute due dates and SDDs once submitted;
-
Inactive: the payment schedule is created, but will require activation later so that the SDDs and due dates can be computed.
-
-
Set an account to credit: the user selects the creditor’s bank account to credit;
-
Choose a payment schedule type from one of the following two options:
-
Periodic: the users selects a periodicity from which the SDDs will be computed;
-
Variable: the user sets up each transaction by defining its amount and due date.
-
If the payment schedule is set to “Variable”, a new block will be displayed:
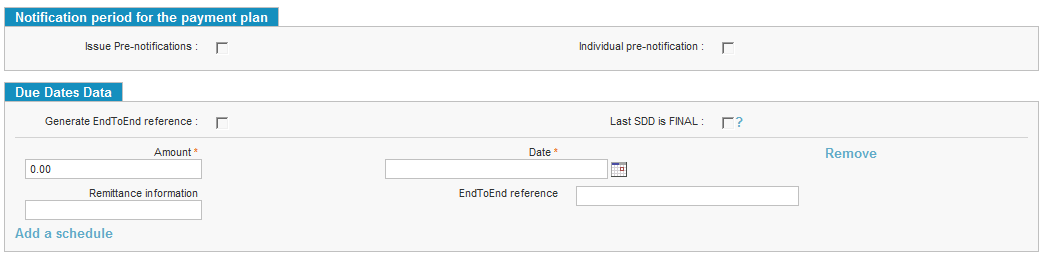
To add a new due date, the user must click on [Add]. He then adds for each payment an amount to charge the debtor, a due date and optionally a remittance message.
The Due date must be in format dd/mm/yyyy. If user provides the wrong input for the due date then error “The date format is invalid (dd/mm/yyyy)” Is displayed.

This is also applicable for due dates used for creating/editing the periodic or variable schedule.
The user can also input for each payment an End to End ID, or check “Generate End to End references” to automatically compute the references.
Once all payments have been typed, clicking [Submit] will create the payment schedule.
If the payment schedule was set to “Periodic”, the following bloc will appear:
The user must enter the frequency by which the payments will be created.
The user must thus fill in the following information:
-
A date for the first due date. This must be a valid date regarding the emission constraints of the creditor organization (see Managing SDD Collection Options). If the selected date is not valid, an error message is pop up while submitting the payment schedule;
-
An amount for every payment;
-
A periodicity. Available periods are:
-
Daily: every day an SDD will be created;
-
Weekly: every week after the first due date an SDD will be computed;
-
Every two weeks:;
-
Monthly:;
-
Every two months;
-
Quarterly:;
-
Semiannual;
-
Yearly.
-
-
The user can also input:
-
The “First amount” if the amount of the first SDD differs from the other SDDs;
-
The “Last amount” if the amount of the last SDD differs from the other SDDs;
-
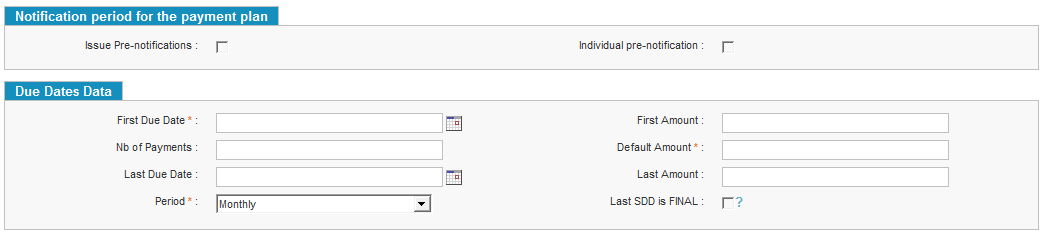
If the last payment should set the SDD status to “Final”, tick “Last SDD is Final”.
-
Either a number of payments (i.e. the number of payments set up in the payment schedule) or a last payment date (i.e. the date on which the last due date will be computed); If not set the schedule is infinite.
-
-
The “Issue Pre-Notifications” options makes a “Notification periods for the payment plan” block appear at the bottom of the page:
-
The first and last notification dates define a time period during which the debtor will be notified;
-
The “Time period for the notification” allows a finer control of the notification process.
-

Once the user has set up the payment schedule, hitting [Submit] creates it.
Case of a One-Off Mandate
If the selected mandate is a one-off mandate, the user will only be able to create a variable schedule with a single due date.
Once the due date has been chosen, the creditor can no longer create schedules on this mandate.
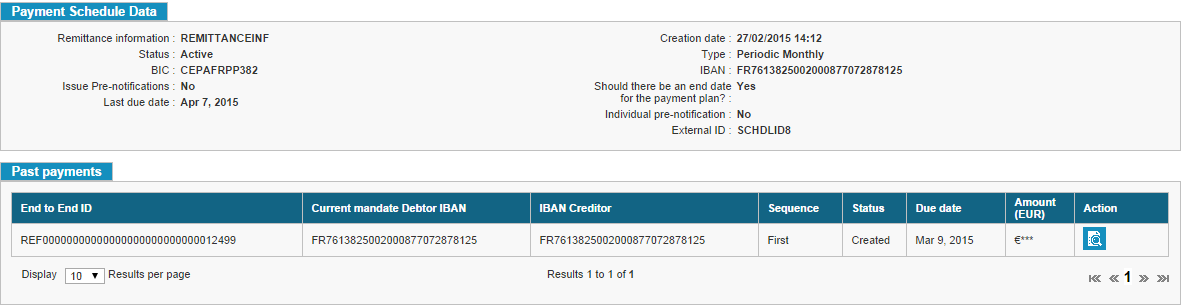
Viewing the Details of a Payment Schedule
To view a payment schedule in details, the user must access the mandate’s details (see Viewing a Mandate, Associated Actions), then hit [Associated Payment Schedules].
From the “Payment Schedule list” block, click on the action button named [Payment Schedule Details].
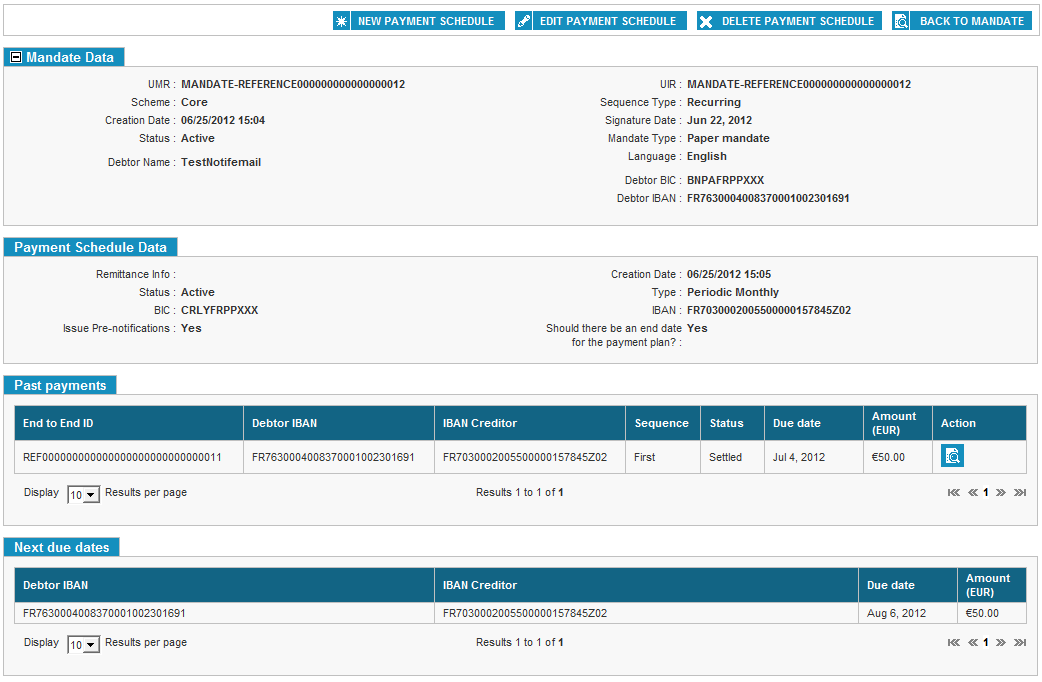
From the details page, the user has access to:
-
The mandate’s data;
-
The payment schedule’s data;
-
A list of all past payments, an action button named [See SDD details] redirects the user to the associated SDD page;
-
A list of all incoming due dates.
How the incoming due dates are computed depends on the way the creditor organization’s parameters were set up (see R6.1
| Adding content |
|---|
| Viewing a Mandate’s Details |
R7
| New parts |
|---|
| Legal notice |
| Creating a SDD from SDD creation form |
R7.1
| Editing content |
|---|
| Appendix 7 - List of grouping criteria of Collections and Collection Files |
| Subscribing to the alerts |
| New parts |
|---|
R7.2
| Editing content |
|---|
| Planned Mandate modification |
| Adding content |
|---|
| Exporting to CSV |
| Exporting Results |
| Viewing transactions through the “Transaction Search” Page |
| Searching for R-Transactions |
| Exporting the Third parties to a CSV file |
R8
| Editing content |
|---|
| Refunding an SDD through an SCT |
| Adding content |
|---|
| Appendix 1 - List of Creditor Parameters). |
The “amount” in detail page is shown in unmasked format only if the user is associated with “View Transaction Amount” profile else it is shown in unmasked format.
Deleting a Payment Schedule
Deleting a payment schedule cancels all SDDs that have not been sent to the bank of the creditor (i.e. those that are flagged with an “Issued” or “Waiting” status).
Payments that have yet to be computed will be removed.
To delete a payment schedule, the user must browse to Home > Creditor > Mandates Management: Display.
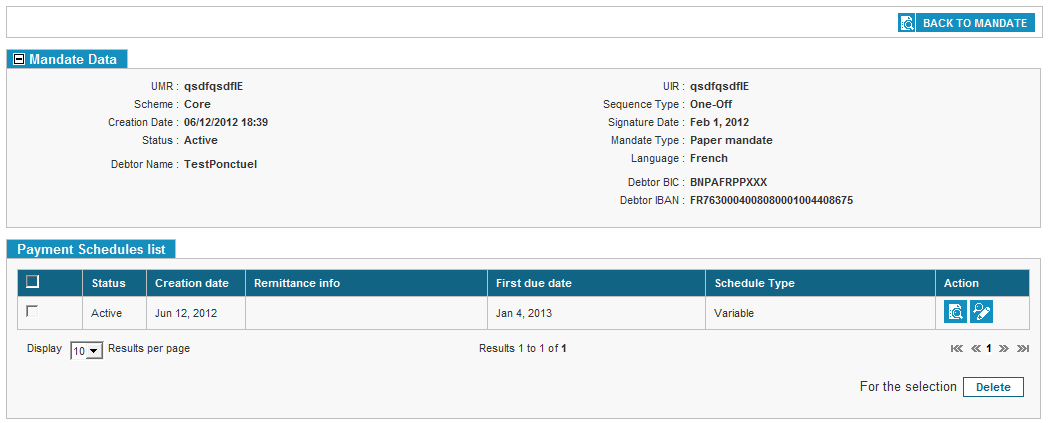
From the payment schedule list, the user selects the schedule to delete by ticking the box next to it. Clicking on [Delete] at the bottom of the page will validate the deletion.

Should the user check if the payment schedule to remove is the correct one, it can be deleted from its details page. Browse to Home > Creditor > Mandates Management: Display Payment Schedule.

The user can now double check the payment schedule before hitting [Delete Payment Schedule].
Editing a Payment Schedule
On the payment schedule list (on associated payment schedule page) the user can edit a payment schedule.

It is also possible to access to the edit page via the payment schedule consultation page.

On this page, the creditor can make modifications via GUI according to some rules described in the General Functional Specifications. The editable fields are:
-
First due date
-
Number of schedules
-
Last due date
-
First amount
-
Last amount
The fields “First Amount” and “Last amount” are editable only if the user is associated with “View Transaction Amount” profile. Otherwise these fields are shown in masked format and are not editable.
Issuing a Single SDD
From an active mandate, the user can create an SDD. To do so, he must click on “Create SDD”.
The SDD creation page appears once the button has been clicked on.


On this page:
-
The user can view the general information about the mandate;
-
The user can input the SDD data:
-
The amount (required);
-
The remittance information message to be given to the debtor;
-
The due date (required)
-
The bank account to credit;
-
The reference (it will be generated by SEPA Payment Suite otherwise);
-
The pre notification settings.
-
The Initiator Transaction Reference.
-
To save the input information the user must click on [Create]. Should an error occur, a message will be displayed on the top of the page.

The due date must be in format dd/mm/yyyy. If user provides the wrong input for the due date then error “The date format is invalid (dd/mm/yyyy)” Is displayed.
If the creation was successful, a message will inform the user and he will be redirected to the details page of the newly created SDD.
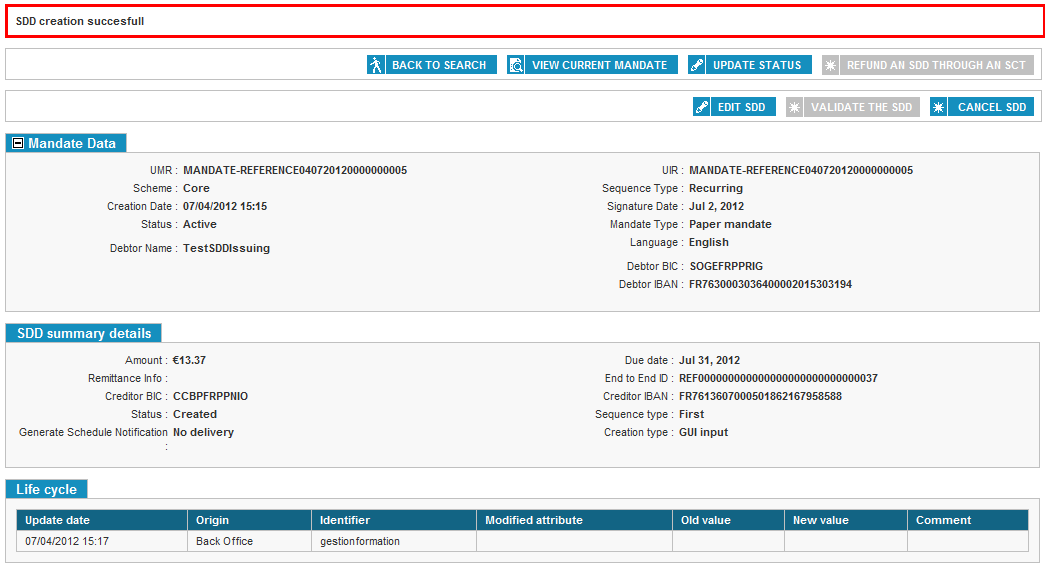
The amount in SDD summary details block is displayed in unmasked format if the user is associated with the “View Transaction Amount” profile else it is displayed in masked format.
Modifying SDD Data
An SDD can only be edited if it is “Active”, “Obsolete” (before establish the remittance) or “Waiting”. As soon as an SDD has been sent to the bank of the creditor it can no longer be modified. To edit an SDD the user must reach the SDD view page (see Viewing a).

From this page, the user clicks the [Edit SDD] to begin the editing process.
The following fields can be modified:
-
The SDD amount: This field is editable only if user is associated with “View Transaction Amount” profile. If the user is not associated with “View Transaction Amount” profile then SDD amount is not editable.
-
The remittance information;
-
The due date
-
The creditor’s bank account;
-
The notification settings (if this will be the last SDD mandate).
-
The Initiator Transaction Reference
-
Settlement mode: this field is editable only if the transaction is not in a collection, the selected value is the current value and the list will contain all the available settlement modes for the given transaction.
If an SDD’s status is set to “Obsolete”, the user must correct the due date. Once this is done, the status will change to “Issued” or “Awaiting validation”.
The due date must be in format dd/mm/yyyy. If user provides the wrong input for the due date then error “The date format is invalid (dd/mm/yyyy)” Is displayed


If the “RCUR only management” checkbox is not activated for Organization, then the checkbox “Last” appears on SDD edit page.

Once the “RCUR only management” checkbox is activated for Organization, then the checkbox “Last” disappears from SDD edit page.

Modifying the status of an SDD
A user can manually update the status of an SDD. To do so, he must browse to the detailed SDD view: Home > Creditor > Transactions Management: Display.
To update the SDD, the user should hit [Update Status]. A scroll list appears at the bottom of the page with a list of available statuses.


To avoid issues, SPS will only show a restricted list of statuses depending on the current SDD status:
| Current Status | Available Statuses |
|---|---|
| Issued | Rejected; Reversed; Acknowledged by the bank; Refunded;Returned |
| Acknowledged | Refunded; Rejected; Returned by the bank |
| Settled | Rejected; Returned; Refunded. |
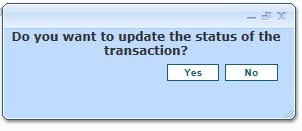
The user chooses a new status and hits [Update], a confirmation popup is displayed to confirm or not the update.
Including Web R-Transaction in Bank Statement
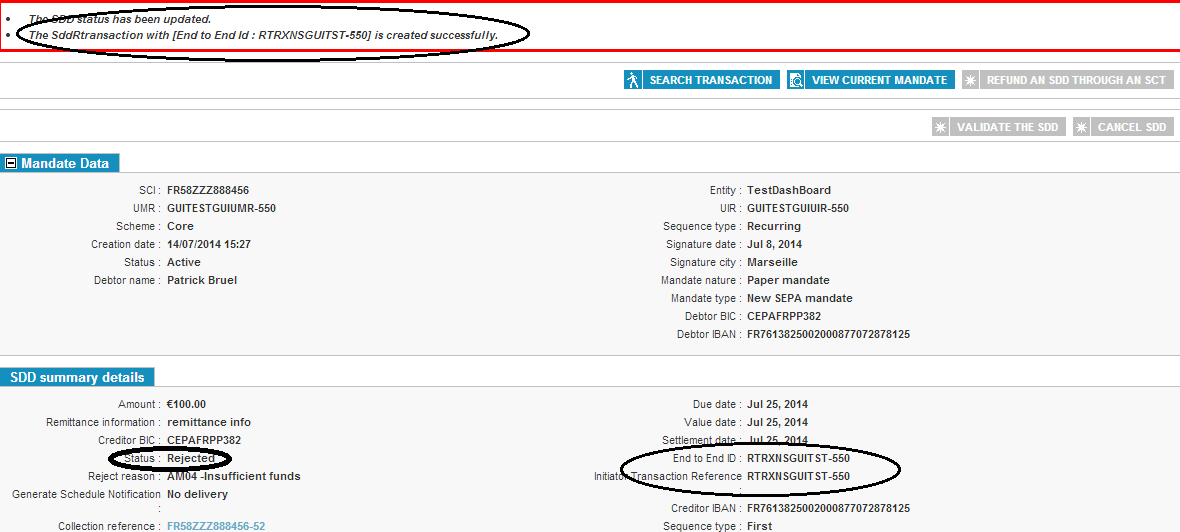
On the transaction modification page, when the user selects the status “Rejected” or “Returned” for a status update, a new field “Include R-Transaction in Bank Statement Generation” appears with the check box selected by default, meaning the R-Transaction created is included in the Bank Statement Generation. The user can choose to uncheck the box. If unchecked, the R-Transaction is not included in the Bank Statement Generation.

When the user clicks on [Update] button, the transaction is rejected or returned, and its corresponding R-Transaction is also created. See the screen below.
Cancelling or Reversing an SDD
Depending on the SDD’s current status, cancelling an SDD can lead to different results.
-
If the SDD is “Created”, “Obsolete” or “Issued”, the SDD status will be set to “Cancelled”;
-
For all over statuses, the SDD cannot be cancelled.
To cancel an SDD, the user must go to the SDDs details page (see Viewing a).

From this page, the user clicks [Cancel SDD] if he wishes to cancel or reverse it. A confirmation window pops up and allows the user to comment his actions (see Confirmation Window).
Refunding an SDD through an SCT
Refunding an SDD through a SEPA Credit Transaction (SCT) allows the creditor to refund a debtor from his associated SDD.
In order to Refund a SDD through a SCT, the following conditions applies:
-
The Organization must be able to generate SCT
-
The SDD status must be one of the following :
-
“Issued”
-
“Settled”
-
“Partially Refund”
-
-
An Option at the Organization level, allows SDD to be “Over refunded”, in case that option is activated on the organization, the following SDD status also allows to create a new refund :
-
“Refund”
-
“Over Refund”
-
To process a refund, the user must reach the SDDs view page (see Viewing a).

From the details page, the user must hit the [Refund an SDD through an SCT] button to initiate the refund.
The user is then redirected to the SEPA Credit Transaction page.
While generating an SCT, some fields are already filled in by default:
-
The amount to refund is identical to the one defined in the SDD;
-
The remittance message sent to the debtor is the same as the one typed in for the SDD;
-
The SCT’s reference is the same as the SDD with an added “SCT” prefix.
However, these fields can still be edited by the user.
If user is not associated with “View Transaction Amount” profile then amount is shown in masked format and is not editable.
Once the SCT has been set up, hitting [Submit] will validate it.
Depending on the total amount of the SCT linked to the SDD, The SDD’s status is changed to:
-
Refunded if the total amount of the SCT is equal to the SDD amount
-
Partially refunded if the total amount of the SCT is lower than the SDD amount
-
Over refunded if the total amount of the SCT is greater than the SDD amount
Viewing an Erroneous Transaction
A transaction request sent either by file or on the internet is erroneous if it fails the following checks:
-
Some required fields were not filled;
-
Some fields have an incorrect syntax;
-
The request’s SCI does not match any known SCI;
-
The associated mandate (the SCI/UMR or the SCI/UIR) does not exist in SPS’ database;
-
The associated mandate’s status is set to “Revoked”, “Finalized”, or “Obsolete”;
-
The transaction’s reference is not unique to the mandate (UMR or UIR) and its creditor (SCI);
-
The requested mandate’s sequence type does not match the mandate’s;
-
The refund’s due date does not fit the time constraints set up in the organization parameters, i.e. the due date is further away in the future than the due date required by the beneficiary bank;
-
The creditor’s account does not match any SCI in the database, or is not authorized on the entity.
Searching for an Erroneous Transaction
If a user wishes to view an erroneous transaction, he must browse to the “Search” page available on: Home > Creditor > Transactions Managers: Search Erroneous Transactions.
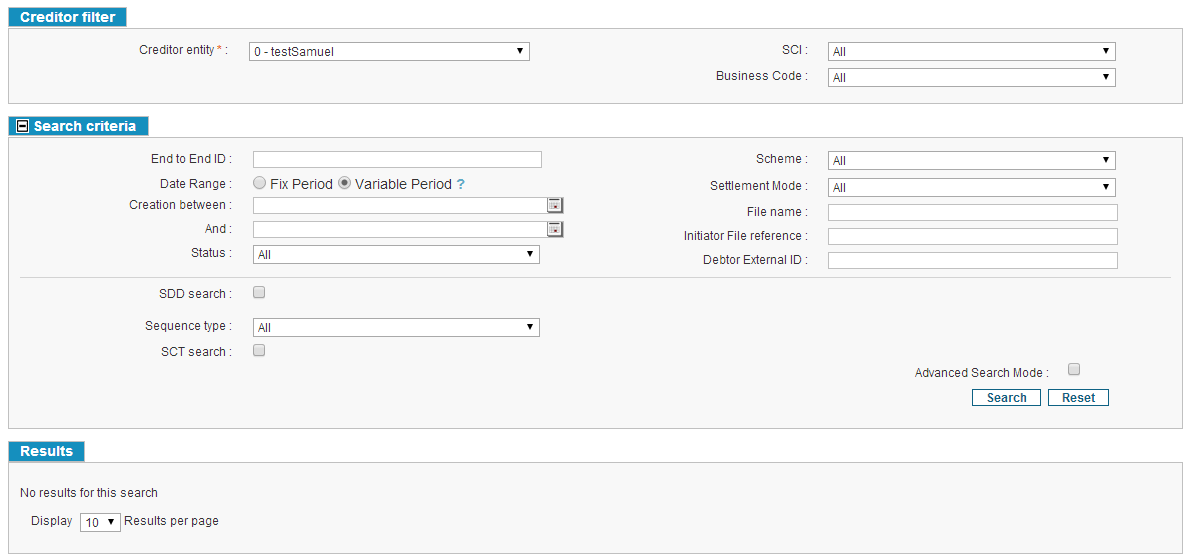
A first block, the “Creditor filter” block, allows the user to select a creditor entity, an SCI account and a Business Code (see Choosing a Creditor Entity, an SCI and a Business Code).
Another block “Search criteria”, allows for a finer search for erroneous transactions.
The “LIKE” search of the End to End ID field works like the one for transactions
If the user hits [Search] without changing the search criteria, then all available erroneous transactions will be displayed at the bottom of the page.
The Creation date must be in format dd/mm/yyyy. If user provides the wrong input for the creation date then error “The date format is invalid (dd/mm/yyyy)” Is displayed.\ This is also applicable for Due date field.
The amount in result block is displayed in unmasked form only if user is associated with “View Amount Transaction” profile.
If the user uses additional search criteria and launches a new search, the results table is updated and so is the “Search criteria” block.
The “Search criteria” block can also be hidden (see Hiding the Search Criteria).
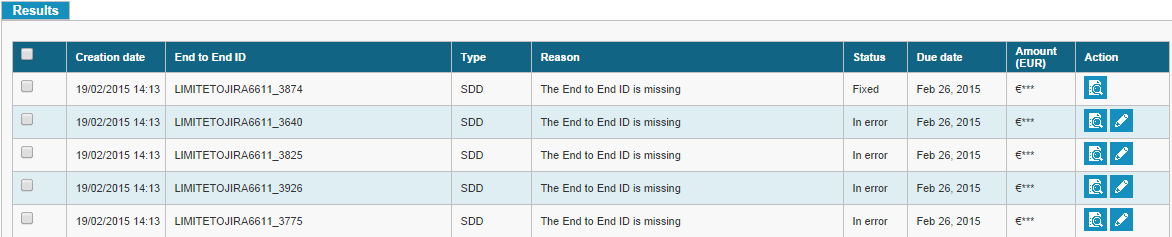
Viewing the Details of an Erroneous Transaction
Clicking on the [Transaction Details] button will load its details in a new page.
Details are displayed on two separate blocks:
- The “Mandate data” block (only if a mandate is linked to this erroneous transaction, see 5.11.3):

-
The “Erroneous SDD data” block:
If the user is associated with “View Transaction Amount” profile then amount is shown in Unmasked format else it is shown in masked format


The user views a summary of the erroneous SDD:
-
The SDD reference;
-
A payment description;
-
The beneficiary bank account’s BIC and IBAN;
-
The erroneous transaction’s status;
-
The amount of the transaction;
-
A rejection information indicating why SPS failed to process the transaction;
-
The due date;
-
The creation date;
-
The sequence type;
-
If the transaction was created from a file or the GUI.
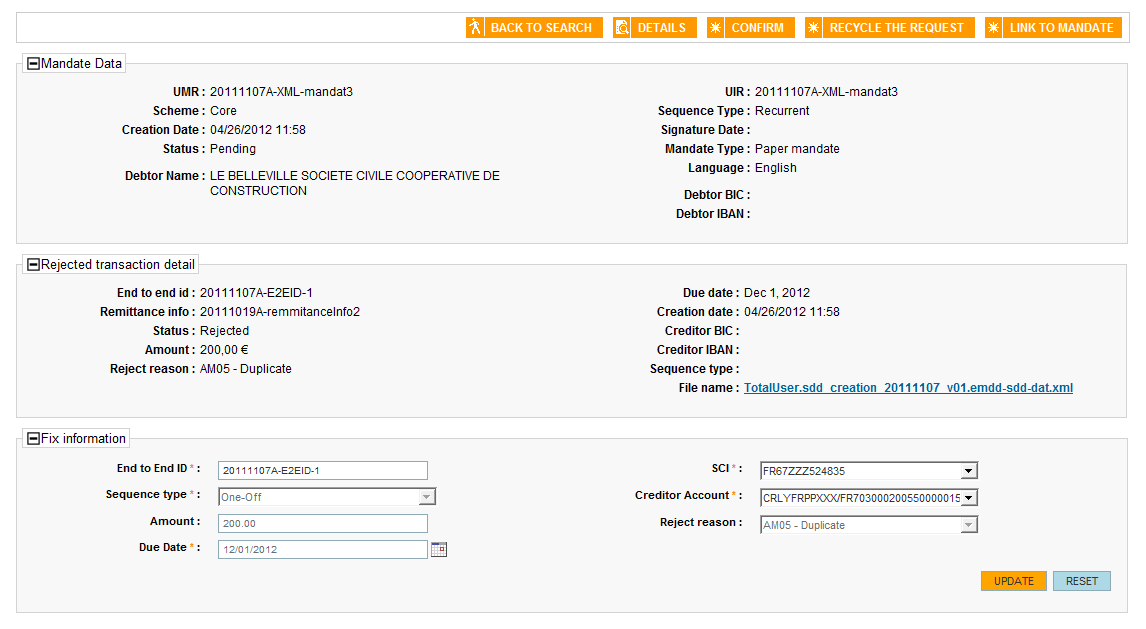
Correcting an Erroneous Transaction
The creditor user can correct an erroneous transaction by hitting the [Edit Transaction] button from the search page.
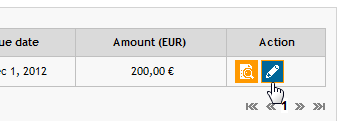
It is also possible to edit an erroneous transaction from its details page by clicking [Edit Payment Request].

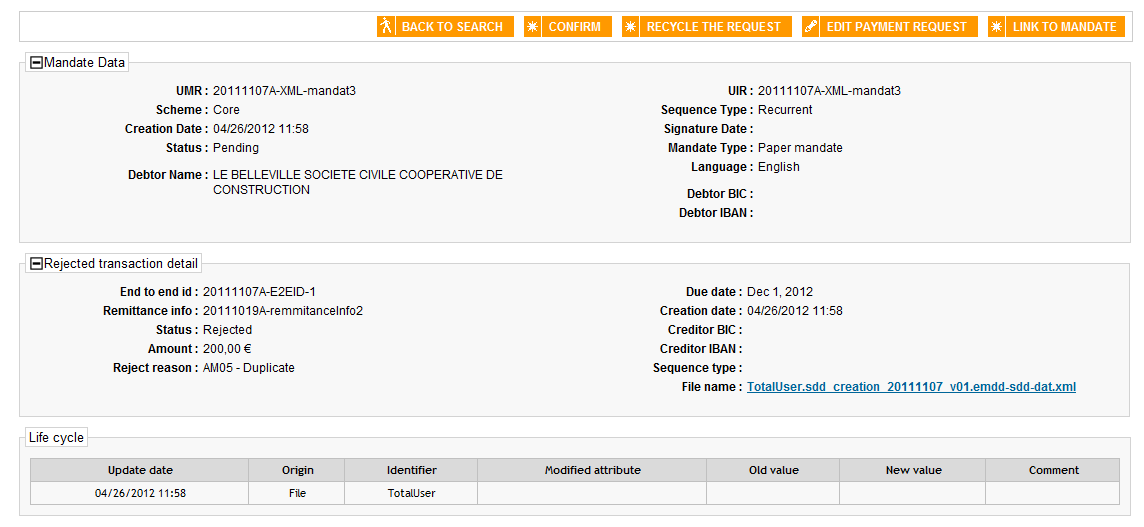
A new page appears containing:
-
The mandate and transaction information;
-
The erroneous transaction details.
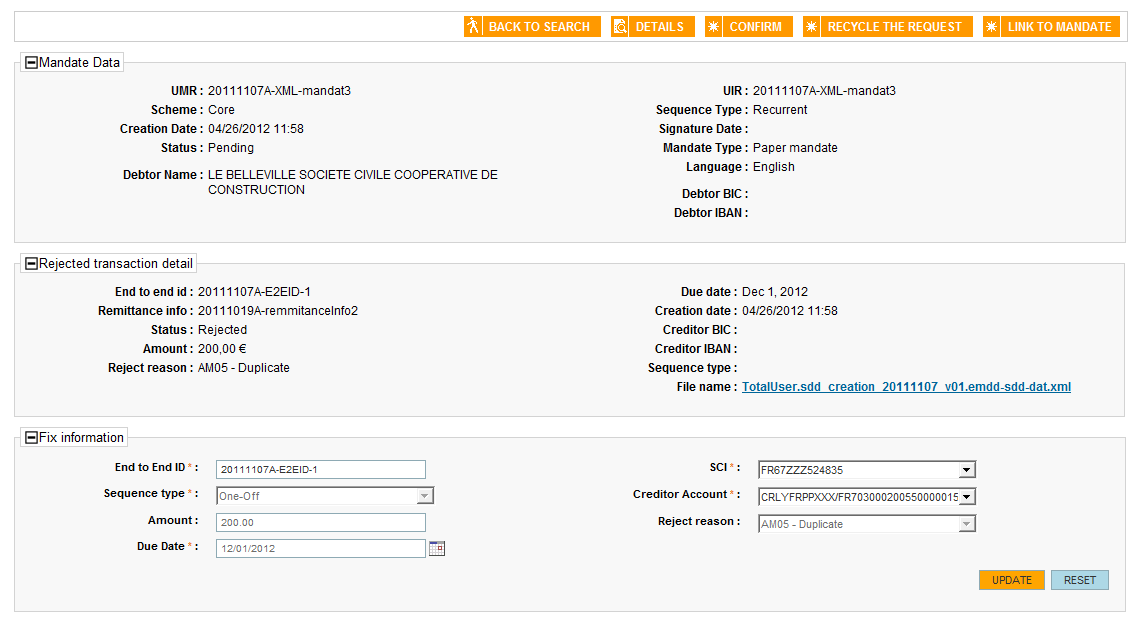
Depending of the rejection motive, one or more fields might require the user’s attention.
The amount field in “Rejected transaction detail” block and “Fix information” block, is shown in unmask form and is editable , only if the user is associated with “View Transaction Amount” profile. Otherwise the amount is shown in masked format and is not editable.
The Due date must be in format dd/mm/yyyy. If user provides the wrong input for the due date then error “The date format is invalid (dd/mm/yyyy)” Is displayed.

| Rejection Motive | Required Action |
|---|---|
| Missing Mandate | Create a mandate and recycle the erroneous transaction. The mandate/transaction association will be automatically computed. |
| Missing Information | Correct the request by adding the missing information (SCI, creditor account, due date) |
| Duplicated SDD | Change the SDD reference. |
| Invalid Due Date | Change the due date. |
| Invalid Creditor Account | Choose a correct creditor account from the node list. |
| Invalid Sequence Type | Select the appropriate sequence type. |
| Amount must respect the expected format Note : The format will be checked before the amount limit. For instance, 0.001 will trigger the format control and not the amount limit control | Have a valid format for amount like 123.45 |
| Invalid Amount | Select an amount between €0.01 and €999,999,999.99. |
| Invalid Mandate status(final/ revoke) | The transaction can not be corrected. The transaction can be recycled and sent only if a rejection on the last issued SDD occurs |
| Invalid debtor Account | Choose a correct debtor account associated to the mandate |
| Unknown Creditor | Choose a correct SCI from the SCI list. |
Confirming/Recycling an Erroneous Transaction
The user can confirm or recycle one or several erroneous transactions.
Batch Recycling/Confirmation
The user can confirm or recycle several transactions at the same time from the erroneous transactions search page (see Viewing an Erroneous Transaction).
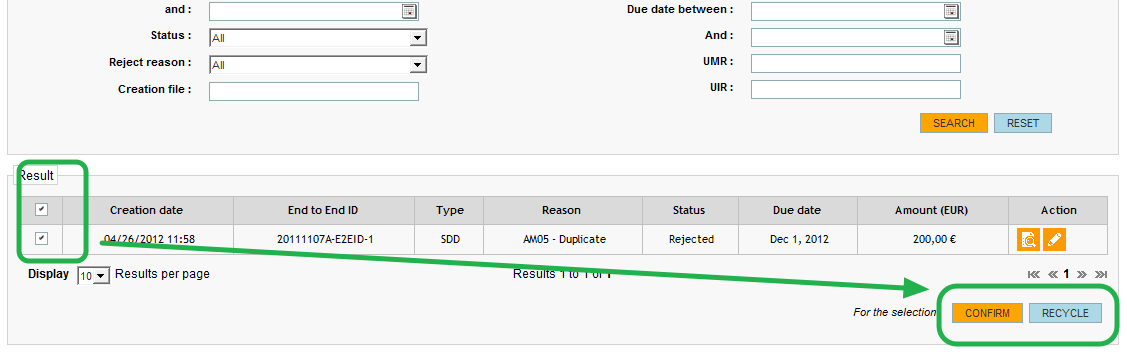
Using the check boxes on the left of every result row to select transactions, the user hits [Recycle] or [Confirm].
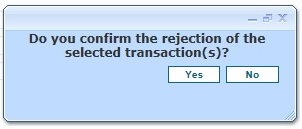
The [Confirm] button must be hit to confirm the action, a confirmation popup is displayed to confirm or not the action. Should the recycling process fail, the transaction will keep its erroneous status. If it succeeds, an SDD is created.
Single Recycling/Confirmation
The user can confirm a rejection or edit a transaction before recycling it. To do so, he must browse to the transaction details page.
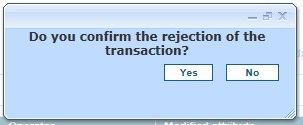
If the user wants to reject an erroneous transaction, the [Confirm] button enables him to do so, a confirmation popup is displayed to confirm or not the action.
If the user wants to reject the rejection of an erroneous transaction, the [Reject the request] button enables him to do so.

If the user wishes to recycle it, he must hit [Edit Payment Request]. An edit page will then appear.
To correct the error(s), the user can edit:
-
The SDD’s sequence type;
-
The account to be credited;
-
The due date;
-
The amount: The amount is shown in masked format depending on user’s role. If the user is associated with “View Transaction Amount” profile then Amount filed is unmasked and ediatable else it is not editable and shown in masked format
For the edition of sequence type, the possible values of Sequence type field vary based on the activation of the field “Rcur only management” for the organization. If the field “Rcur only management” is not activated , the drop down of the Sequence type will have “First” ,“Final”, “Recurrent” and “One-off” as possible values.
Once field “Rcur only management” is activated , the drop down of the Sequence type will not have “First” and “Final” as possible values.
Clicking [Update] once the necessary changes were made will update the transaction.
To recycle the transaction now, the user will have to go to the transaction search page and recycle it from there (see Batch Recycling/Confirmation) or clicking the [Recycle the request] button on the details page of the erroneous transaction.
As for the viewing page, if the user wants to reject an erroneous transaction, the [Confirm] button enables him to do so, a confirmation popup is displayed to confirm or not the action.
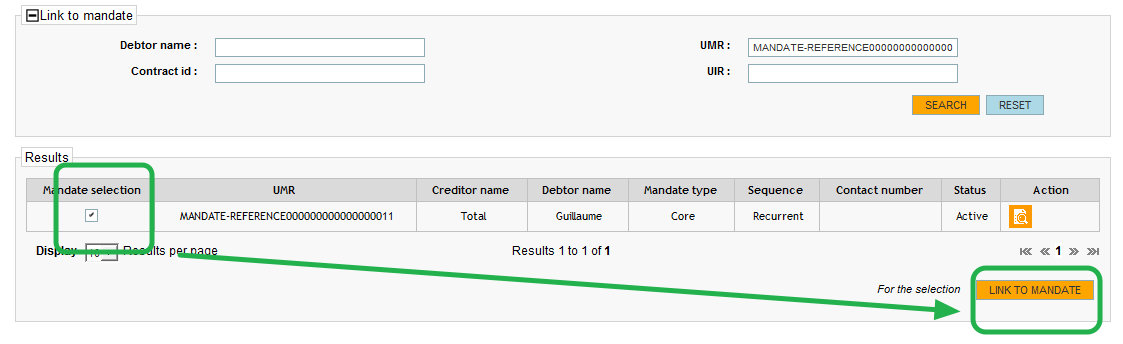
Linking an Erroneous Transaction to a Mandate
From the erroneous transaction details page, the user can link an erroneous transaction to a mandate.
Clicking on [Link to Mandate] from the erroneous transaction page will allow the user to proceed.

A mandate search page will appear, allowing the user to input mandate information to locate a specific mandate.

The user will be able to input a debtor’s name, contract ID, UMR and/or UIR. Once the mandate has been located, ticking the checkbox on the left of the table and hitting [Link to mandate] at the bottom of the page will associate the transaction to the mandate.
Generating a Collection
A collection is an aggregation of transactions that have common characteristics. Transactions that are part of a collection have the following common traits:
-
A node of a linking creditor entity;
-
A financial stream (SDD/reversal/SCT);
-
The SCI;
-
The SDD scheme (Core/B2B);
-
The payment sequence type (First/Recurrent/Last/One-Off);
-
The due date;
-
The creditor’s BIC;
-
The creditor’s bank account.
It is possible by activating the corresponding delivery options according to group by several criteria; see Appendix 7 - List of grouping criteria of Collections and Collection Files.
Generating a collection is done either manually by the user or automatically by the SPS payment scheduler only for a child organization.
For a root organization, these options are enabled and cannot be disabled.
Selecting a parameter for a creditor entity allows for enabling or disabling the automatic generation of collections. To do so, go to the page: “Collections files Options” in Home > Creditors > Organizations management: Show Collections Options.
Collections (an XML Payment Information block from a PAIN file) are generated from transactions currently existing in the database.
To generate a collection, go to the “Manual generation of collections” page in Home > Creditor > Transactions Management: Collection Generation.
Caution: In case of validation active, the due date won’t be recomputed during a Collection generation even if the recalculation option is enabled.

The creditor can configure an automatic generation at a fixed time. Collections are automatically generated every night. The goal is that mass treatments of data should be executed by night. It is however possible to generate a collection manually should a transaction be created and sent the same day.
It is advised not to use the manual generation of collections for data mass treatment.
The collection file and collection generation is to enable for sub entities. The GUI takes into account selected organization to display generation buttons. For instance if a sub-entity is not allowed to generate at its own level, buttons on the GUI will be displayed as follow and when the generation will be launched by the parent it will generate for this child.
Reseller users are also able to generate collections and collections files.
Viewing a Collection
Searching for a Collection
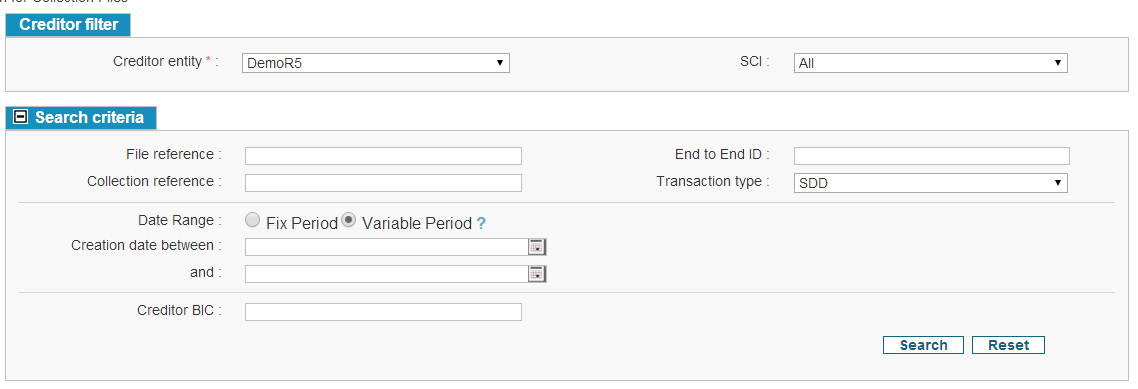
A user that wishes to search for a collection must go to the “Search SDD collection” page: Home > Creditor > Transactions Management: Search for a collection.
The “Creditor Filter” block allows the user to select the creditor entity and the SCI account (see Choosing a Creditor Entity, an SCI and a Business Code).
The “Search Criteria” block displays filters for a more refined search.
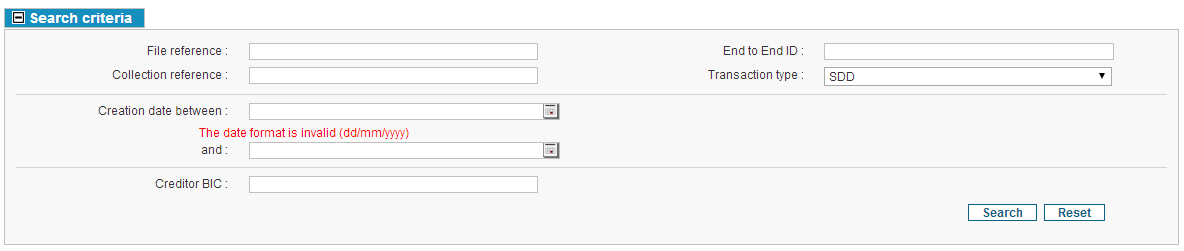
The Due date must be in format dd/mm/yyyy. If user provides the wrong input for the due date then error “The date format is invalid (dd/mm/yyyy)” Is displayed.\ This is also applicable for “Creation date” field.

The “LIKE” search of the End to End ID field works like the one for transactions.
If the user clicks on the [Search] button without inputting any criteria, then all the collections accessible by the user will be displayed in the results table at the bottom of the screen.
If the user adds additional search criteria and launches a new search, the results table is updated and the search parameters are displayed on the “Search Criteria” block.
It is possible to hide the “Search Criteria” block by clicking the “Search criteria” label (see Hiding the Search Criteria).
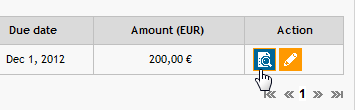
The “Action” column on the results table has two buttons. The [Detail] button displays an overview of the SDD collection. The [Collection file details] links to page that shows the details of the selected collection.
The result block contains a column “Total amount”. The user can see “Total amount” in unmasked format only if he is associated with “View Transaction Amount” profile. Else “Total amount” is shown in masked format.

Subtotals
If the user searches for collections and if the search returns results, the number of results might exceed the number of collections displayed in one page.
If the user selects collections on the results table, then the number of selected collections and the total amount will be displayed at the bottom of the page.
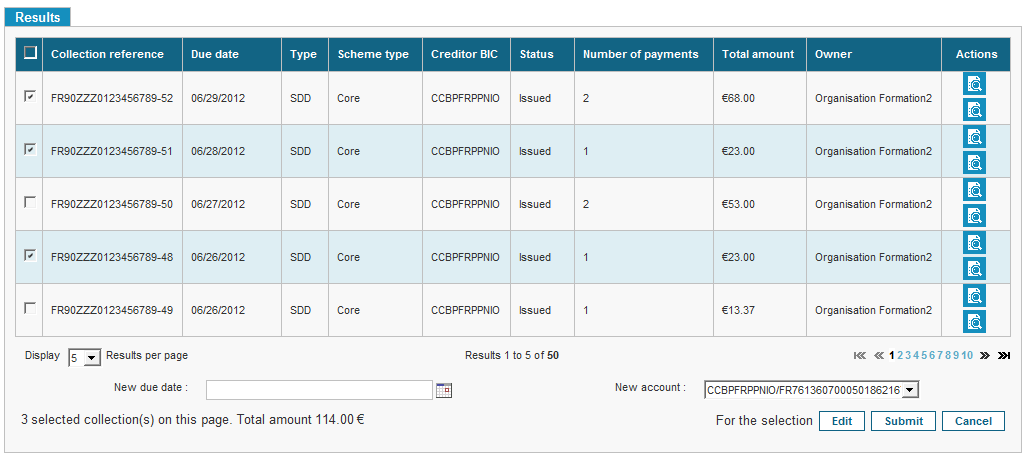
If the user checks the main tick box at the top of the results table, a message will inform him that only the collections visible on the current page are selected.
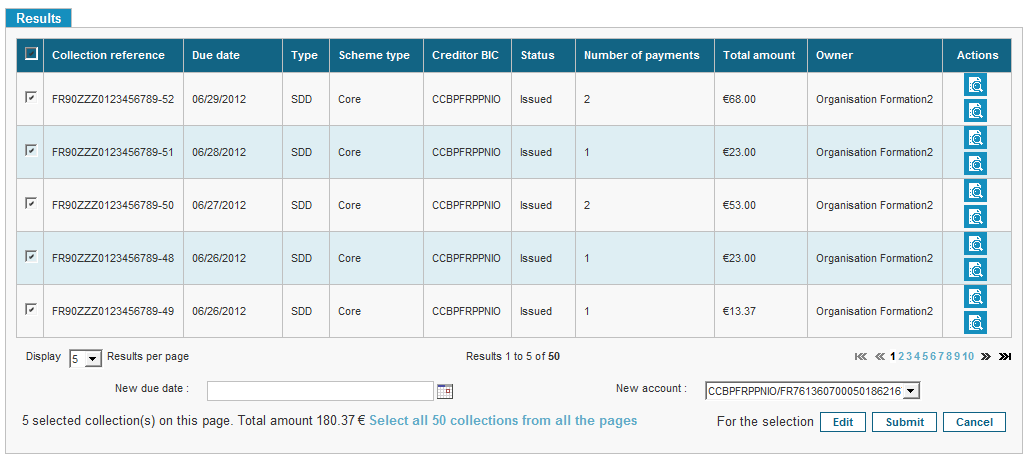
As a result, a link will appear at the bottom of the page to allow the user to select all collections on all pages.
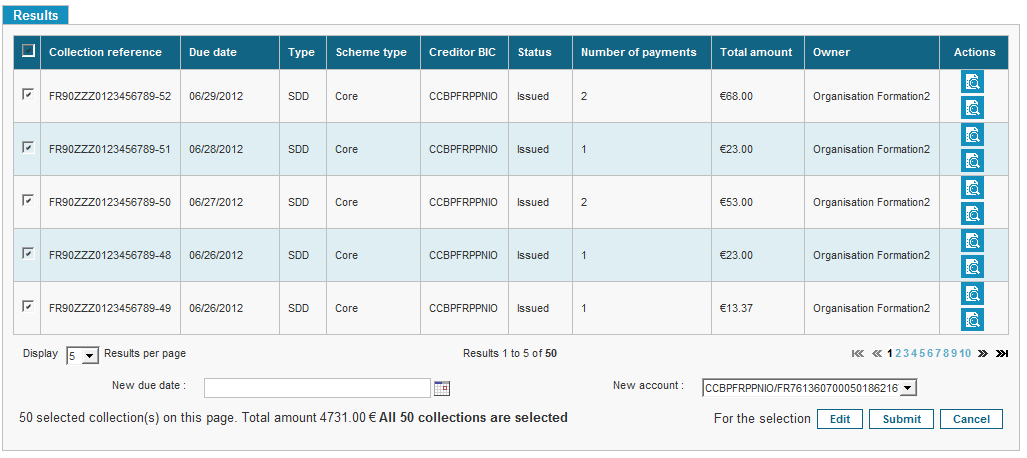
The message will be updated once all collections are selected. Should the user untick one collection on the current page, all collections on the other pages will be unselected as well.
For all collections, it is possible to edit, validate or cancel those selected.
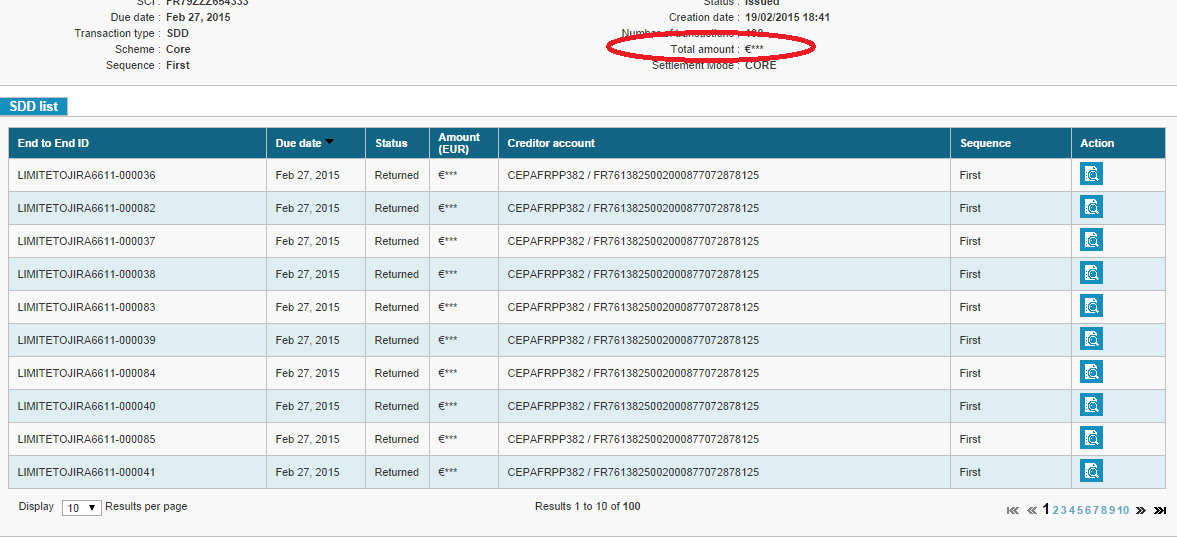
Viewing the Details of a Collection
The [Back to search] sends the user back to the search page. [See the Linked File] redirects the user to the file details page (see Viewing a Collection File).

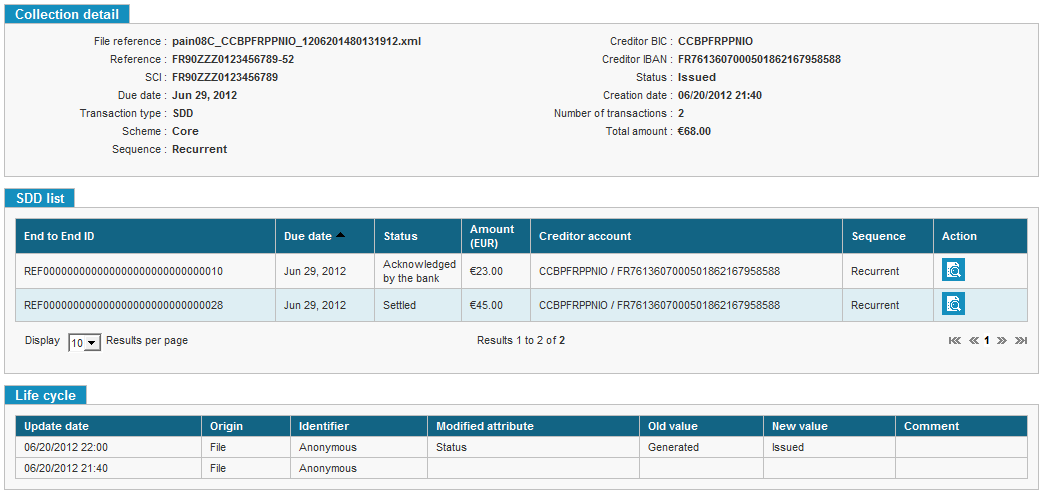
The “Collection detail”, “SDD list” and “Life cycle” blocks list all available information related to the selected collection.
In “Collection detail” block, the Total amount is shown unmask format if the user is associated with “View Transaction Amount” profile. Else it is shown in masked format.
Editing a Collection
The creditor user can either edit a single collection from its detailed view or mass edit collections from the search page. To do so, click the [Edit] button at the bottom of the search table.

A collection can be edited as long as it has not been cancelled or issued to the bank of the creditor. Editable fields are:
-
The creditor account;
-
The due date.
-
Settlement mode: This field is editable. The selected value is the current value and the list will contain all the available Settlement Modes. The Due Date will also be checked and potentially recalculated, depending on parameters.
After the edit, all transactions included in the collection are updated according the new input.
If the user is associated with “View Transaction Amount” profile, then “Total amount” is shown in unmask format and is editable. Otherwise “Total amount” is shown in masked format and is not editable.
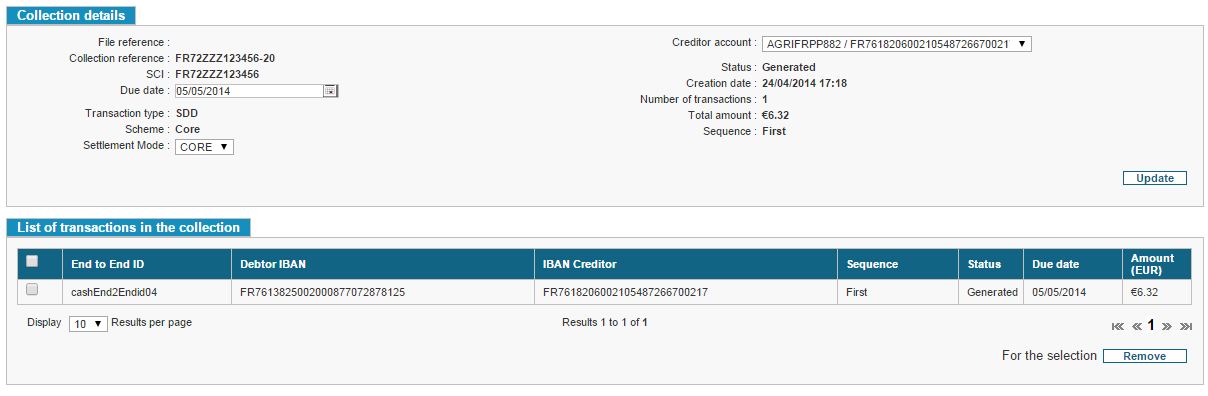
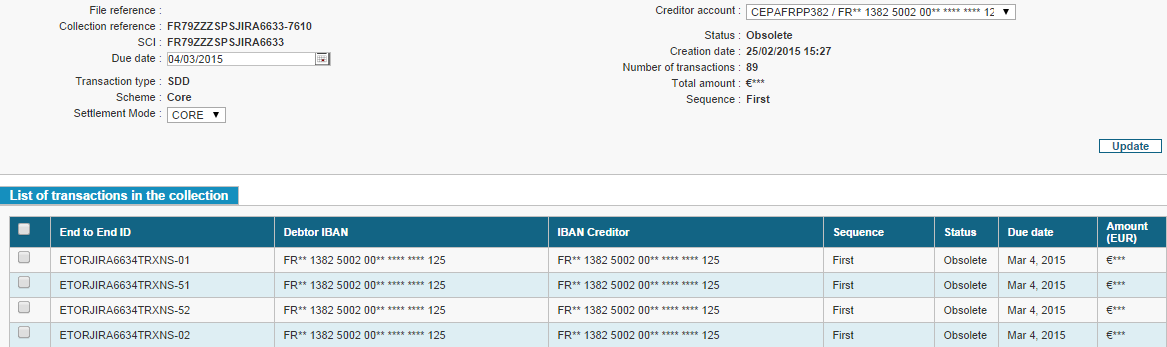
Removing a Transaction from a Collection
If the collection contains more than one transaction, the user can delete transactions from it. From the collection details page, the user must click on [Edit the Collection].

Amount is shown in unmasked format depending upon the user’s role. If the user is not associated with “View Transaction Amount” profile the Amount is shown in unmasked format else it is shown in masked format.
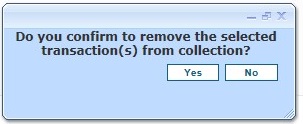
The list of all linked transactions is displayed. The user must select the transactions that need to be removed and hit [Remove]. A collection must to contain a minimum of one transaction. To delete all transactions of a collection, the user must use the cancellation action on this collection.
When removing transactions from a collection, a confirmation popup is
displayed to confirm or not the action.
Validating a Collection
It is possible to start the process of validating the collections. To validate a collection, the creditor must either validate the collections in bulk from the search page, or validate those one by one from their details pages.
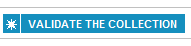
Hitting [Validate the Collection] is required to continue.
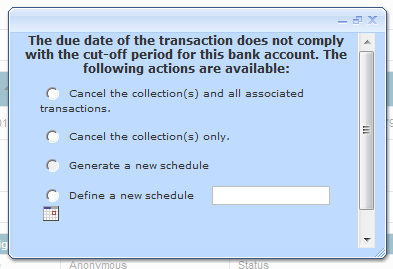
While validating the collection, if the delivery date to the bank is expired, a window will pop up.
The creditor can:
-
Validate with the default due date. The collection and its transactions will be set to the “Obsolete” status.
-
Automatically reset the due date (this option is only available if the “Due date computing” parameter is activated). SPS sets a due date accordingly. The message for this is “Validate with the current due date or the next valid one”
-
Input a date of his choice. The creditor selects a new date for the transactions. If the new due date is still not valid, the collection and its transactions will be set to the “Obsolete” status.
When the validation is successfully completed, the collections and its transactions will be set to “Created”.
Cancelling a Collection
The creditor can cancel collections. To do so, the creditor cancels them in bulk from the search page or one by one from the detailed view page.
To cancel a collection, click the [Cancel the Collection] button.

Should the cut off delay be expired, a window will pop up.
The due date is not valid any more. The creditor can:
-
Cancel all transactions. The collection and its transactions will be set to “Cancelled”;
-
Automatically set a new due date (this option is only available if the “Due date computing” parameter has been activated). SPS will set the date accordingly. The collection is cancelled but the transactions will be set to “Issued”;
-
Manually set the new due date. The creditor chooses a new date for the transactions. The collection is cancelled and the transactions issued, except if the new date is still not valid. In this case, the transaction is set to “Obsolete”.
Viewing a Collection File
Searching for a Collection File
When a user wishes to view a collection file, he must go to the “Search for a Collection file” page: Home > Creditor > Transactions Management: Search collections file.
A collection file is an ISO 20022 compliant file to be sent to the bank. Typically, it is named pain.008.
A first block called “Creditor filter” allows the user to select a creditor entity as well as the SCI account from which the information will be filtered (see Choosing a Creditor Entity, an SCI and a Business Code).
Another block, “Search criteria”, allows for a finer search by adding additional filters.
The “LIKE” search of the End to End ID field works like the one for transactions
If the user clicks on the [Search] button without inputting any filter, then every available collection file will be displayed in the results table at the bottom of the screen.
The Creation date must be in format dd/mm/yyyy. If user provides the wrong input for the creation date then error “The date format is invalid (dd/mm/yyyy)” Is displayed.
If the user adds additional criteria and launches a new search, the results table will be updated and the filters displayed in the second block.
That “Search Criteria” block can be hidden from view as well (see Hiding the Search Criteria).
The results are displayed in a table. An “Action” column on the right displays additional buttons. Those are:
The [Collection File Details] sends the user to a page that will display additional information regarding the selected collection file. If an error occurs during the file generation, the button is not display.
The [Collection File Download] allows the user to download the collection file. In order to be able to download the collection file, its status has to be ‘ISSUED’. If a bank statement file has been integrated pertaining to the collection file and transactions have been acknowledged, rejected or returned, it is no longer possible to download the file. The button in this case will be greyed out.
The [Generate Delivery Sheet for Collection File] generates, unsurprisingly, a delivery sheet for the corresponding collection file.
The result block contains a column “Total amount”. The user can see “Total amount” only if user is associated with “View Transaction Amount” profile else “Total amount” is shown in masked format.
Viewing Collection File Details
Clicking on [Collection File Details] will redirect the user to the selected collection file page.
The user can see “Total amount” in unmasked format only if user is associated with “View Transaction Amount” profile else “Total amount” is shown in masked format.
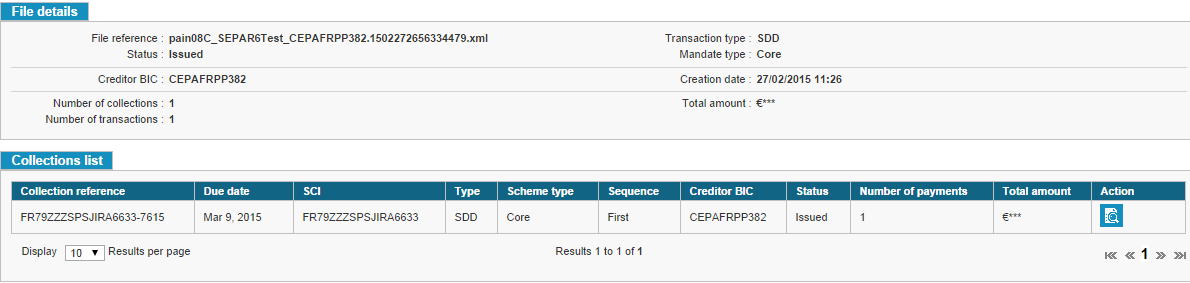
Details on the collection file are displayed on this page. It is also possible to view the specifics of every collection on file.
The user can also run the following actions:
The [Collection File Download] allows the user to download the collection file. This file should already have been automatically send to the bank of the associated creditor. In order to be able to download the collection file, its status has to be ‘ISSUED’. If a bank statement file has been integrated pertaining to the collection file and transactions have been acknowledged, rejected or returned, it is no longer possible to download the file. The button in this case will be greyed out.
The [Generate Delivery Sheet for Collection File] generates, unsurprisingly, a delivery sheet for the corresponding collection file. This file can be used as fax confirmation sent to the Creditor. The IBAN is displayed in the delivery sheet; this information is never masked in the exported files whatever the user’s role.
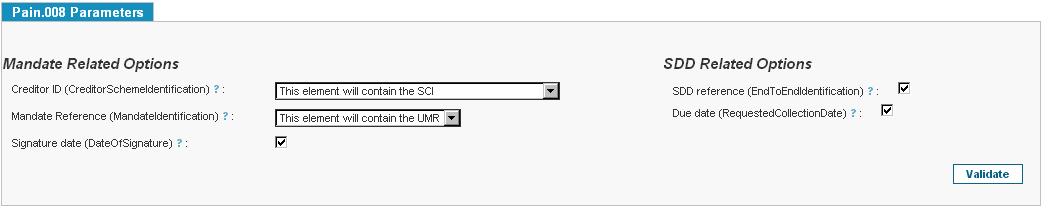
Setting options of collection files
The user can set the interpretation of the tags of the collection files (pain.008) by consulting the general parameters of an organization and click on the [CONFIGURE THE PAIN.008 INTEGRATION] button.

the name and the external identifier of the organization are remembered in the table "informations of the organization".
"How to Use pain.008 File" indicates if the parameter "management mode" is:
-
Transactions and mandates: in case of non receipt of SDD attached to a mandate, the system will create a mandate and associated it to the SDD.
-
Only Transactions: in case of non receipt of SDD attached to a mandate, the system will create an erroneous transaction because mandate can not be created.
This parameter is in direct line with the parameter "Management mandates payment instruction."

For options related to the mandate, the "id creditor" and "mandate reference" settings are used to specify the content of the corresponding tags. The parameter "Signature Date" is used to indicate which date will be taken for the creation of the mandate between the value provided in the file and the current date.
For options related to SDD, the "SDD reference" and "Due Date" indicate if the values in the file or the values generated by the system will be taken for the creation of the SDD..
When the user has finished his changes, he confirms by clicking the [VALIDATE] button.
Viewing an R-Transaction
R-Transactions are operations that delay or cancel the processing of transactions. These operations occur because of the technical or financial impossibility to process the payment (incorrect IBAN, insufficient funds on the account), because the creditor’s bank explicitly stated to cancel the transaction, because the debtor revoked the transaction, or because the debtor’s consent was not properly given.
SEPA Payment Suite supports R-Transaction files delivered by the creditor’s bank: those can be SDD rejects by the creditor’s bank, refusals from the debtor, or returns and refunds from the creditor. Supported file formats are pain.002, acmt.022, camt.053, camt.054 and CODA.
Reminder: R-Transactions
Revocation
It is an operation initiated by the creditor to cancel a transaction that should not occur and has yet to be issued on the banking platform. The operation is limited to the creditor and his bank. It can be the consequence of a complaint from the debtor to the creditor.
Cancellation request
The request is initiated by the bank of the creditor to cancel a SDD taken incorrectly by the creditor or due to an error by the creditor
Reject
The reject occurs before payment. It can be issued for several reasons:
-
For technical reasons detected by the creditor’s bank, the Clearing and Settlement Mechanisms, or the debtor’s bank (invalid format, incorrect IBAN, etc.);
-
Because the debtor’s bank cannot process the transaction (if the account was closed for example);
-
Because the debtor requested that the transaction should not occur, it is then considered a refusal from the debtor.
Refusal
The debtor refuses to pay, and informs his bank before the payment is processed by the bank. The refusal is used to process oppositions by the debtor. The transactions will be returned, unpaid. From a banking perspective, the operation is assimilated to a reject.
Return
The return of a SEPA payment is an operation that the debtor’s bank cannot process for technical or banking reasons (insufficient funds, frozen account, opposition).The debtor’s bank must return the SEPA payment at least 5 working days after payment.
Reversal
The reversal is an operation initiated by the creditor to cancel a transaction that should not have happened but was issued to the banking platform. The reversal is also issued by the creditor’s bank when it detects an error (file duplication for example).
Refund
The refund is initiated by the debtor from his bank after the settlement date. Two cases are possible:
-
Dispute by the debtor without having to justify the claim which may be exercised within a period of 8 weeks.
-
Contestation du débiteur pour «opération non autorisée». La banque du débiteur doit rechercher la preuve de l’autorisation de prélever, c’est-à-dire le mandat signé, après un délai maximum de 13 mois après la date de règlement.
-
Dispute by the debtor for "unauthorized operation". The bank of the debtor should look for the signed mandate, this claim may be exercised within a maximum period of 13 months after the settlement date.
Life Cycle of an R-Transaction
The following diagram summarizes the main steps of an R-Transaction inside SPS:
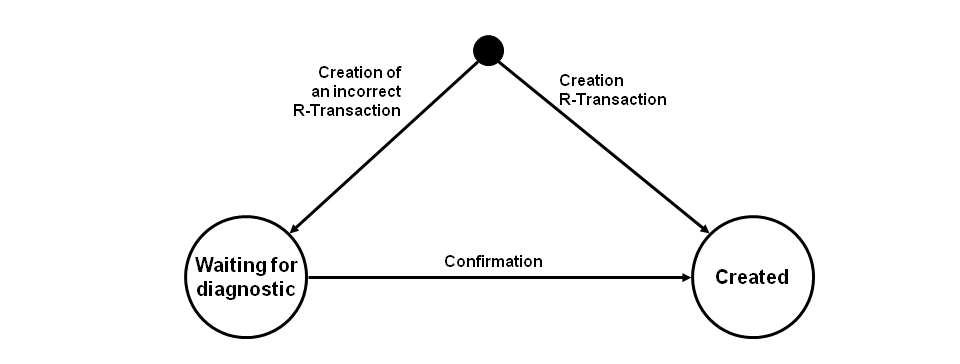
An R-Transaction is considered as inconsistent when the rejection code does not match an R-Transaction-compliant code.
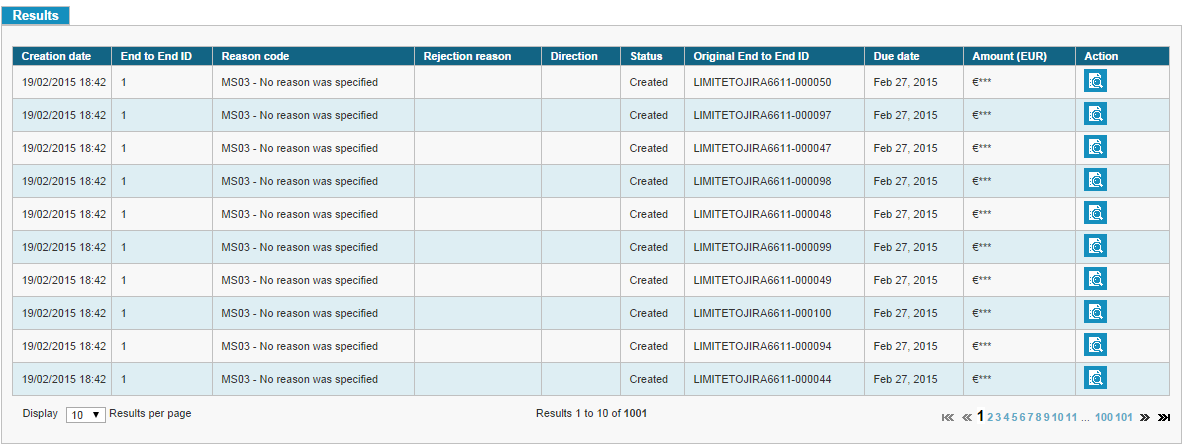
Searching for an R-Transaction
In order to search for an R-Transaction, go to the “Search for an R-Transaction”: Home > Creditor > Transactions Management: R-Transaction search.
The first block titled “Creditor filter” allows the user to select the creditor entity and the corresponding SCI account (see Choosing a Creditor Entity, an SCI and a Business Code).
Another block, “Search Criteria”, gives more control over the search function to filter the R-Transactions.
In this block, we can search for R-Transactions using the reject reason. These reject reasons are defined by SEPA and can be recognized by their label or their ISO code. (See Appendix 6 - List of reject reason codes in SPS)
The “LIKE” search of the End to End ID field works like the one for transactions.
If the user clicks on the [Search] button while keeping the default search criteria, then all available R-Transactions visible by the user will be displayed in a table the bottom of the screen.
The Creation date must be in format dd/mm/yyyy. If user provides the wrong input for the creation date then error “The date format is invalid (dd/mm/yyyy)” Is displayed.\ This is also applicable for Due date field.
If the user inputs any criterion and launches a new search, the results table is updated and the aforementioned criteria are displayed in the second block.
To hide the “Search criteria” block, click the “Search criteria” label on the top left (see Hiding the Search Criteria).
Results are displayed in a table. An “Action” column allows the following features:
-
The [See R-Transaction details] links to the detailed view of the selected R-Transaction;
-
The [Link this R-Transaction] button is only available if the current R-Transaction does not have an associated SDD and allows the user to assign an SDD to it. See below for more information on the topic.
Result block contains a column “Amount” which displays the amount associated with that R-Transaction. The amount is shown in unmasked format if the user is associated with “View Transaction Amount” profile; else the amount is shown in masked format.
The creditor can extract the results by clicking the [EXPORT TO CSV] button.
The maximum number of R-Transactions exported in the file is limited to 100001.
But if the number of R-transactions to export is more than 100001, then an error message is displayed.
If the user clicks on the [EXPORT TO CSV] button again while previous export is still in process then error message is displayed.
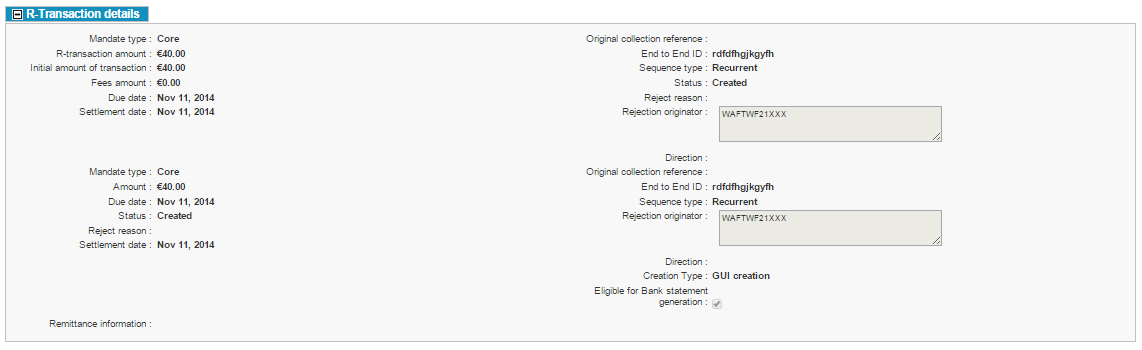
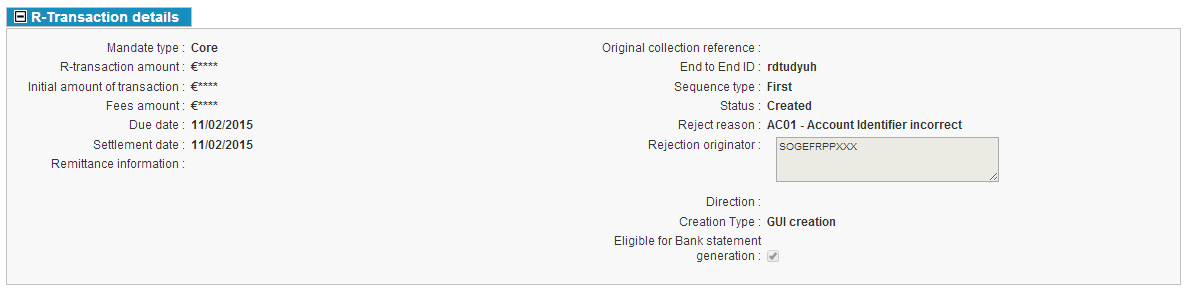
Viewing the Details of an R-Transaction
The details of an R-Transaction match the information received by the files sent by the bank.
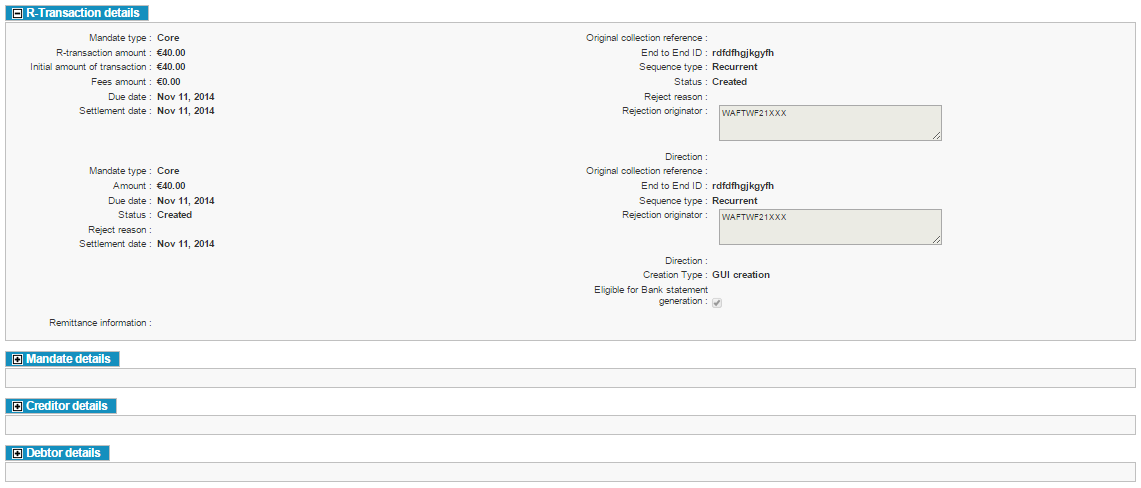
These details are displayed within 4 different blocks.
-
R-Transaction details:
It displays “R-Transaction amount” in unmasked format if the user is associated with “View Transaction Amount” profile else it is shown in masked format.
- Mandate details:

- Creditor details:

- Debtor details:

If the R-Transaction is linked to an SDD, a button at the top of the page allows viewing the associated SDD.

If not, the user can manually link this R-Transaction to an SDD using the [Link this R-Transaction] button.

Identifying R-Transaction origin
On the R-Transaction details page, three fields allow to distinguish between R-Transactions created using file imports and those created using the GUI or Web Services:
-
Creation type : indicate the origin of the R-Transactions creation; the possible values are:
-
GUI
-
File
-
Web Service
-
-
File Name : name of the file which created the R-Transaction.
-
Eligible for Bank statement generation : if the R-Transaction was created by status update (GUI or Web service) is to be included or not in the generated Bank Statement files.
The field “File Name” is displayed only if creation type is “File”. Note: R-Transactions created by files which were imported by Web Service are considered to be created by “File”.
The three fields are not editable.
In case of Web Service, if the R-Transaction is created by updating the transaction status, the file name field is not displayed.
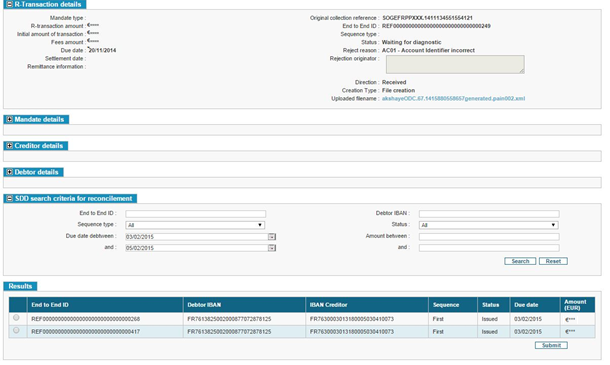
Reconciling an R-Transaction
Manually linking an R-Transaction is also possible for those that are flagged with the “Awaiting diagnosis” status: users with sufficient privileges can link a received R-Transaction with an issued SDD to update its status. When the linking is completed, the R-Transaction is no longer marked as “Awaiting diagnosis”.
Go to [Link this R-Trans] from the R-Transaction search page or the [Link this R-Transaction] from the detailed view of an R-Transaction.
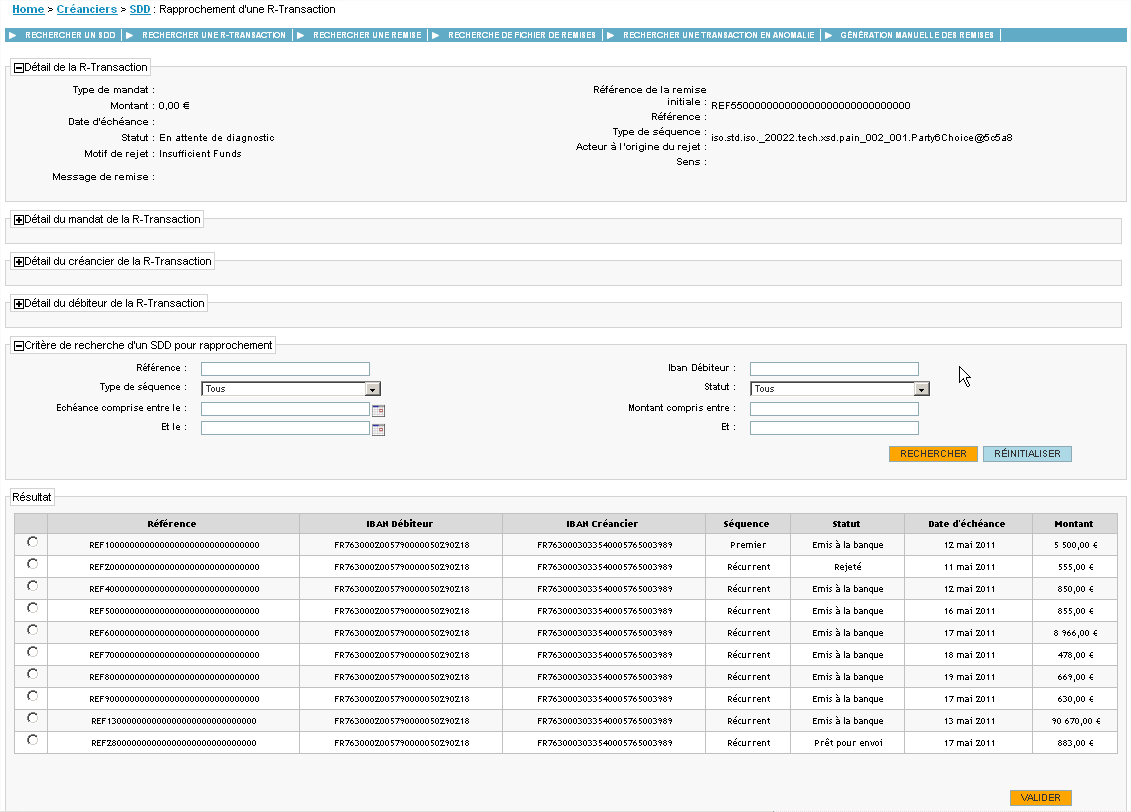
The page is split into two parts:
-
The first part shows the R-Transaction details;
-
The second part allows searching and selecting an SDD to associate the R-Transaction to.
The first 4 blocks offer a detailed view of the R-Transaction. Those blocks are identical to the ones available on the R-Transaction lookup page explained in the previous section.
The last 2 blocks allow inputting search criteria for an SDD, displaying the results and selecting an SDD to associate to the R-Transaction. The “Search Criteria” block is identical to the one seen on the R-Transaction search page, although it includes radio buttons on the left of every SDD and a [Validate] button to select an SDD.
The Results block contains “Amount” column. It displays the amount in unmasked format only if the user is associated with “View Transaction Amount” profile is activated; else the amount is shown in masked format.