The “Organizations Management” gives an overview of the organizational structure of the creditor. The structure defined on SPS should reflect as closely as possible the hierarchical structure of the company. A creditor is pictured in SPS as an “entity”.
A node of the creditor organizational structure is defined by a name, a set of SCIs, a set of Business Codes and bank accounts (BIC and IBAN). SCIs are inherited from the top of the structure to the bottom, although restrictions can be set up to each level of the organization. Furthermore, it is possible to set, for each node, the bank accounts that a creditor (identified by a SCI and optionally a Business Code) can use.
A creditor structure has to be linked to a node of the reseller structure (see Resellers Management).
Creating, editing and removing a creditor are all available actions. However, removing an entity is only possible if the node does not have any child nodes nor is linked to any object (a mandate or an SPS user).
The module is accessible from the [Organizations Management] menu.
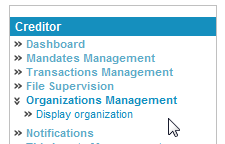
Managing a Creditor Entity
The page is available on Home > Creditor > Organizations Management: Display Organization.
Details of a Creditor Entity
At first, no information is displayed when the user reaches the Organization Management module.
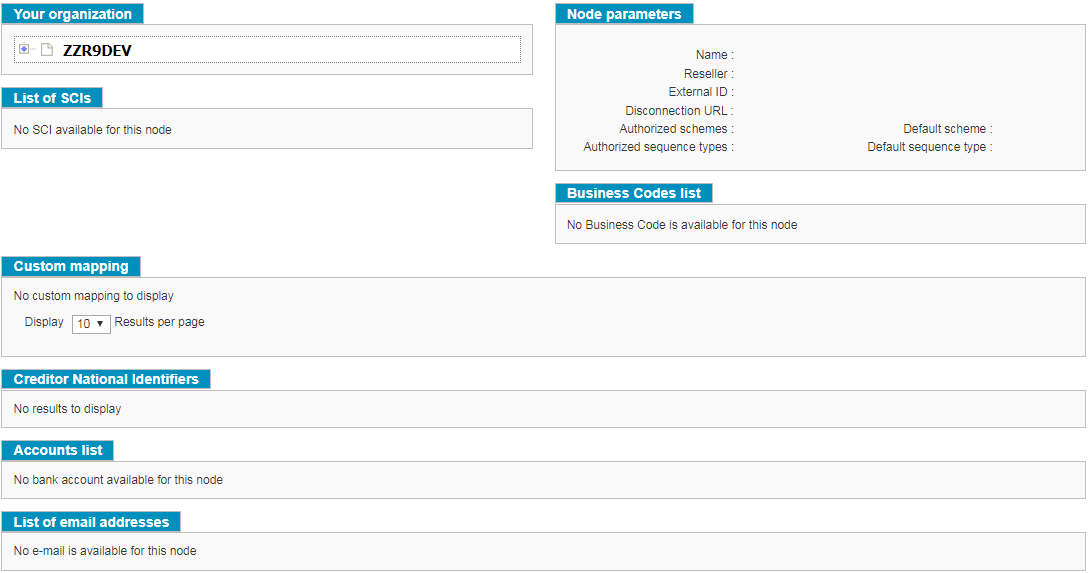
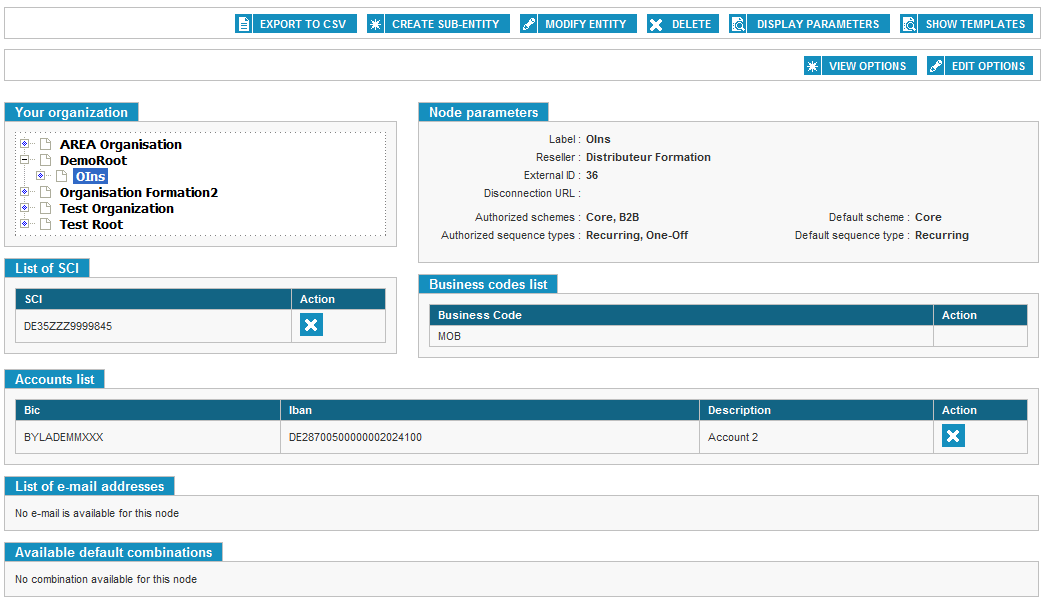
When the user clicks on a creditor entity, node details are displayed.

Viewing General Information
This information can be edited on each hierarchical level.
Viewable information is:
-
Label: the name of the creditor entity;
-
Reseller: the name of the reseller that sold the SPS service to the creditor;
-
External ID: this ID is used to name files that are sent by the reseller (see Appendix 3 - Filenames Conventions);
-
Authorized schemes: the mandate schemes processed by SPS (Core, B2B);
-
Default scheme: if a new mandate processed by SPS does not have an attributed scheme, the default scheme will be used;
-
Authorized sequence types: the type of sequence processed by SPS;
-
Default sequence: if a new mandate processed by SPS does not have an attributed sequence, the default sequence will be used.
-
Disconnection URL: the page which to redirect the user's browser after logging out.
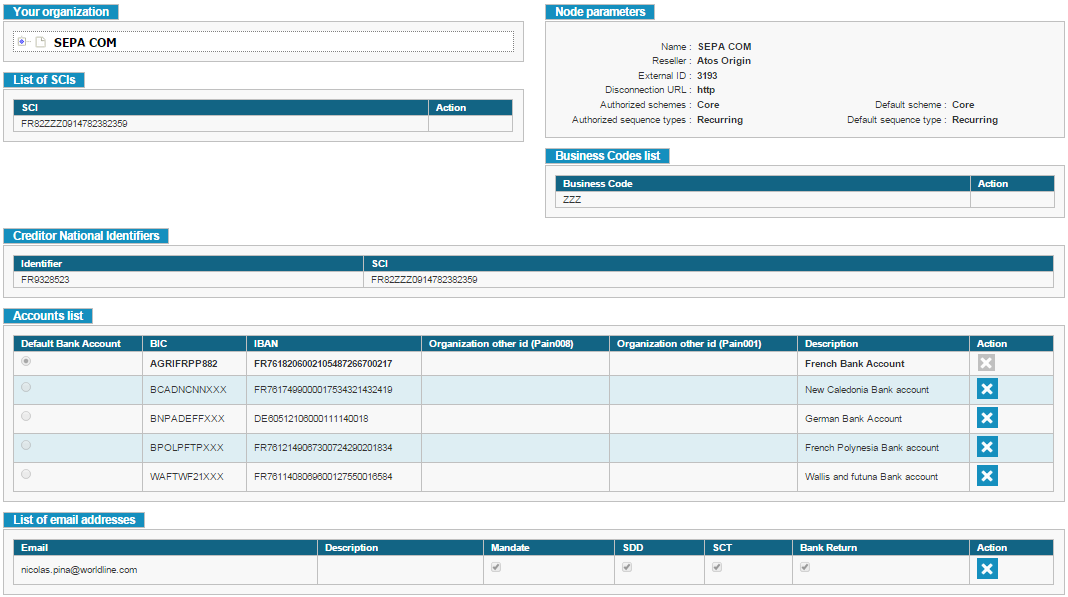
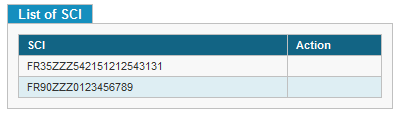
Viewing Attached SCIs
A node of the creditor entity is defined by a set of SCIs. The user can view the list of SCIs he can use. The initial SCI list of a creditor entity is managed by the creditor’s reseller. Only the reseller can edit this list.
Viewing Business Codes
The user can view the list of Business Codes used by the creditor entity.
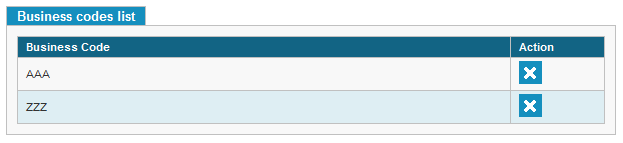
The creditor manages the list of Business Codes. If the user is linked to the root of a creditor organization, he can add or delete the list of
Business Codes that the organization (its root and nodes) will use.
Viewing Bank Accounts
The user can view the list of bank accounts linked to the creditor organization.

For each bank account, the creditor organization must supply an account label as well so that users that do not have the rights to view the BIC/IBAN details can still manage the accounts from their descriptions.
Bank accounts are set up at the root of a creditor organization. Sub-entities can only use one or several of these accounts.
The default bank account cannot be deleting from this table, the delete button is disabled.
Viewing Email Addresses
The user can view the email addresses and their alerts subscription set up for the creditor organization.
Email addresses are used to send creditors:
-
Alerts;
-
Mandates orders.
Viewing Available Default Combinations
The user can view the creditor organization’s default bank accounts combinations.

Combinations are set up for each node of the creditor organization.
The creditor organization can define, for every time a mandate’s bank account is not specified, the account that must be used. To do so, the organization states, depending on the mandate’s SCI or Business Code, the bank account to be attributed.
As an example, on the above screen capture: if a mandate does not have any associated bank accounts but provided the SCI is FR67ZZZ524835 and the Business Code is ZZZ, then the CRLYFRPPXXX - FR7030002005500000157845Z02 bank account will be linked to the incomplete mandate.
The user can also set up a generic account that will be used for a specific SCI, regardless of the Business Code.
Viewing the Hierarchy of an Organization
The user can view the details of his organization, its options and its child nodes. To do so, he must browse to Home > Creditor > Organizations Management: Display Organization.
To view the hierarchy, click the 
A tree view of the organization will appear to allow the user to browse the entire hierarchy.
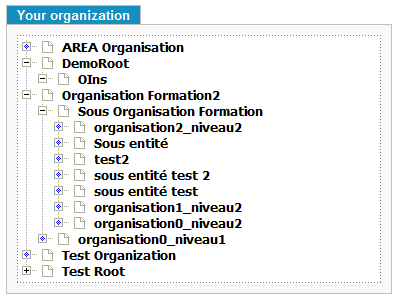
When a node is clicked on, its details appear on the page. If the node has child nodes, the user can in a similar fashion view their details.
Creating a Root Creditor Organization (Available Only to Resellers)
Creation of a Root Creditor Organization Workflow
Only a reseller user (i.e. a user linked to a reseller entity with the sufficient rights) can create a root creditor organization. When that organization is created, the entity the user is linked to is considered as the reseller of the organization.
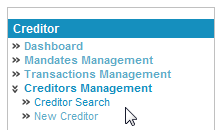
Creating a Creditor
Only a reseller user can create a root creditor organization. To do so, the user must create a creditor from the page: Home > Creditor > Creditors Management: New Creditor.

While creating a creditor, the user has to input a name and an SCI. Clicking [Create] will generate the creditor.
For the same root creditor organization, it is possible to create more than one creditor if the organization uses several SCIs.
Creating a Root Organization
Once the creditor has been created, the user must reach the page Home > Creditor > Organizations Management > Create Root.
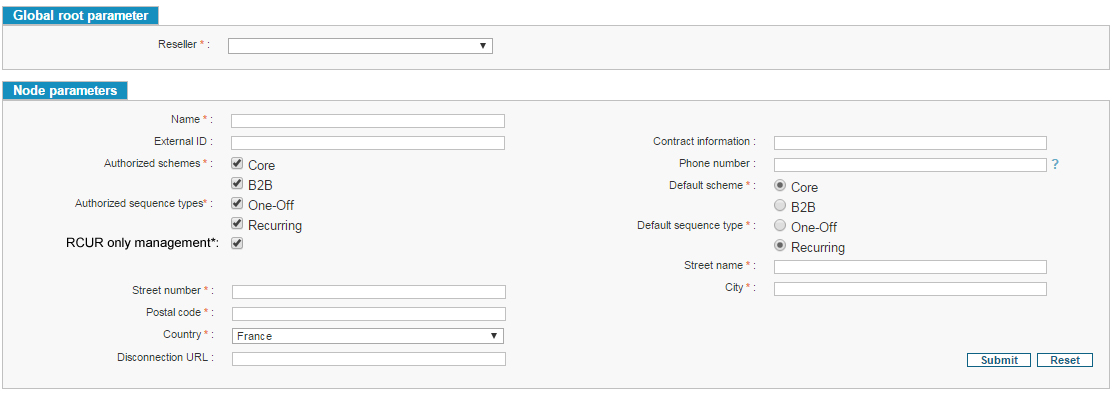
The creation page is divided into two blocks.
-
The “Global Root Parameters” block requires the name of the reseller that sold the service to the creditor organization. If the reseller has child nodes, the user will have to choose the reseller or one of the child nodes. The user can also input a comment regarding the contract between the creditor organization and the reseller.
-
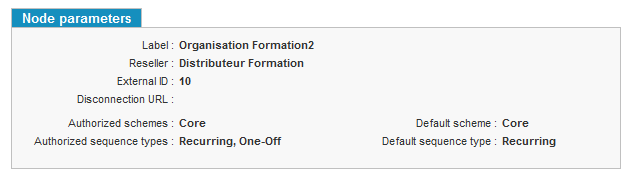
The “Node parameters” block displays the root parameters. Available fields are:
-
The label of the creditor organization that will be used to name the organization in SPS;
-
The phone number on which notifications will be sent to the creditor;
-
The list of authorized schemes;
-
The default scheme used if no scheme was set up;
-
The list of authorized payment sequences;
- With the option to activate of the RCUR management(*)
-
The default payment sequence if none was set up;
-
The address of the root creditor organization that can differ from the creditors’ addresses.
-
To confirm the creation, the user hits [Validate].
* All SDD of recurrent mandates will have RCUR as sequence type; FRST will not be used anymore, after this activation. Once this option activated, it cannot be deactivated on the page modification.
When the “RCUR_ONLY” option is activated, if there are already existing transactions with FIRST or FINAL sequence type then those need to be migrated to RECURRENT sequence type.
But this migration is applicable only for those transaction which are not in one of the following status
-
Generated
-
Issued
-
Acknowledged by bank
-
Rejected
-
Returned
-
Settled
-
Refund
-
Over refund
-
Partially refund
Assigning Data to a Root Creditor Organization by a Reseller User
After hitting [Validate], the user is sent to the “Edit Root” page, on Home > Creditor > Organizations Management.
On this page, the supplier defines the data that the creditor organization will be able to manage:
-
The SCI (or SCIs) managed by the organization (only a supplier user can add or remove SCIs to or from an organization, and the organization cannot use an SCI that was no set up by the supplier);
-
The bank accounts of the organization (self-managed by the creditor);
-
The organization’s Business Codes (self-managed by the creditor);
-
The organization’s email addresses (self-managed by the creditor).
Modification of a Creditor Organization’s Options by a Reseller User
An option is a service or a set of services performed by SPS.
On the page Home > Creditor > Organizations Management: Display Organization, the user can click on the organization he wishes to configure.
By clicking [Edit Options], the user can modify the organization’s options.

Resellers can subscribe at any moment to one or several options provided by SPS. They can also manage their sub-resellers’ own options or their clients’. Consequently, it is not possible for a sub-reseller or a client to add or remove options without the reseller interaction.
When an option is activated for a company, all associated services become available for the users of this company.
Similarly, when an option is not activated, all associated services become unavailable, are invisible on the GUI and their processes are not executed.
If the company has set up an organizational structure in SPS to display its internal organization, the activated option becomes available for all entities of the structure. The creditor organization can choose not to apply the option to all of its child entities. A child entity has only access to the options viewable by its parent entity.
Please see Appendix 4 - Options List for more information on the available options.
Setting up an Organization
After selecting a root organization from Home > Creditor > Organizations Management: Display Organization, the user must click on [Modify Entity]. From the page, the user can edit the creditor organization’s data (see Details of a Creditor Entity):
The user is redirected to his organization’s edition page. On this page, the user can edit the following data:
- The organization’s node parameters: the organization’s general information;
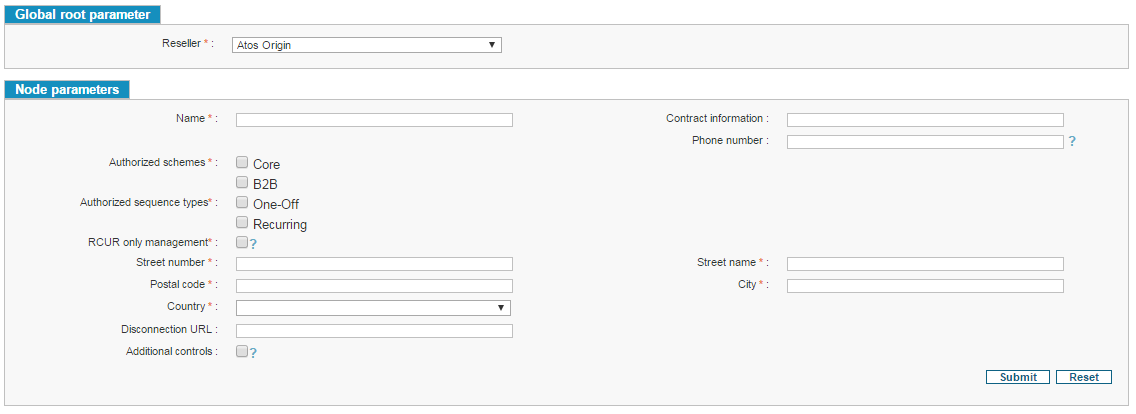
-
For “RCUR only management” option a validation pop-up is displayed to confirm if the user wants to activate this parameter with the following validation message: Do you confirm the activation of the RCUR only option? After activation, the option cannot be deactivated.
-
The “additional controls” option will allow to control the following data:
-
Creditor Name
-
Debtor Name
-
Street Name
-
Postal Code
-
Street Number
-
City
-
Ultimate Creditor Name
-
Ultimate Debtor Name
-
UMR
-
UIR
-
Remittance Information
-
End to End Id
-
For this list of data, The EPC (European Payment Council) have published in the document EPC217-08 that senders must ensure that the
content of identifiers/reference data elements:
-
Is restricted to the restricted basic Latin character set
-
Must not start or end with a ‘/’
-
Must not contain two consecutive ‘/’s anywhere in the data element
If activated, the control will be applied on the Mandate/SDD/SCT/payment schedule creation and modification GUI pages, web services and files integration.
- The list of SCIs: at a sub node level, the user can only attribute or remove SCIs that were defined at the level of the parent organization. Adding a new SCI to an organization is done by the reseller;

-
The organization’s bank accounts: see 10.3.1Manage Bank Accounts
-
The list of Business Codes. At a root level, the creditor can create or delete Business Codes ; at a sub node level the creditor can only attribute or remove preset Business Codes;


- The organization’s email addresses.


No other information can be modified for the creditor organization whether it is at the root or on a node.
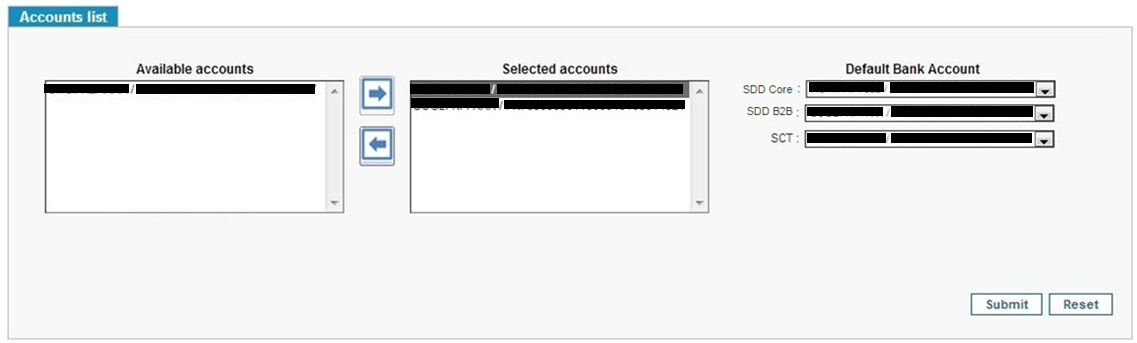
Management of Creditor Bank Accounts
On is organization’s edition page, the user can manage the list of the organization’s bank accounts; if the organization is at a root level, the user can add or remove bank accounts, at a sub node level the user can onlyh attribute or remove preset accounts.
The Organization should have a provision to select a default bank (one per scheme authorized on the organization) account from the list of bank
accounts associated with it.
If the user tries to delete a bank account that is at the time of the deletion a default bank account of the organization, the user must be asked to select a new default bank account.
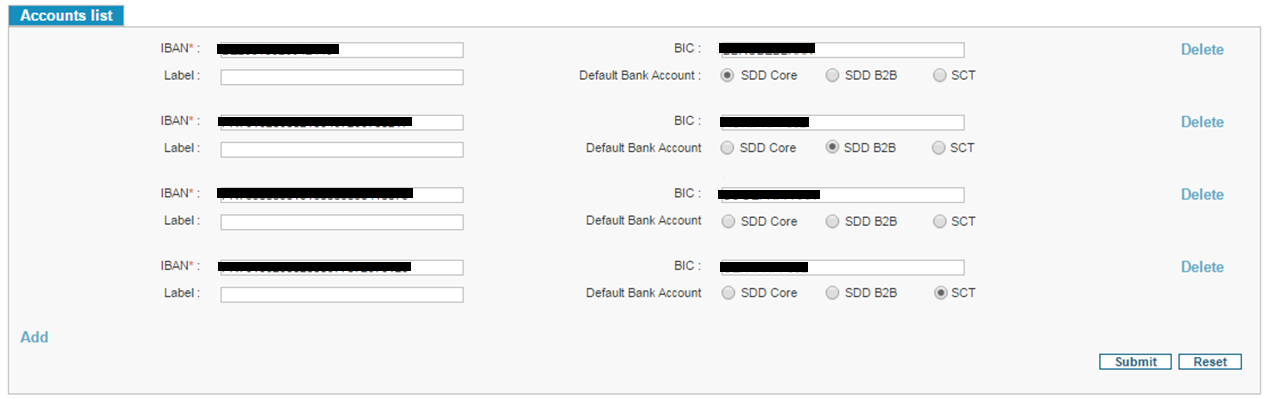
A child node’s account list is populated by selecting from a list of available accounts, which is nothing but the accounts listed under its parent organization.
A new panel “Default Bank Account” is available; it allows defining a default bank account for SDD Core, SDD B2B and SCT. The content of the two drop lists is initialized by the content of the selected accounts list, and dynamically updated according the modifications applied by the user on the selected accounts list.
By default the default bank account lists are empty (on the first configuration: the sub-entity creation).
Once the sub-entity has one or more than one account, the selection of a default bank account for each scheme possible on the entity is mandatory. If a default bank account is left empty when the user submit is account list, then an error message is display (“you must select a default bank account”).
As for root organization, one bank account can be the default one for several types.
On root level, BICs are automatically computed from the IBAN.
It is not possible to remove a bank account used by a mandate regardless the status of the mandate (it concerns also the mandate at the end of their lifecycle).
The option “Currency in collection file” allow to add the currency tag (<Ccy>) at the creditor bank account level in the collection file, this tag is set to the value “Euro”. The option is deactivated by default.
Viewing an Organization’s Parameters
From the organization view page, the user can see the creditor’s parameters by hitting [Display Parameters].
The user is redirected to the parameters view page on Home > Creditor > Organizations Management: Display Options.
The parameters are split into several blocks.
Editing an Organization’s Parameters
From the parameters display page, the user can click on [Edit Parameters] to change the parameters of the selected organization.

Creditor Parameters
For each organizational node, parameters can be set. Refer to R6.1
| Adding content |
|---|
| Viewing a Mandate’s Details |
R7
| New parts |
|---|
| Legal notice |
| Creating a SDD from SDD creation form |
R7.1
| Editing content |
|---|
| Appendix 7 - List of grouping criteria of Collections and Collection Files |
| Subscribing to the alerts |
| New parts |
|---|
R7.2
| Editing content |
|---|
| Planned Mandate modification |
| Adding content |
|---|
| Exporting to CSV |
| Exporting Results |
| Viewing transactions through the “Transaction Search” Page |
| Searching for R-Transactions |
| Exporting the Third parties to a CSV file |
R8
| Editing content |
|---|
| Refunding an SDD through an SCT |
| Adding content |
|---|
Appendix 1 - List of Creditor Parameters for a complete explanation of every parameter.

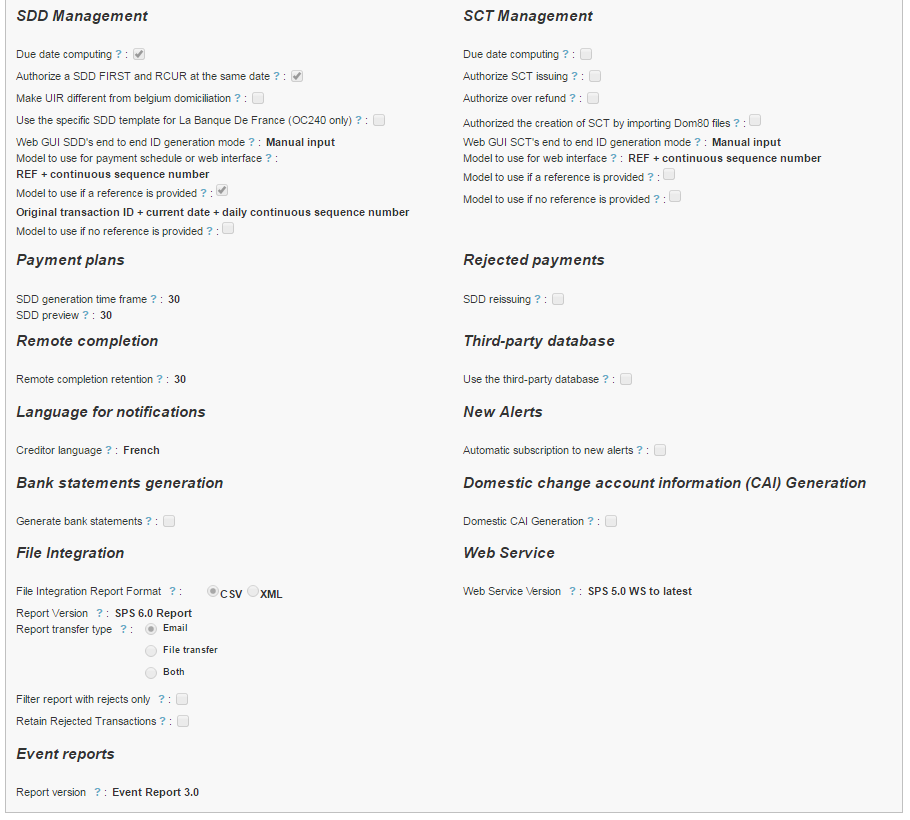
To update the options, the user must click on [Edit Parameters].
The user will then be able to tick or untick parameters. A ticked box indicates an option is active on the selected node.
Note: the check box for “Authorize a SDD FIRST and RCUR at the same date” appears only when check box for “RCUR only management” for the organization is not activated. Once the checkbox for “RCUR only management” is activated for organization, thenthe “Authorize a SDD FIRST and RCUR at the same date” disappears from SDD Management.
File Integration
File Integration Report Format: sets the file integration report format
Report Version: indicates which version of the integration report will be used
Retain Rejected Transactions: if the user wish to retain the rejected transactions in the imported domestic file. if the user hit the box, two other fields appears:
-
Apply retaining for the following domestic files (only CFONB160 and DOM80): the user must to select the File format(s) for which he
wishes to retain the rejected transactions in the initial file. -
Transactions Retaining Reasons: the user must to select the reason(s) for which he wishes to retain the rejected transactions in the initial file.
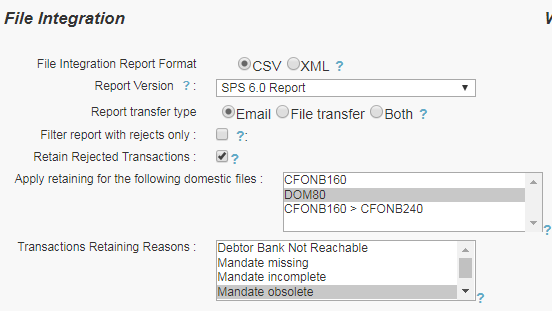
If an attempt is made to submit the page without selecting any value in the Multiple Value List, an error should be shown.

Commercial Data Management
From the parameters display page, the user can click on [Commercial Data Management] to search commercial data of the selected organization.

Setting up Commercial Data
The available actions on this page are:
-
Go back to Organization Parameter page
-
Go to a new Creditor Commercial Data creation page
-
Search Panel with several criteria
-
Result panel with existing Commercial Data depending on search criteria
-
Go to Creditor Commercial Data details display page
-
Go to Creditor Commercial Data details edition page
-
Delete Creditor Commercial Data
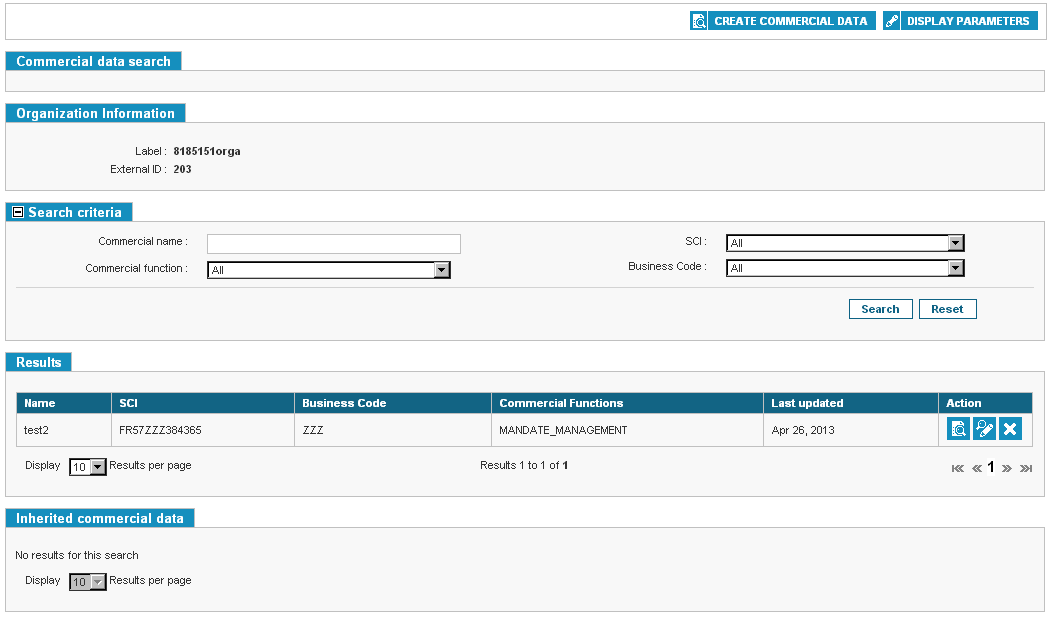
Viewing Commercial Data
From the configuration page the user can displayed the details page of a data commercial by clicking on the [COMMERCIAL DATA DISPLAY] button

On this page, the user can see details of the Commercial Data such as Creditor data, Business Code, commercial name, commercial address and commercial return address, the corresponding Commercial Functions in which to use this Commercial Data and the commercial logo.
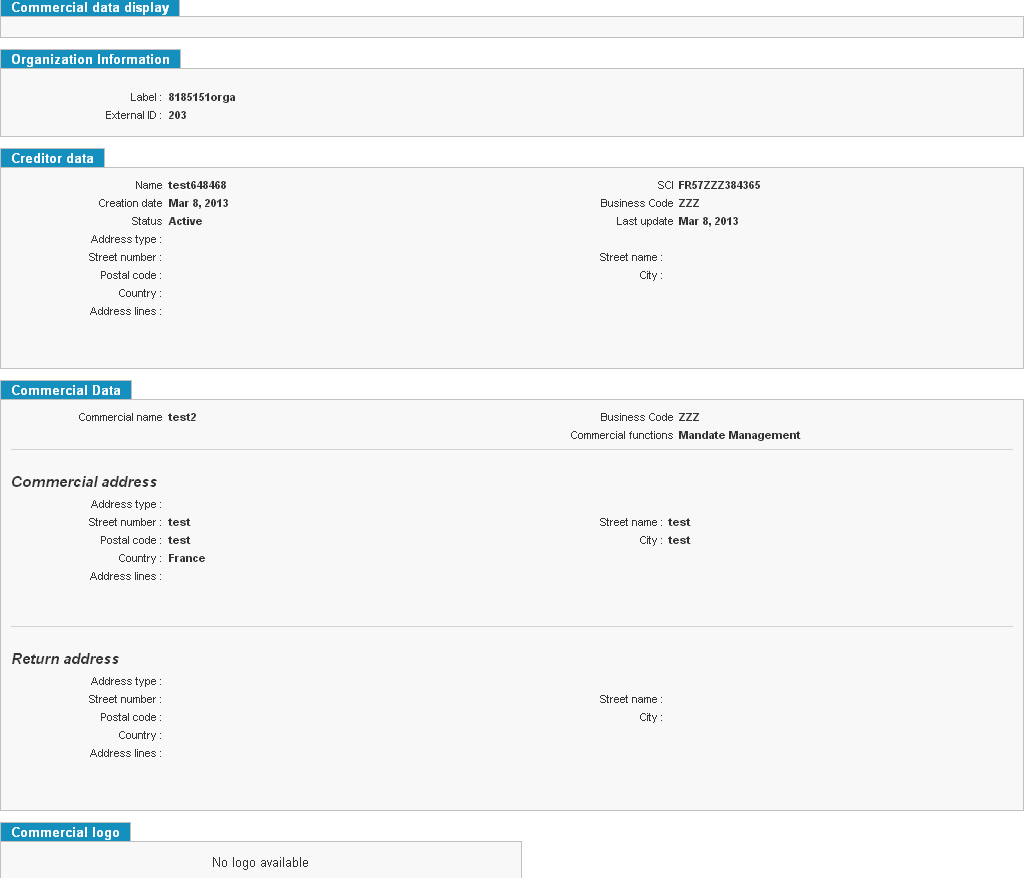
From the top buttons bar, the user can go back to Commercial Data search page, edit the current Commercial Data or delete it if he has the rights.

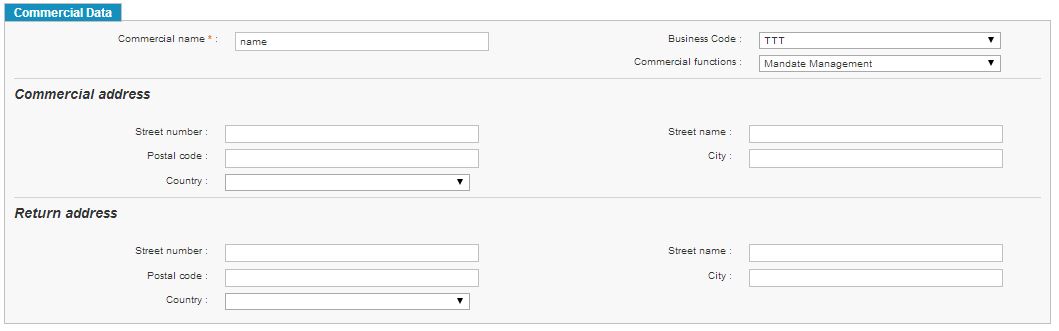
Creating Commercial Data
On this page, the user can create a new Commercial Data choosing the Creditor, the Business Code, commercial name, commercial address and commercial return address, list of Commercial Functions in which to use this Commercial Data and the commercial logo.
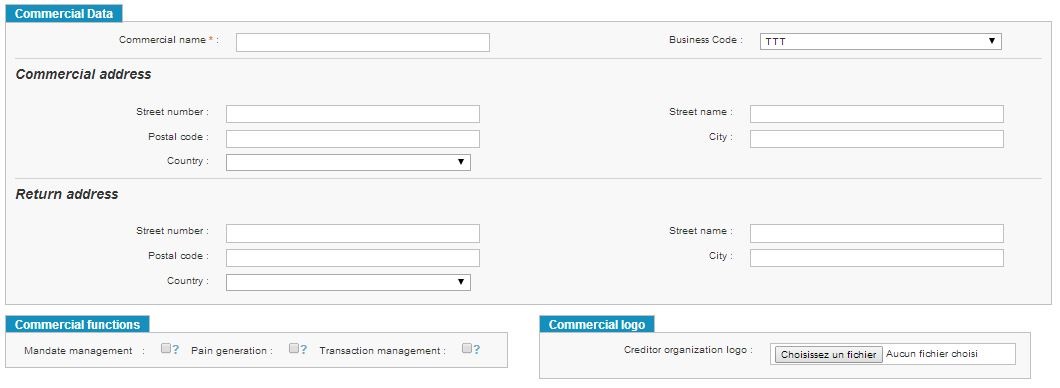
From the buttons, the user can:
-
go back to Commercial Data search page; this action will cancel the creation.
-
validate and create the Commercial Data
-
reset the page emptying fields.
If some data are not filled by user then data from creditor will be inherited.
Editing Commercial Data
On this page, the user can edit details of the Commercial Data such as the Business Code, commercial name, commercial address and commercial return address, the corresponding Commercial Functions in which to use this Commercial Data and the commercial logo.
For each commercial function a help text will describe impacts if the function is checked.
The list of commercial function is: MANDATE_MANAGEMENT, PAIN_GENERATION, TRANSACTION_MANAGEMENT.
From the top button bar, the user can go back to Commercial Data search page; this action will cancel the edition.
From the bottom button bar, the user can validate and update the Commercial Data with new values or reset the page filling it with the Commercial Data stored parameters. After submitting, the user is send to the consultation page of the new commercial data.
Deleting Commercial Data
A Commercial Data can be delete from the results block of the configuration block and from the consultation page.

Inheritance
In case of mandates, pain and transaction management functions, inheritance is active for sub-organizations. It means that if a sub-organization has no commercial data for an ICS/BusinessCode/CommercialFunction then the one of the parent organization will be used if it exists.
Inheritance is visible in the bottom of the search page and looks like this:

Controls and data - creation/edition of a Commercial Data
On creation and edition page of a Commercial Data, there are controls on mandatory fields. If not filled the user will not be able to Create/Update Commercial Data and an error message will be displayed on the page.
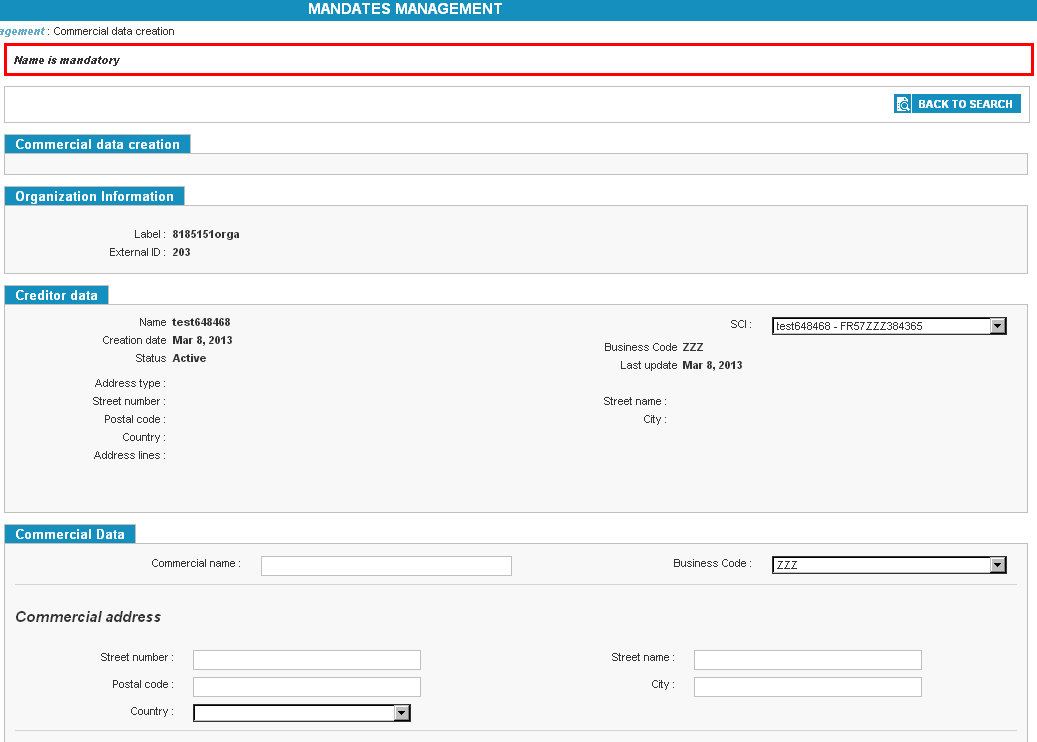
List of mandatory fields:
-
SCI, to define the Creditor
-
Business Code
-
Creditor Commercial Name
-
Commercial function
The return address is a new concept in SPS, it will be used in notifications and mandate forms. By default the return address is empty.
In case the address is empty the one of the organization will be used as default.
An address can’t be partially filled. For instance you can’t only put the city.
On creation and edition page of a Commercial Data, some parameters have restricted values.
For the Creditor, the user can choose a SCI between those defined at Organization level.
For the Business Code, the user can choose between those defined at Organization level.
For the Commercial Function, the user can choose from a list existing in the system and hardcoded.
It will be impossible to have the same Commercial Function used more than once for the same Organization/Creditor/Business Code combination. Otherwise we won’t be able to choose the proper Commercial Data to use when needed.
So, only unused Commercial Functions for the same Organization/Creditor/Business Code combination can be set.
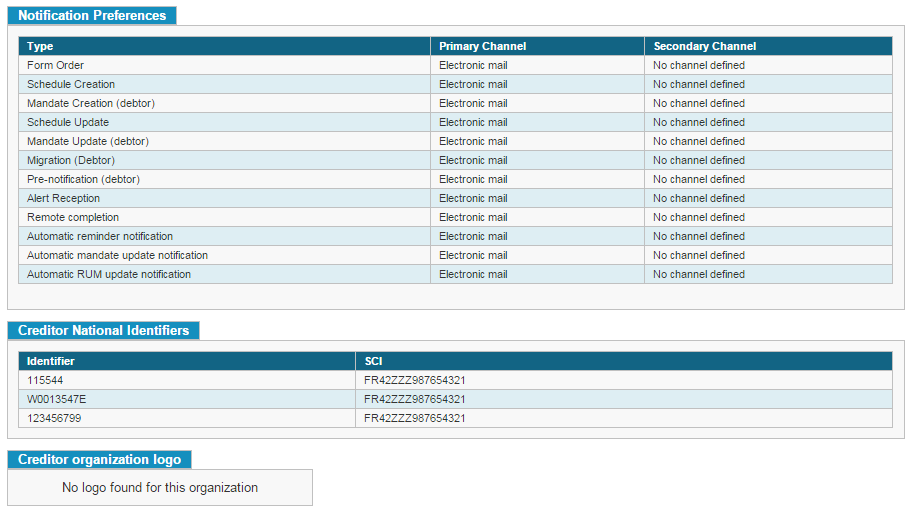
Notification Preferences
Defining Notification Channels
From the “Edit Options” page, the user can setup the preferred notification channels. Notifications can be sent either by email, mail or text message. The user selects the notification class he wants to configure and the primary and secondary channels appear.
The user selects a primary channel. The primary channel will be the channel of choice is the debtor’s information is sufficient to exploit it. As an example, if the primary communication channel is by email and provided that the debtor’s email address is known, this channel will be used.
If information is lacking to use the preferred channel, SPS will try to send a notification to the secondary channel, given that SPS has sufficient information on the debtor. If this is not the case, the notification will not be created.
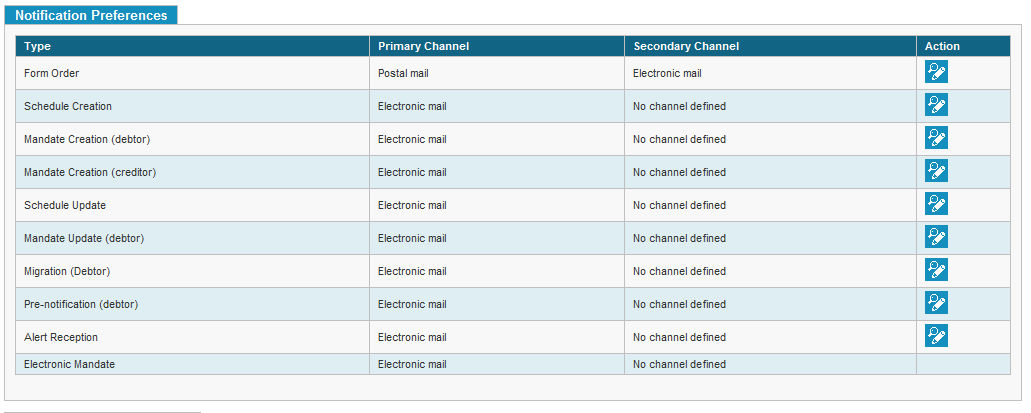
There are 8 notification classes the creditor can configure. Depending on the class of the notification, some channels cannot be chosen:
-
The “form order” is the dispatch to the creditor of an order of several mandates;
-
The “schedule creation” is the notification sent to the debtor containing his payment schedule. For each schedule creation notification the user must choose either the beginning and the end period or a periodicity.
-
The “mandate creation (debtor)” is the dispatch to the debtor of a mandate that the creditor has created. The debtor must complete it and send it back to the creditor;
-
The “schedule update” is the notification sent to the debtor containing his payment schedule. For each schedule update the user must choose either the beginning and the end period or a periodicity;
-
The “mandate update (debtor)” is a mandate update notification sent to the debtor;
-
The “migration (debtor)” is a message sent to the debtor after his mandate was migrated to the SEPA Direct Debit format;
-
The “pre-notification” is a notification that wars the debtor that a direct debit is about to occur;
-
The “alert reception” warns the creditor that an alert was received.
Modifying the Notification Messages
A user can edit the notification messages sent to the debtors. These models can use variables that will be updated according to the value attributed to the debtor. If the user has access to a node and its child nodes, he must select the node to modify.
To configure the notification models, the user must reach Home > Creditor > Organizations Management, select an organization and hit [Show templates].
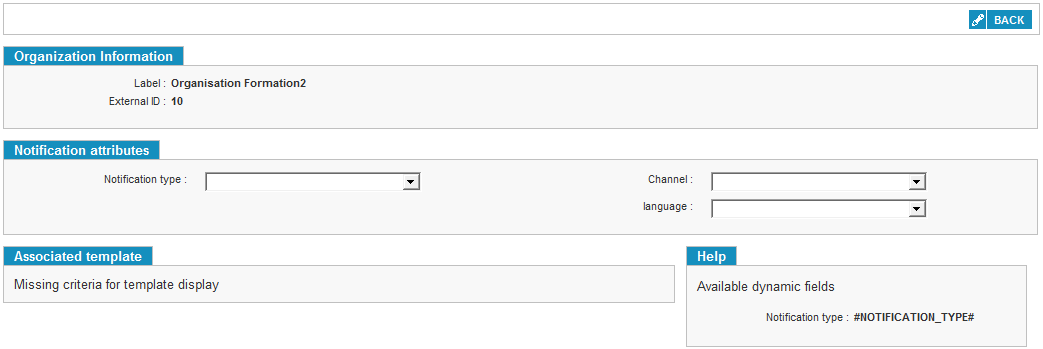
On the notification templates management page, the user selects the notification class he wishes to configure as well as the associated channel. The notification message, if it exists, is then displayed in the “Associated template” block.

Depending on the notification class, some channels are unavailable.
| Notification Class | SMS | Electronic Mail | |
|---|---|---|---|
| Form Order | X | X | |
| Schedule Creation | X | X | |
| Mandate Creation (debtor) | X | X | |
| Schedule Update | X | X | |
| Mandate Update (debtor) | X | X | |
| Migration (debtor) | X | X | X |
| Pre-notification (debtor) | X | X | X |
| Alert Reception | X |
The user can now set up the notification model. By default, a model is proposed by the application.
If the selected channel is the electronic mail, the user must configure:
-
The sender’s email address;
-
The message subject;
-
The body of the message.
If the selected channel is standard mail, the user will set up:
-
The message subject;
-
The message body.
If the selected channel is by text message, the user must remember that a SMS cannot exceed 160 characters.
On the right of the message template edit box is located the list of dynamic fields the user can use. Depending on the notification class, some fields might not be available. These fields will be replaced in the notification by the associated value when the message is sent. To use these fields, the user must input them within two hash symbols (#).
As an example, if the user chooses to use the creditor’s SCI dynamic field in the sentence “Your creditor SCI is: “, he must input #CREDITOR_SCI#. On the template management page, the sentence will appear as “Your creditor SCI is: #CREDITOR_SCI#”. For a creditor identified by the FR72ZZZ123456 SCI, the message received will read “Your creditor SCI is: FR72ZZZ123456”.
The creditor can setup message in different languages. The language to be used in the notification will be selected as follows:
-
Either a language is declared on the mandate, and it will be used for the notification;
-
Or SEPA Payment Suite will use the default language chosen for debtor notification.
Matching an SCI with a National Identifier
To integrate some domestic files, the national identifier used before a migration to the SEPA format must be linked to the creditor’s SCI.
The user must browse to Home > Creditor > Organizations Management, select a creditor organization, hit [Display
Parameters] and then [Edit Parameters].

The user then selects an SCI and inputs the associated national identifier.
Managing SDD Collection Options
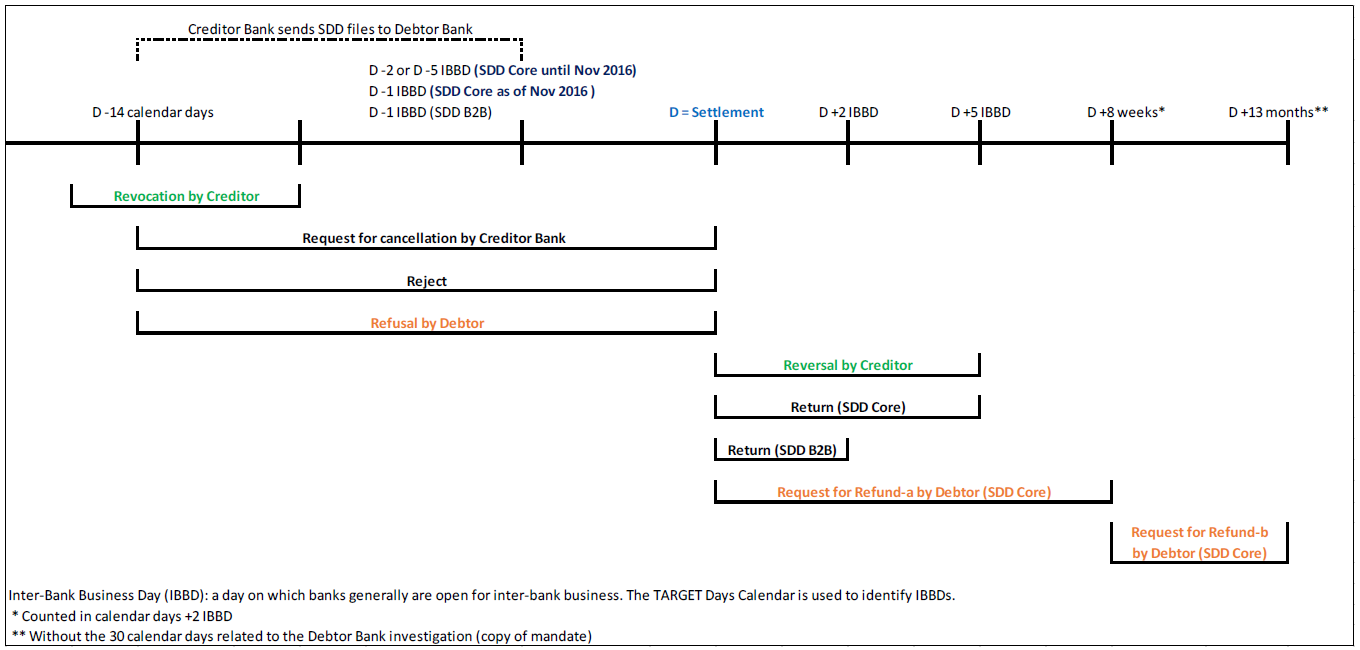
Reminder: Collection Options
Strict issuance dates are often set either by law or by the banks, and affect the creditor that must comply with these constraints while sending the collection files to their banks. Because the time windows vary depending on the banks, these parameters will allow the creditors to set the correct collection options.
Managing SDD Collection Options
To view collection options, the user must go to the node of a creditor organization by browsing to Home > Creditor > Organizations Management, then clicking [Display Parameters] and [Show Collection Options].

The “Collections files Options” page appears.
Collection options can be edited by selecting a creditor entity and a bank account. Therefore, for the same creditor organization, there can be as many collection options combinations as there are bank accounts.
Cut-Off Time Limit Configuration

The user selects a bank account among the list of all available account and the “Emission constraints of the selected account” block appears at the bottom. If the organization has only one bank account, it is automatically selected.
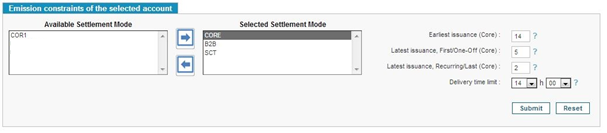
The block contains is constituted by three parts:
-
The list of the available settlement mode: this list contains all the settlement modes available for the account (activated before in the options of the organization) if at least one is selected in the options page of the organization, otherwise the list is empty and the arrows buttons are disabled.
-
The list of the selected settlement mode for the selected account: this list contains all the settlement modes activated for the selected account. the settlement modes can be moved from one list to another by selecting a settlement mode, and clicking on arrows, except for the settlement modes CORE, B2B and SCT.
-
The cut off parameters of the selected settlement mode in the list “Selected Settlement Mode”: The lists of the cut off parameters are dynamically displayed according the selected settlement mode in the “Selected Settlement Mode” list. When the user modifies a cut off time parameter, he must have to click on [submit] to save his modification before selecting another settlement mode (and displayed the cut off time parameters of the new selected settlement mode).
Several parameters can then be set.
| Parameter | Description |
|---|---|
| Earliest issuance (Core, Cor1, Bank specific settlement mode) | Number of civil days before the issuance date from which the SDDs will be integrated into collections and sent to the bank. Banks usually do not accept to process files that were sent too early. The creditor can also set the parameter in a way that will avoid modifying collections that were already sent and will allow taking into account mandates updates. This means the creditor should not send the collection files too early. The EPC states the earliest issuance should be set to 14 (Core) |
| Latest issuance, first/one-off (Core, Cor1, Bank specific settlement mode) | Minimum number of IBBD days before the due date that the creditor bank requires to process the streams and forward them to the recipient’s bank. If the period is expired, the creditor’s bank will refuse to process the files or will delay their processing. The EPC sets a 1 civil day time frame, but your bank might require a longer one (Core). |
| Latest issuance, recurring/last (Core, Cor1, Bank specific settlement mode) | Minimum number of IBBD days before the due date required by the creditor’s bank to process the streams and forward them to the recipient’s bank. Should the time frame expire, the creditor’s bank might refuse to process them or may delay their processing. |
| Earliest issuance (B2B) | Number of civil days before the due date from which the transactions will be aggregated into collections sent to the bank. Banks might refuse to process collections that were sent too early. The creditor can also set the parameter in a way that allows him to avoid sending the collections too early in time, so that he will not have to edit already-sent collections and will be able to update mandates faster. |
| Latest issuance, first/one-off (B2B) | Number of IBBD days before the due date from which the creditor must send the First/One-Off B2B transactions to the bank. The EPC states the parameter should be set to 1. |
| Latest issuance, recurring/last (B2B) | Number of IBBD days before the due date required by the creditor’s bank to process the streams and forward them to the recipient’s bank. Should the delay expire, the creditor’s bank might refuse to process the transactions or may delay their processing. The EPC says the number of days must be at least 1 civil day, but your bank might require a longer time frame. |
| Delivery time limit | Last hour after which the bank will not be able to process today’s transactions. After the set hour is passed, SPS will process the transactions occurring for the rest of the day as if they occurred the day after. |
The default options are set according to the EPC recommendations.
The user can change them if an agreement was signed between the creditor organization and its bank.
Once the parameters have been set accordingly, hitting [Validate] will save the changes.
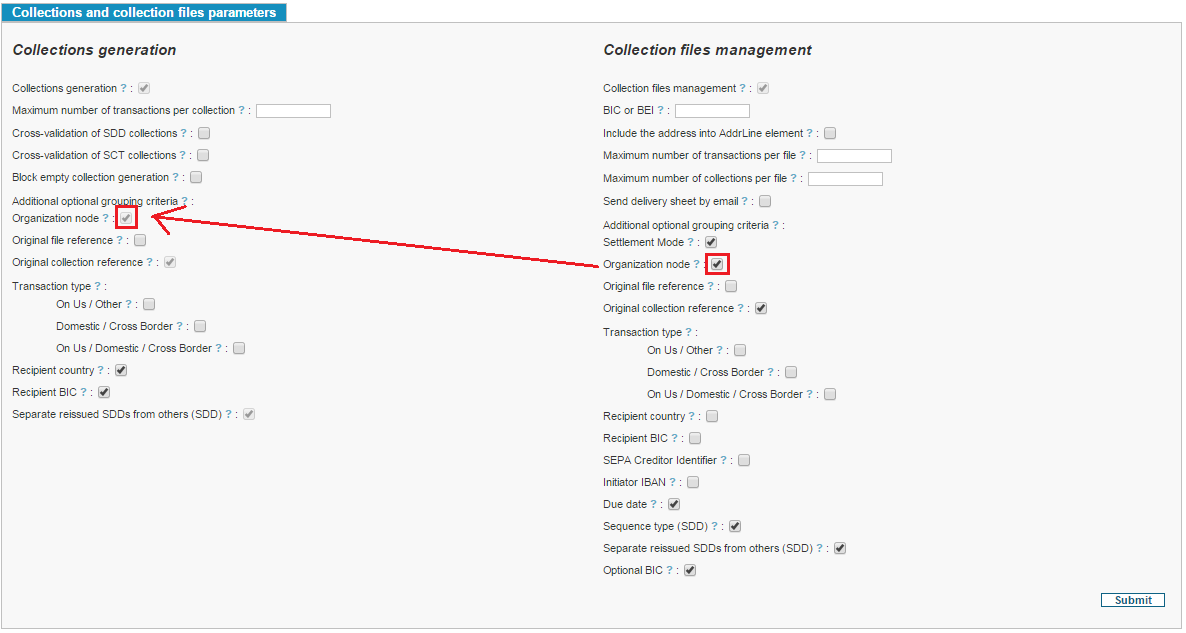
Setting up Collections and Collection Files Parameters
On the same page (Home > Creditor > Organizations Management: Collections files Options), the user can set the options for the files generated by SPS (ISO 20022 compliant PAIN files). For more information, please see Appendix 2 - Generation Collections and Collection Files (ISO 20022Files).
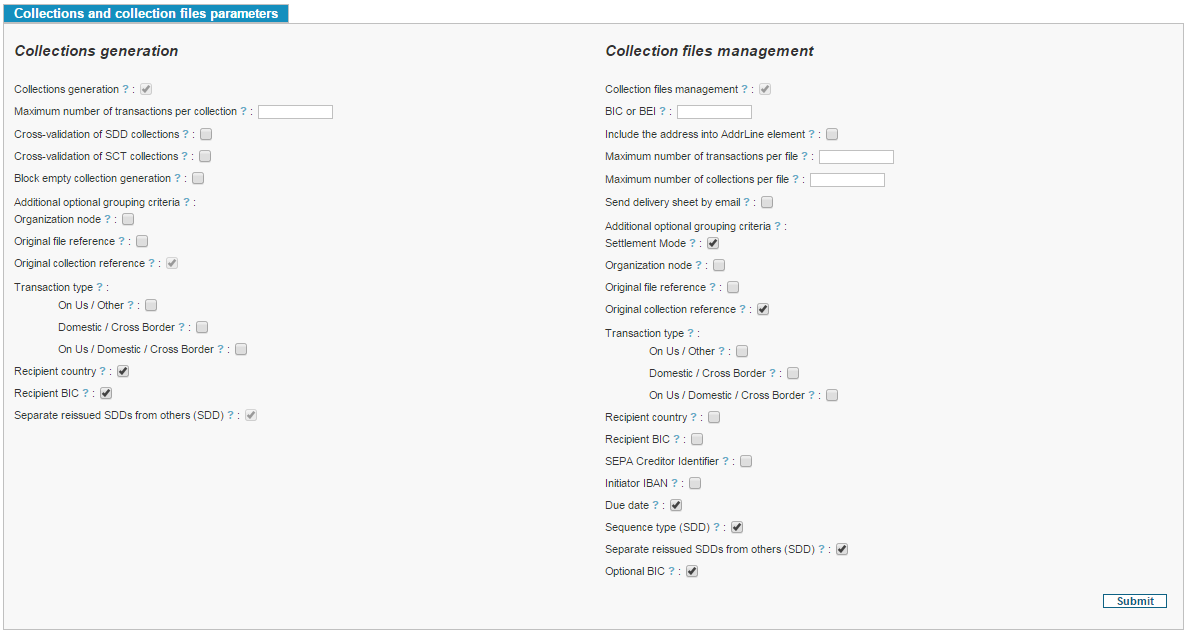
The optional criteria are described in Appendix 7 - List of grouping criteria of Collections and Collection files.
An option selected at the file level must necessarily be report in the collection level.
The reported criteria must become disabled and checked. This report is necessary for all the criteria which are optional for both files and collections.
Transaction type option
The transactions can be grouped into different collections depending on their type, three criteria are available:
-
On Us
-
Domestic / International
-
On Us / Domestic / International
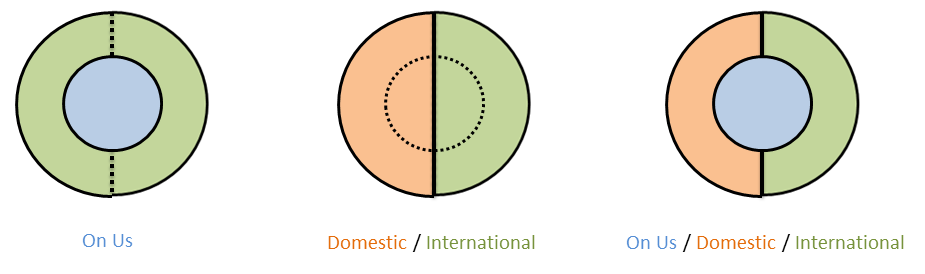
-
On Us: Initiator BIC and Recipient BIC are in the same “On Us” group (in the beginning no group will be constituted, each BIC will be its “own” group. Groups will be constituted progressively, on a central basis (i.e. managed by SPS support team, and the groups will be the same for all SPS instances and all creditors). 1 BIC may belong to more than 1 group.
-
Domestic: Initiator IBAN Country = Recipient IBAN Country.
-
International: if two other conditions are not met.
Association of a Pain format to a BIC
The block “Collection File Format Selection” allows selecting for each BIC of the organization the output format of SDD collections files. Three Pain001 and three Pain008 formats are available.
| Available PAIN File Formats | |
|---|---|
| PAIN.008 Formats | PAIN.001 Format |
| pain.008.001.02 | pain.001.001.03 |
| pain.008.002.02 | pain.001.002.03 |
| pain.008.003.02 | pain.001.003.03 |
| pain.008.001.02 specific INTESA (if activated on the organization option) |
The default formats are Pain.008.001.02 for SDD collections files and Pain.001.001.03 for SCT collections files.
To applied his choice, the user must to click on [submit].

The Pain.008 Format column appears only for the users having the right to manage SDDs, and the Pain.001 Format column only for the users having the right to manage SCTs.
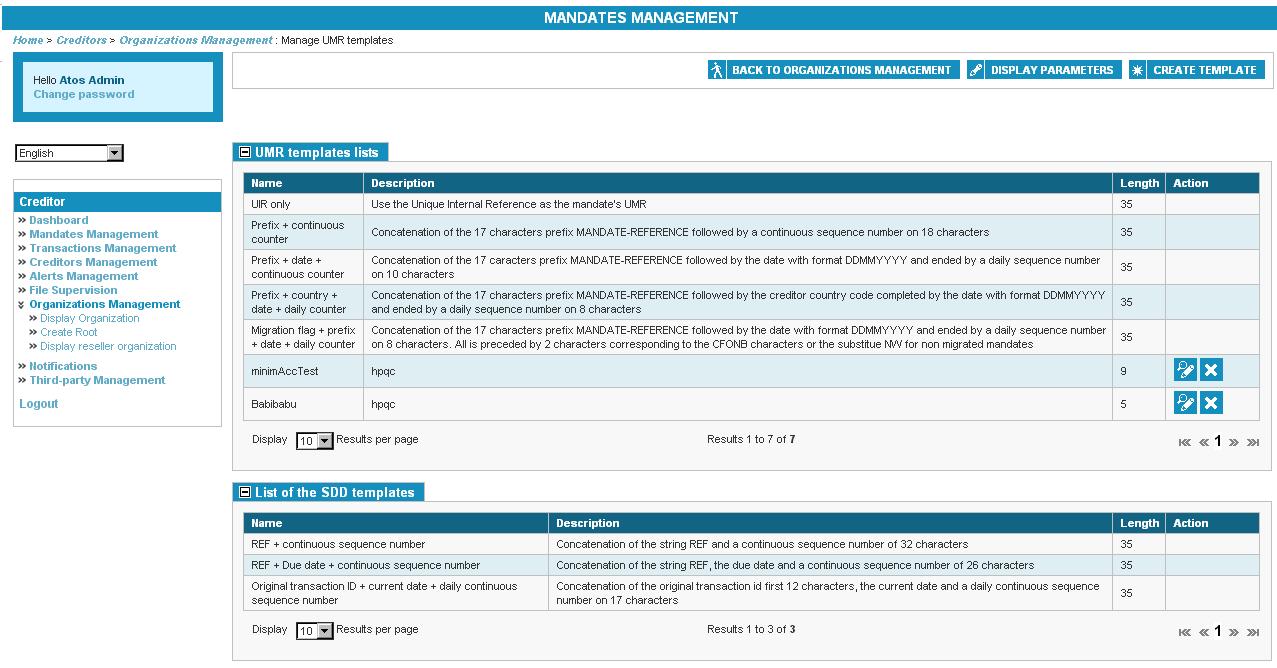
Manage templates
The interface of templates management allows the user to view, create, edit and delete templates used to generate the references of mandates (UMR) or SDD (end-to-end id).It is available on the settings consultation page of a creditor organization by clicking on the [MANAGE TEMPLATES] button**.**

The templates viewing page appears.
The block “UMR templates lists” contains the templates which can be chosen for the automatic generation of UMR in the settings of an organization. By default, five models are available to the user. They can not be deleted or modified. The models created by the user are displayed below.
The block “List of the SDD templates” contains the templates which can be chosen for the automatic generation of end-to-end id in the settings of an organization. By default, three models are available to the user. They can not be deleted or modified. The models created by the user are displayed below.
The user can access to the consultation page of the organizations by clicking the [BACK TO ORGANIZATIONS MANAGEMENT] button, or go back to the parameters management page by clicking the [DISPLAY PARAMETERS] button

Note: In order to get the value of "initiator transaction reference" in the E2EID, the sub-field to use in E2EID generation model is "Initiator Transaction Reference".
The sub-field "Original End to End Id"(Original Transaction Id) is map to the E2EID provided by the creditor (for example the E2EID on the line 07 of CFONB SDD).
Create template
In the same menu, the user can create a template by clicking the [CREATE TEMPLATE] button.

The block "template type" is displayed dynamically in the top of the page allows the user to specify if he wants to create an UMR template or a SDD template.

In both cases, a block «Template settings» is displayed below with the following fields:
-
Name
-
Description: To describe the content of the template.
-
Total length: this field is dynamically updated; the total characters number of a template is limited to 35.
In the case of an UMR template, the check-box “CFONB Directive” is displayed and allows creating a UMR with this directive (the name of the UMR will begin/ended with the operator “|”).

By clicking [Add a sub-field] button, the user can set the content of the template. The dropdown allows choosing between different parameters from business objects or from customizable objects.
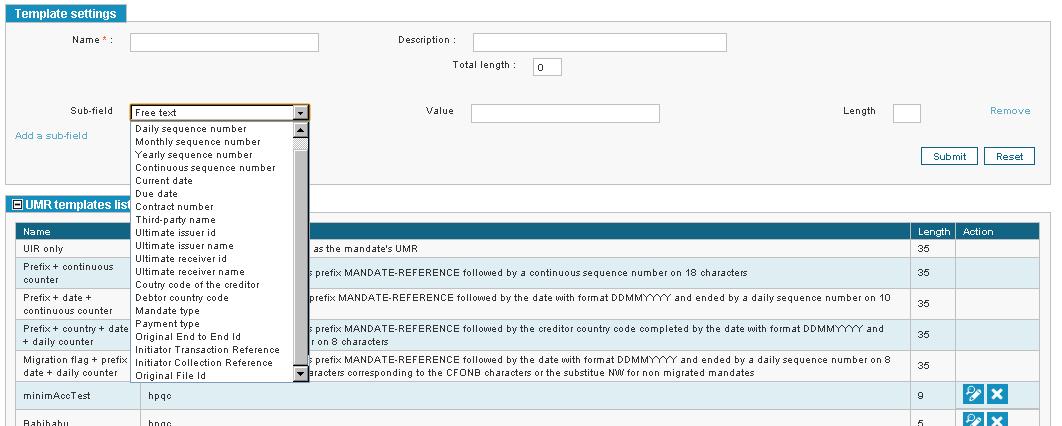
When the value of the sub-field is customizable by the user, the field content can be change by the user (ex: “Free text”). The fields “Length” and “Total length” are automatically updated according to the selected value.
In case of sequence numbers, the value will be incremented at each generation of UMR, it is necessary to specify the number of the allocated characters to the counter and not the value.
A sub-field can be delete by clicking the [REMOVE] button.
To save the new template, the user clicks the [SUBMIT] button. After the submit action, the consultation page of the templates is displayed and the new template appears in last position of the list.
Editing template
The user can change any model than those offered by default by clicking on the [EDIT TEMPLATE] button. Blocks "template type" and "Template settings" then appear at the top of the page filled with the template parameters. It is possible to modify them with the same actions as described above for the template creation.

Deleting template
The user can delete a template by clicking the [DELETE TEMPLATE] button. The consultation page is displayed without the model in the corresponding block.
A red message is displayed on the top of the page to confirm the action.
Setting up automatic processes
If the user’s organization has the option activated, the user can configure the triggering time of the batchs. He can do that by clicking the [BATCH CONFIGURATION] button. Otherwise, the option's block in the content of page is not displayed.

Once on the batch configuration page, the block «Organization information» show the label and the external ID of the organization.
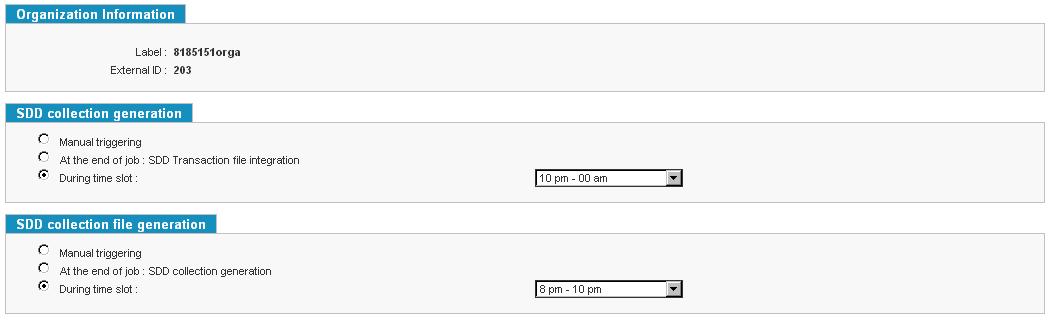
Each following blocks correspond to a specific module of automatic processing. It is possible to configure the trigger to be:
• Manual release: the user launches the generation from the GUI.
• At the end of a batch
• In the time interval configurable in the dropdown field.
The batch configuration option for the batches ‘collection generation’ and ‘collection file generation’ should be visible only if the options ‘collection generation’ and ‘collection file management’ for the organization is active.
Extract Mandates soon coming obsolete
The block “Extract Mandates soon coming obsolete” is made available for the user to configure the type of report generation.
Three types are available:
-
None
-
File transfer
-
Email
Description of the three type of configuration
None

It is the default value, the feature is not configured. The user do not wants the feature.
File transfer

If selected, two fields are displayed dynamically:
-
Frequency: the frequency when the report is generated:
-
Weekly: the report will be generated each Monday
-
Monthly: the report will be generated each first day of the month
-
-
Expiring Period: 1 month, 2 months, 3 months

If selected, as for “File Transfer” type the field “Frequency” and the field “Expiring Period” will be displayed, an additional field which corresponds to the email to send the report is also displayed, the user can set several emails, separated by “;”.
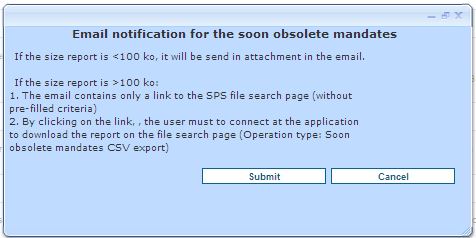
If the size report is <100 ko, it will be send in attachment in the email.
The email template is:
| Hello, In attachment of this email you will find the "Expiring Mandates soon coming Obsoletes" report [FILENAME] generated on [DATE]. Kindly take an appropriate action before the mandates become obsolete. Kindly do not reply to this email. This is an automated generated mail. |
If the size report is >100 ko:
-
The email contains only a link to the SPS file search page (without pre-filled criteria)
-
By clicking on the link, the user must connect to the application using his login and password, to download the report (the name of the generated report will be provided in the email)
The email template is:
| Hello, The “Expiring Mandates soon coming Obsoletes" report [FILENAME] generated on [DATE] can be downloaded by clickingon the link [LINK]. You must log to the application using your usual login and password, and download the report on the file search page (Operation type: Soon obsolete mandates CSV export). Kindly take an appropriate action before the mandates become obsolete. Kindly do not reply to this email. This is an automated generated mail. |
The report will be sent in a .zip file, the maximum number of mandates that can be retrieved in a 100ko file are near between 250000 and 300000 (it depends the size of the mandates data).
When the user clicks on the [submit] button, a popup describing the rule about the report size is displayed.
To search the report (File Supervision -> Search For File), a new type will be added on the operation type list: “Soon obsolete mandates CSV export”.
Content of the report
The generated report will contains the basic information about the mandate(s) which are going to expire in the period specified in the “Batch Configuration” page.
The report is in CSV format and will contain the following data:
-
UMR
-
UIR
-
Debtor Name
-
Debtor Id
-
Organization Name
-
Date of the last SDD issued
-
Expiry Date
-
SCI
-
Creditor Name
-
Ultimate Debtor ID
-
Ultimate Debtor Name
R-transaction file generation
If the “Generate bank statements” option is activated for the organization, in the batch configuration page a new block is available to manage the automatic R-transaction file generation.
It is possible to configure the trigger to be:
-
Automatic triggering disabled: the user launches the generation from the GUI
-
At the end of the job of bank return file (Pain.002, Camt.053, Camt.054)
-
In the time interval configurable in the dropdown field

Dynamic PDF template for Mandate
A user can personalize the legal information above the PDF mandate whatever the mandate language by clicking on the [EDIT DYNAMIC TEXT FOR MANDATE PDF] button on the organization options page.

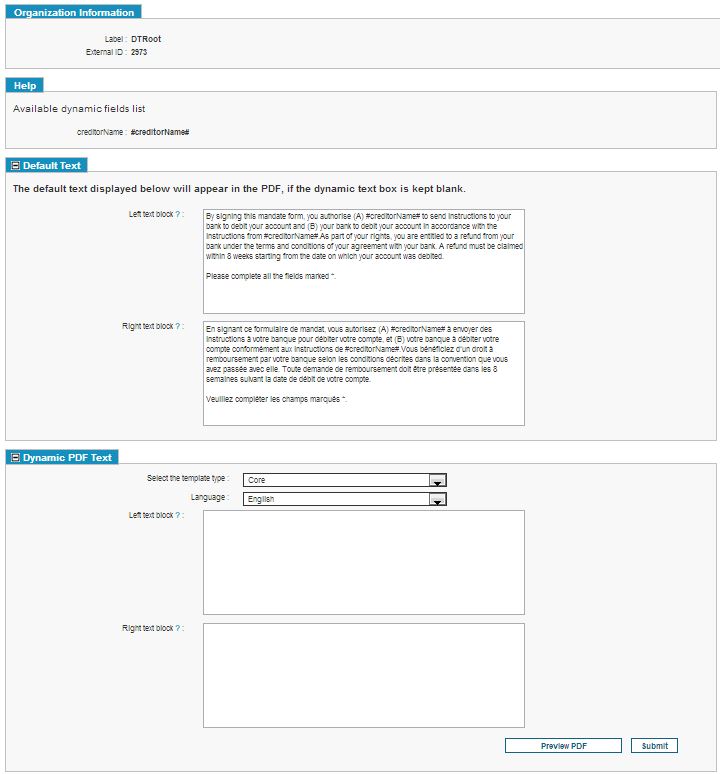
Help section
This block contains the dynamic field that can be used in the dynamic content.
If the User wants to add #Creditor Name# in the dynamic text then the field that user has to enter in the text box should be in the form #CreditorName#.
If a commercial data exist for the mandate, the creditor name will be replaced by the name of the commercial data.
Dynamic PDF Text section
Under “Dynamic Text Box” section the User can choose the Mandate Type and enter the text of their language choice.
Mandate Type:
From Mandate Type’s drop down the user can choose the type for which the text has to be entered. By default the value of the Mandate Type will be the value chosen at the organization level.
| Display label | Enum label |
|---|---|
| Core | CORE |
| Business | B2B |
Table 1. Possible values for Mandate Type
For each Mandate Type (CORE, BUSINESS) there will be different default text. Similarly choices will be given to the User so that different dynamic content can be added for each Mandate Type.
Languages Available:
The languages which are available for the Mandate will be available in the Language Drop down. The default one is the current mandate language.
Text Boxes:
The user can enter legal texts in the languages he wants whatever the mandate language, then on clicking [Submit] button the entry against that block will be stored in the SPS database if validation is successful.
There is an asynchronous reload of the textboxes, when the user modify the fields “Mandate Type” or “Language”, only the text blocks are reload, not the entire page.
Rules for displaying the contents with in the block are:
| Left Block | Right Block |
|---|---|
| Dynamic Text | Dynamic Text |
| English default text | French default text |
| Default text other than English | English default text |
Table 3. Rules display languages in mandate
In case of default texts, if the left block’s language is anything other than English then the language in the right block has to in English, while if the language in the left block is English then the right block’s language should be French.
Default Text section
This section show the default texts for The two blocks, if no texts was set in the two dynamic blocks, it will be set by the default texts. The two blocks are dynamically reloaded according the selected mandate language of the drop down. The default blocks are not editable.
The language of the first default text is the selected mandate language.
For a mandate language another than English the second default text is in in English, for an English language mandate the second default text is in French.
If no dynamic content is available for a chosen country then the content that would be available in the PDF will be the default content. There will be no preview button available for the default text. The default content is stored in database.
Validation/Preview of the template
After the user entered the dynamic text for the language selected, then the user can check how the dynamic content will look like in PDF, by using the [Preview] button.
Several cases are possible for the submission/previsualization of dynamic content in the text boxes. Below table will give the details of all possible cases.
| Text Box 1 | Text Box 2 | Submit Result/ Displayed Message | Preview Result/ Displayed Message |
|---|---|---|---|
| Empty | Empty | Default Text will appear in the PDF Warning: The two blocks of text are empty; they will be filled by default texts. |
The previsualization is possible. Default Text will appear in the Blocks |
| Empty | Dynamic Text | Validation Error. An error message will be shown to the User Error: A single block of text has been entered, please complete the second |
The previsualization is not possible. An information message is displayed to the User. Error: A single block of text has been entered, please complete the second |
| Dynamic Text | Empty | Validation Error. An error message will be shown to the User. Error: A single block of text has been entered, please complete the second |
The previsualization is not possible. An information message is displayed to the User Error: A single block of text has been entered, please complete the second |
| Dynamic Text | Dynamic Text | Success The change has been taken into account. |
The previsualization is possible. Dynamic Text will appear in the Blocks. |
Table 5. Possible cases of submit/preview
Inheritance of the templates
For the organizations that have not parameterized the dynamic PDF template, they going to use the template of their parent organization. If the dynamic template is parameterized on the root only, all the sub-organizations are going to use the root configuration.
Management of Domestic Change Account Identification
Activating the Domestic Change Account Identification System
At the organization parameters page, an option is displayed to allow a creditor to generate a Domestic Change Account Information (CAI) file.

Activating the Domestic CAI System
By activating this option the creditor accept to generate domestic CAI’s within the imported transaction file.
Selecting the Domestic CAI File in which will be generated from the Origin File.
Once the user has accepted to generate domestic CAI’s, two select models are displayed over the same block, just after Domestic CAI Generation checkbox. These lists will display the supported domestic files that will be generated as well as the origin of the file; in this case it will be XML format that supports inter-bank exchange of change account information ACMT.022.001.02.

Selecting the Output format and the Origin of Transactions
By default, CFONB240 and ACMT022 are selected when checking the Domestic CAI Generation. These lists are only shown when the user activated the first option. Otherwise they are hidden. It is mandatory to select one value from these lists.
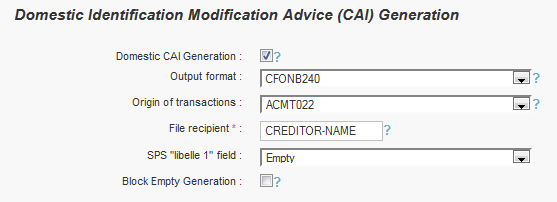
CFONB240 CAI Parameters
In case the CFONB240 is selected as the output format, there will be 3 more fields that are included into the configuration parameters. These fields will display the File Recipient, the SPS “libelle 1” field and the Block Empty Generation.
File Recipient]
This field will allow the creditor to set in a field of the header and footer of the CFONB240 (Zone 10 Position 43 to 66) the commercial name of the creditor instead of using the name of the creditor configurated in SPS. This value is mandatory, and if the user does not provide any information an information message will be displayed. The max length of this field should be 24, if not the characters after this length are not taken into account during the generation of the CFONB240.
SPS labelle 1
The transaction line of the CFONB240 has an empty zone called ‘Libelle 1’ (Zone 19 Position 153 to 184) which is generally used to transit any information that the creditor wishes. By default this field is set as empty which means that no information will be transit by this zone, but it can be configurated with the following values:
-
UIR
-
UMR
-
DEBTOR_NAME
-
DEBTOR_BIC
-
DEBTOR_IBAN
-
DEBTOR_ID
-
CONTRACT_ID
-
END_TO_END_ID
-
INITIATOR_COLLECTION_REFERENCE
-
INITIATOR_TX_REFERENCE
-
REMITTANCE_INFO
Block Empty Generation
It is also possible to generate Domestic CAI empty files for each creditor bank account. It is recalled that an empty generation file is a content that is strictly composed of a Header, Footer and no transactions are included. This is used basically to indicate the Creditor that there were not operations converted since the last execution date of the generation process.
For more information about the detail of the header and footer of the CFONB240 please refer to the file SPS R4 - ACMT022V2 to CFONB240 DCD - Mapping.xlsx
Batch Configuration Generation
Once the creditor has configured and activated the Domestic Change Account System, it will be possible to generate the Domestic CAI File by 2 ways:
- Via the Batch Configuration Page. Once the user head to this page he will see the block ‘CAI Domestic File Generation’. There he can choose the time slot that he wishes the CAI Domestic File will be generated.

If the Domestic Change Account System is deactivated this block must no longer be displayed.
- If no specific Batch Configuration Trigger is declared for the Organization, the generation process will be triggered by the global trigger. This job has been configurated to be daily executed at 3:30AM.
Management of Emails addresses
For root organization:
A list of emails can be added to the organization to receive various alerts.
An optional field “Description” is available for each email to enter a description.
Only one email can be entered per row. The email entered in each row should be unique. If the user enters the same email address more than once an error message is displayed.
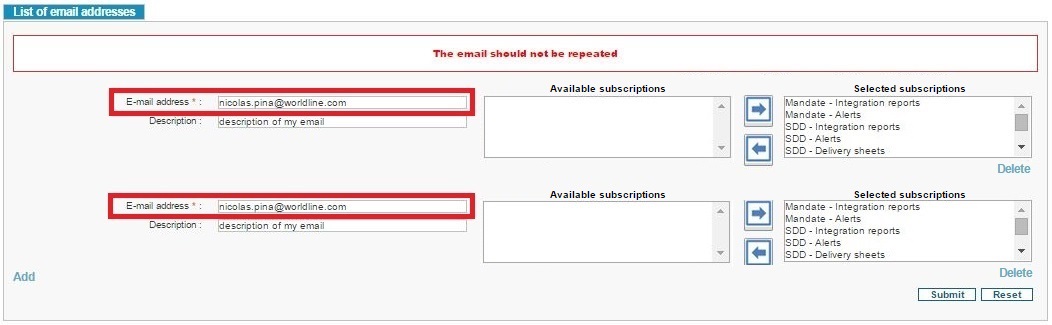
While adding an email for the root organization, two lists are available to activate or deactivate a subscription to the email address. If you want to set a subscription on the email, you need to move the wanted subscription of the “Available subscriptions” list into the “Selected subscriptions” list:
| Lists | Descriptions |
|---|---|
| Available subscriptions | Subscriptions which can be associated to the email address set |
| Selected subscriptions | Subscriptions which are associated to the email |
The user has to use the two arrow buttons to add or remove objects into the “selected subscriptions” list.
There are 11 objects available:
| Subscription names | Descriptions |
|---|---|
| Mandate - Integration reports | Integration reports referring to mandates, see appendix 8 mandate subscription to have the complete list of concerned files |
| Mandate - Alerts | Alerts referring to mandates. It correspond to the alerts subscribed in the Alerts Management -> Subscriptions page |
| SDD - Integration reports | Integration reports referring to SDD, see appendix 8 SDD subscription to have the complete list of concerned files |
| SDD - Alerts | Alerts referring to SDD. It correspond to the alerts subscribed in the Alerts Management -> Subscriptions page |
| SDD - Delivery sheets | Delivery sheets generated with the collection files |
| SCT - Integration reports | Integration reports referring to SCT, see appendix 8 SCT subscription to have the complete list of concerned files |
| SCT - Alerts | Alerts referring to SCT. It correspond to the alerts subscribed in the Alerts Management -> Subscriptions page |
| SCT - Delivery sheets | Delivery sheets generated with the collection files |
| Bank Return - Integration reports | Integration reports referring to Bank Return files, see appendix 8 Bank Return subscription to have the complete list of concerned files |
| Bank Return - Alerts | Alerts referring to Bank Return files, see appendix 8 Bank Return subscription to have the complete list of concerned alerts. It correspond to the alerts subscribed in the Alerts Management -> Subscriptions page |
| Third Party - Integration reports | Integration reports referring to third party files, see appendix 8 mandate subscription to have the complete list of concerned files |
At least one subscription type needs to be selected. If user tries to submit the form without selecting any of the subscription types, an error message is displayed and the form will not be submitted.
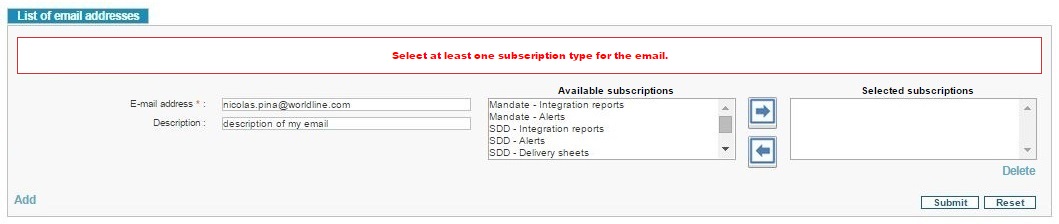
All the subscription types are selected by default (in the “selected subscriptions” list).
The alerts subscription can be consulted on the organization display page.
Each subscription is separated by the symbol “:”
It is not possible to delete an email address used by a sub-entity from the parent organization, if the user tries to delete one, an error message is displayed:
“Email [email_address] is already used in sub-organization and cannot be deleted”
For child organization:
All the emails available for child organization are displayed in tabular format with a check box against each email.
The emails to be mapped to the child organization are selected using check box. The emails mapped to the child organization have the same alert subscriptions as its parent organization.
No one is selected by default.
Each subscription is separated by the symbol “:”
R-Transaction Fee Calculation:
On the creditor display parameter page, a new option “R-Transaction Fee Calculation” is displayed.

This option will redirect the user to new page where the R-Transaction Fee Calculation. Under this section the user can enter Fee Id and Fee Type as Internal or External. The data will be saved to database once submitted. This Fee Id value is used while calculating the R-Transaction Fee amount.
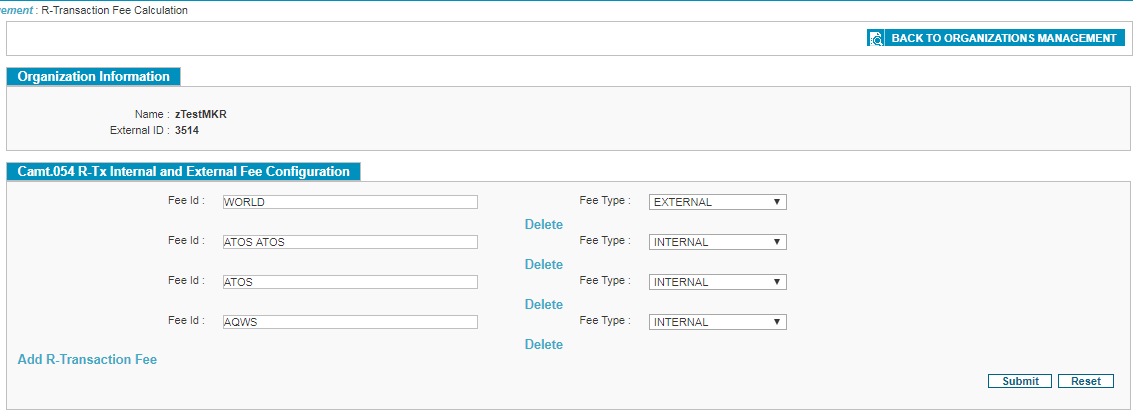
Action can be performed on the page:
a. User can add multiple values using “Add R-Transaction Fee” and delete corresponding values using “Delete”.\ b. User can add multiple values and display on the page.