Time Out Calculation
Time out of the session occurs at various steps of the mandate creation page. The time out occurs for security reasons and so the session needs to expire after a particular interval of time.
-
When user appears on init session test page, fills in all the information needed for successful creation of session, and click on “Create session” button, If user does not hit the URL for more the 30-35 mins then user will get a session time out error.
-
When the user appears on the first step of the mandate creation page and has not filled in any information for about 30 mins. After about 30 mins, the user will get a session time out error. In this case, mandate status will not be created.
-
When the user has filled in all the information on the step1 of the mandate creation page and moved on to step 2 by clicking on Confirm Information. The User is redirected to step2 and will receive an OTP code. If he has not filled OTP for about 30 mins, and tries to fill in the OTP code and Click on Sign the SEPA Mandate: in this case, the mandate status will be suspended.
-
When the user has filled in all the information of step1 and step2 of the mandate creation page and has now been redirected to step 3 of the mandate creation page. If he stays on the summary page for more than 40 mins without doing anything, after about 40 mins he tries to click on Continue My Subscription: in this case, the mandate Status will be revoked.

Figure 38: Session time out error
Languages Available
There are various languages available such as EN-English, FR- France, ES-Spanish, DE-German, IT-Italian and NL-Dutch in which you can have mandate creation possible. The mandate language will match the language of the session. The customer needs to provide the translated custom mandate templates (if custom templates are used) for the signature to occur in this language as well.
Standard Pdf Generation with SPS
The customer can apply or choose the personalized templates for their mandate creation process. If they do not wish to choose any particular template then they can have the standard pdf template for the mandate creation and by default it gets applied on the pdf mandate.
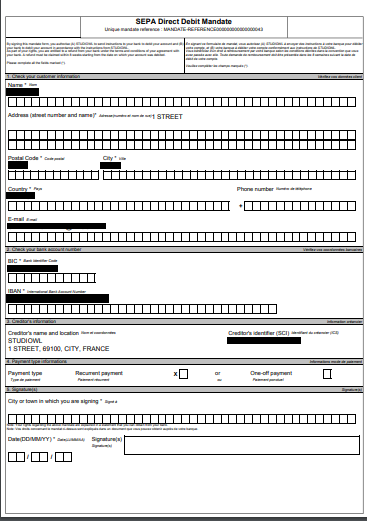
Figure 39: Standard Pdf template
Personalization
CSS
This feature allows the customer to apply personalized css for all the signature session steps. The customer can use the css to change the style, font- size, font-color, background-color, height, width of components and so on… Here are two screenshots of both default and custom css applied:
Figure 40: Personalized CSS not applied
Figure 41: Personalized CSS applied
Logo
This feature allows the customer to apply a personalized logo at the top of each signature page.

Figure 42 : Logo
Name
This feature allows the customer to provide a business name that will appear during the signature session, especially in step 1 and in the mandate, as well as in OTP messages if they are referencing to the name of the creditor.

Figure 43: Circled in red is the custom name of the creditor during step 1
Title
This feature allows the personalization of the page title during the signature process. This text will appear on the browser tab as you can see in the screenshot below.

Figure 44 : Title
OTP Message
This section allows customizing your OTP messages that the customer receives. The OTP messages that the customer receives will either be in SMS/Email. In this the customer can choose the creditor for which you they need to provide OTP and the language in which they want OTP to be received. Here is an example of how the OTP message is received:
- DEMO Marchand – Debtor Name
- studioWLRBS – Creditor name
- MANDATE-REFERENCE000000000000000044 – UMR
- 6737 – 4-digit OTP
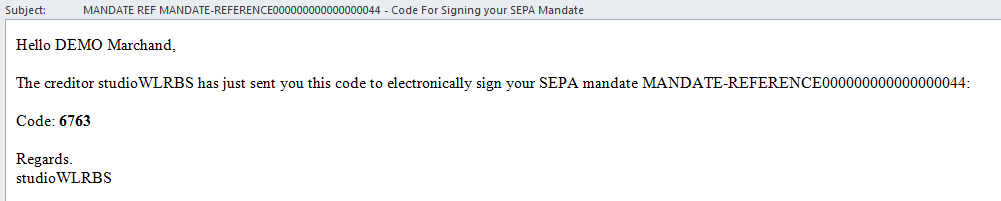
Figure 45 : OTP Message
PDF Personalized Template Mandates
This feature allows the customer to personalize the mandate template for each language and SEPA scheme (Core, B2B, and Core Enterprise). The layout of the mandate can be modified, the style, the legal texts, the translations etc. The position and style of the signature on the pdf can also be modified. Here is an example of how the mandate can be customized:
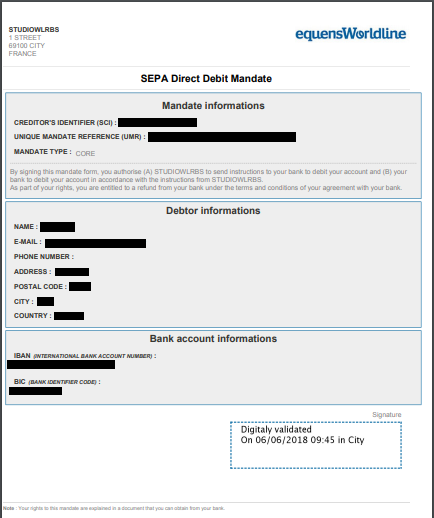
Figure 45 : PDF Personalized Template
Web Responsive and Supported browsers
There are some browsers which are supported for the creation of the mandate such as:
- Google Chrome
- Mozilla Firefox
- Internet Explorer
- Microsoft Edge
- Safari
- Opera
All three signature pages are responsive, and display well on most screen sizes and devices (mobile, tablet etc.)
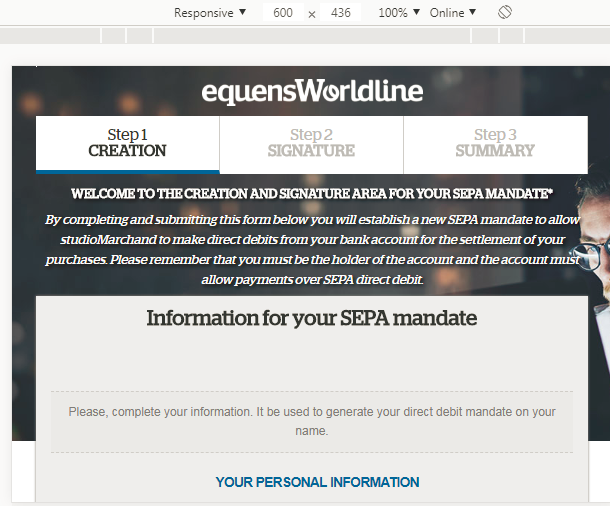
Figure 46: Web Responsive Browser